Rubberband V2 reference (RB2.b39)
Rubberband V2 is a Sierra Chart study for NQ. It lights a COMBO column when price and order flow are both stretched the same way into a fresh 1-minute high or low, and it can trade that signal in sim. This page starts with a short guide to using it. The full reference, with every rule tied to a line of the source, follows the guide.
How to use
This guide covers the version you run now: RB2.b39 with the inputs saved in 1chart.Cht at
09:59 on 2026-10-12. That means exhaustion mode, the Fixed scale, Full scale 5, auto trade
choice 7 ("Entries, breakeven exit only, sim") and the breakeven exit after 20 bars. Only those
last two differ from the b39 defaults. The numbers below are those settings. The full reference
after this guide covers every other setting.
One thing about your chart matters for every "bars" setting below. Until about 01:57 ET on 2026-10-12 it ran 3-second time bars. Since then it runs 10-delta bars: a bar closes once its market buys minus market sells reach 10 contracts either way, so bars start on trades and vary in length. Over the 1,771 gaps between bar starts in the live b39 rows of 2026-10-12, the median was 3.1 seconds, and the middle 80% ran from 0.16 to 13.3 seconds. The study counts bars, not seconds, so "20 bars" can pass in a few seconds during a spike or take minutes in a quiet tape.
The idea in one paragraph
Price sometimes runs hard for a few seconds, with aggressive orders and the resting book all leaning the same way, into a new 1-minute high or low. Rubberband V2 measures how stretched that run is. PRICE measures how far price moved. FLOW measures how one-sided the orders are. COMBO puts the two together, and lights only at a fresh 1-minute extreme. COMBO is green at a fresh low (the buy side) and red at a fresh high (the sell side), so its color is always the fade of the push. At box 8 of 10 the study can enter in sim, in COMBO's color.
What you see on the chart
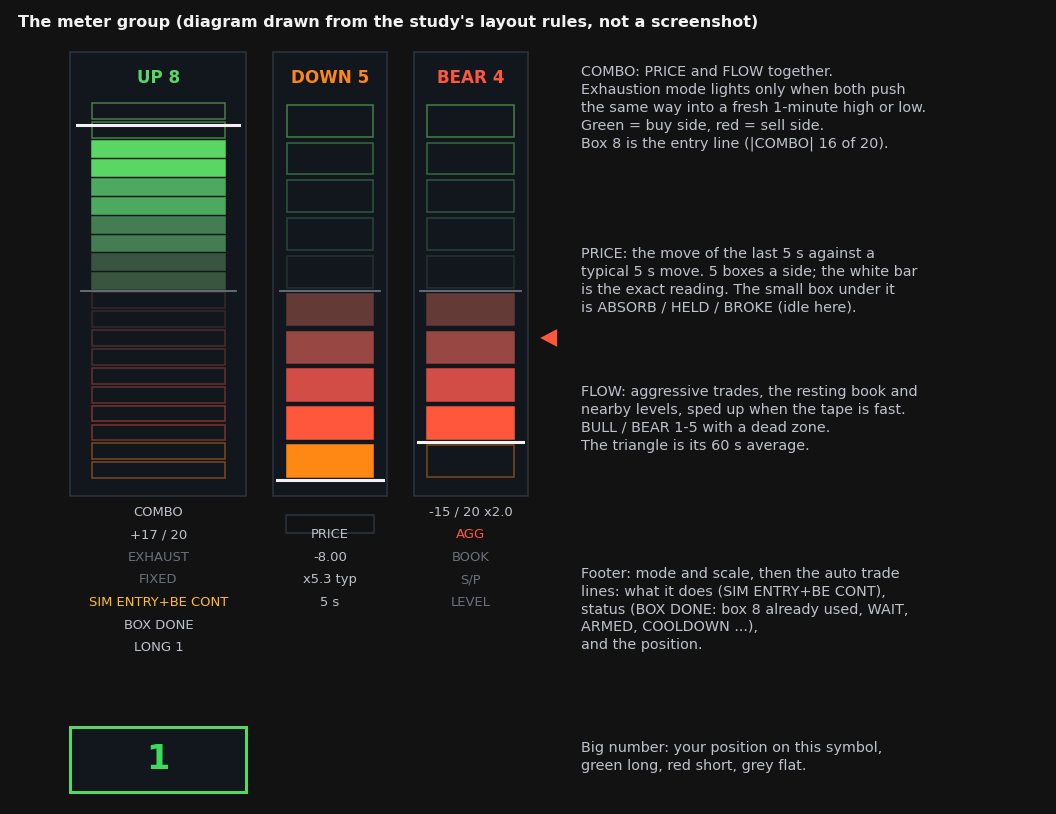
The diagram above is drawn from the study's layout rules, with readings from the long example further down. It is not a screenshot. Your chart has the meter at the right edge, in this order from left to right: COMBO, PRICE, FLOW.
| What | Where | What it tells you |
|---|---|---|
| COMBO column | the tall column, 10 boxes a side | The signal. Green boxes count up, red boxes count down. The header reads UP 8 or DOWN 8, and the white bar marks the exact reading. Box 8 is where the study enters. |
| COMBO footer | under COMBO | COMBO, the reading (+17 / 20), the mode (EXHAUST), the scale (FIXED), then the auto trade lines: SIM ENTRY+BE CONT, a status (ARMED, WAIT, COOLDOWN, BOX DONE and others), your position (LONG 1), and BE ARMED or BE LIMIT once the breakeven exit is working. |
| Position counter | big number under COMBO | Your position on this symbol and account: green when long, red when short, grey 0 when flat. |
| PRICE column | middle, 5 boxes a side | How far price moved in the last 5 seconds, counted in typical moves. Each box is one typical move. The footer gives the move in points (-8.00), its size (x5.3 typ) and the window (5 s). |
| ABSORB box | under the PRICE boxes | ABSORB (amber) when heavy one-sided market orders are not moving price. It turns HELD when the aggressors give up and price stays put, or BROKE when price trades through. It never triggers a trade. |
| FLOW meter | right column, 5 boxes a side | Order flow pressure: BULL 1-5, BEAR 1-5 or FLAT. The triangle beside it is the last 60 seconds' average. The chips AGG, BOOK, S/P and LEVEL light when that part leans one way. STALE with an amber border means no new data for 5 seconds. |
| Order flow table | top right corner | Five rows of numbers behind FLOW: aggressive buying and selling, the resting book, stacking and pulling, the nearest level, and speed of tape. When all four lean the same way, the filled cells blink. |
| Lines on the chart | price area | Big resting orders (walls), absorption levels, wall signal arrows, and the Rubberband ABSORB lines. See below. |
| Sounds | speakers | A bing when a long opens or grows, a bong when a short opens or grows. |
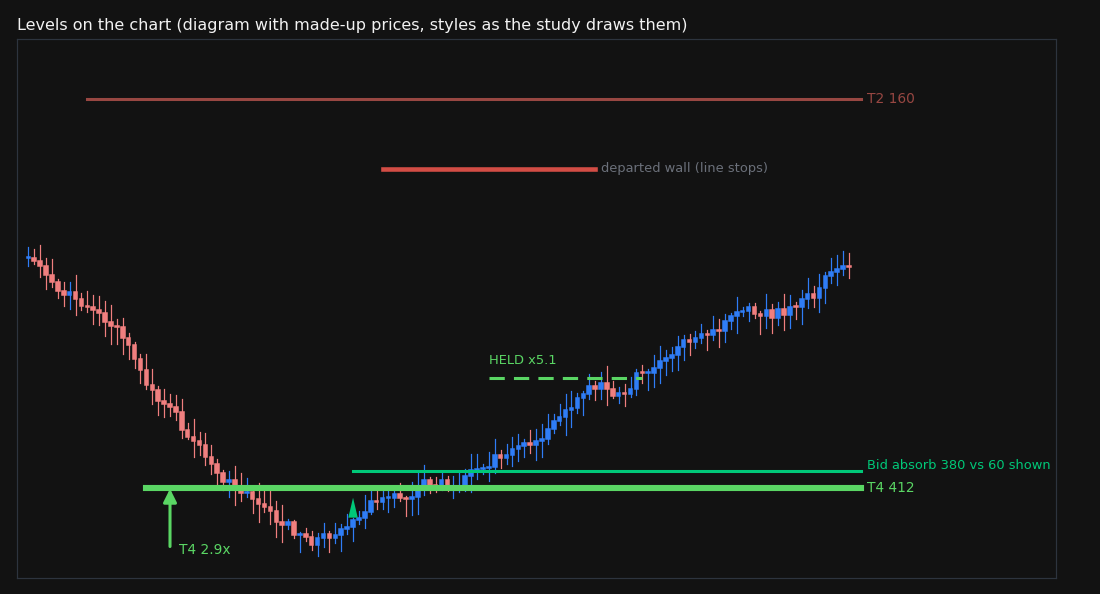
The lines in this diagram use the study's styles with made-up prices:
- A solid colored line is a resting wall, a price where an unusually large order rests. Its thickness and color show its tier, T1 (thin, dark) to T5 (thick, bright). Its label in the right margin gives the tier and the size resting now. The line stops when the order leaves the book.
- An arrow at a wall is a wall signal. It appears once a wall has rested for 3 bars, pointing up at bid walls and down at ask walls. Bigger walls get bigger arrows.
- A solid line with a small triangle is an absorption level, a bar high or low where far more traded than the book showed, and price held. It runs until a bar closes more than 2 ticks through it.
- A dashed line is a Rubberband ABSORB line. It is amber while ABSORB is open, then takes the HELD or BROKE color. It turns grey when ABSORB gives up after 2 minutes.
Pulled walls and breakthrough levels are off on your chart, so you will not see them.
How each one is calculated
PRICE (sections 3.6 and 3.4):
- The move is the last price now minus the last price 5 seconds ago.
- The typical move is the median size of a 5-second move. The study takes the larger of two medians: one over the chart's bars of the last 30 minutes (each bar's close against the close about 5 seconds earlier), and one over the last 3 minutes of 250 ms samples. The second one catches a burst such as the open within a minute or two.
- PRICE = 4 x (move / typical move), capped at -20 and +20. So one typical move is one box, and 5 typical moves fill the column.
- Example, from the long further down: price fell 8.00 points in 5 seconds when the typical 5-second move was 1.50 points. That is 5.3 typical moves, so PRICE was capped at -20, with 5 boxes down.
FLOW (section 3.7):
- Aggression compares market buys with market sells over the last 10 chart bars, the live bar included: (buys - sells) / (buys + sells + 20). The 20 keeps one lone trade from counting.
- The book compares the resting bid with the resting ask within 10 ticks of price, smoothed over about 8 seconds. It needs a live depth feed.
- The level part is support strength below price minus resistance strength above it. It counts walls and absorption levels within 10 ticks, more strongly the nearer they are.
- Each part is a score from -5 to +5. Aggression and the book become scores through the cut-offs 0.05, 0.12, 0.20, 0.33 and 0.50 (a balance of 0.50 means about 3 to 1). The level part is already on that scale: a level's tier, 1 to 5, fading to 0 at 10 ticks away.
- FLOW = 4/3 x (aggression + book + level), so -20 to +20. The stacked / pulled part has weight 0 on your chart.
- Speed of tape: when the last 10 seconds trade faster than the last 5 minutes, FLOW is multiplied by up to 2. At 1.67 times the normal pace it is doubled.
- The research found that the book part decides which pushes reach box 8. Without it, only 15 of 109 of your Fixed-scale entries would have reached box 8 (section 7).
COMBO in exhaustion mode (section 3.8):
- It needs PRICE and FLOW leaning the same way, and price at a fresh 1-minute extreme. A fresh high means the current 250 ms sample's high is at or above every high of the 60 seconds before it (a double top at the same price counts). A fresh low is the mirror.
- Push up into a fresh high: COMBO = -sqrt(PRICE x FLOW), red, the sell side.
- Push down into a fresh low: COMBO = +sqrt(PRICE x FLOW), green, the buy side.
- Anything else gives 0. That includes a push that is not at a fresh extreme, and PRICE and FLOW pointing different ways.
- On the Fixed scale each box is 2 points, so box 8 needs |COMBO| of 16 or more. That means PRICE x FLOW must reach 256: for example 16 and 16, or 20 and 12.8. Box 9 needs 324 and box 10 needs 400 (both at 20).
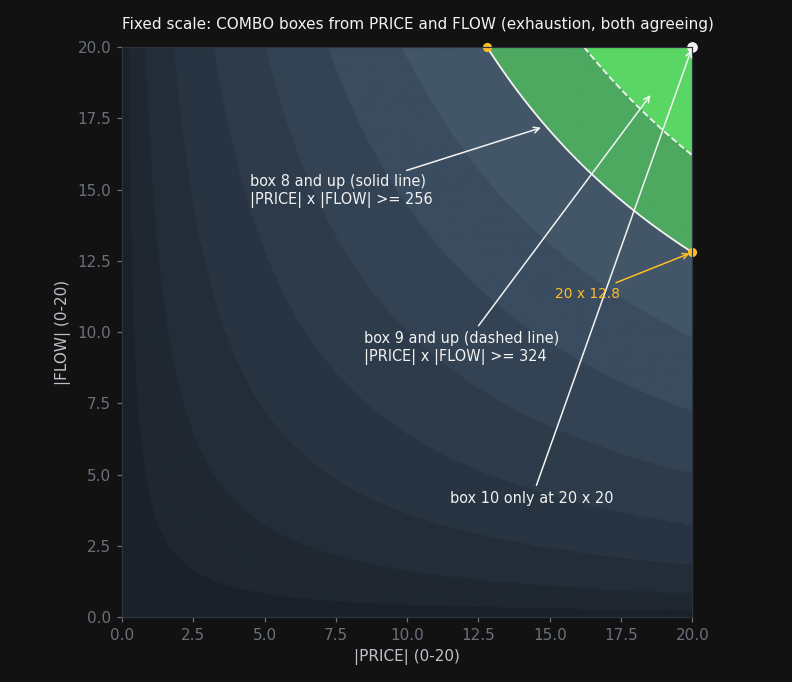
The green area in this chart, above the solid white curve, is box 8 and up. PRICE is often already at its cap of 20 when a push is fast. FLOW is then what decides whether COMBO reaches box 8. With PRICE at 20, FLOW needs 12.8.
ABSORB, HELD and BROKE (section 3.10):
- ABSORB lights when unsmoothed aggression is at tier 3 or more, and at least as strong as the book part, for 2 bars in a row while price does not follow. That means PRICE is flat or leaning the other way, and the range of the last 10 bars is within one typical move.
- It marks the price where those aggressors traded the most.
- HELD: aggression fades to tier 1 or less while the close has gone no more than 2 ticks past that price on the aggressors' side.
- BROKE: price trades through that price. Because of a defect (
L782), BROKE fires at the price itself, not 3 ticks past it as the input text says.
Walls and absorption levels (section 2):
- A wall is a price where the resting size is at or above the 99.95th percentile of resting sizes over the last 300 bars, and it must rest there 3 bars.
- A wall's tier is how many times bigger than that line it is: T2 from 1.25 times, T3 from 1.6, T4 from 2.4, T5 from 4.5.
- An absorption level needs two things at a bar's low or high: the volume traded there is at or above the 99.5th percentile of per-price volume, and it is at least 4 times the largest size the book showed there. Then the bar's close must not go more than 1 tick through it for 5 bars.
How the study trades it on your settings
With choice 7, the study only enters, in sim. The only exit it makes is the breakeven exit (section 5):
- Arming. After the study loads, or the auto trade choice changes, nothing happens until
COMBO has been seen below box 8. The footer reads
WAIT, thenARMED. - Entry. In Continuation, green buys and red sells. When COMBO first touches box 8, the study
sends a market order for 1 contract, tagged
RB2 COMBO box 8, with the Trade Window's attached target and stop. If COMBO climbs to box 9 and then 10 it adds 1 contract at each, for at most 3 a side. - Limits. One 10-second wait applies between any two entries. Each box trades once per position. A side's boxes reset only when COMBO is back below box 8 and you are flat on that side. The study never reverses: while you hold a long it skips red boxes.
- Breakeven exit. Once 20 chart bars have passed since the position opened, and price is
against you, the breakeven exit arms (
BE ARMED). On the next update the study places a limit order at your average price, taggedRB2 breakeven, for the whole position. It keeps that order's price and size in step. If price trades 2 ticks through the limit without a fill, it sends a market exit as a backstop. - Cleanup. Once you are flat after a breakeven limit was placed, the study cancels every working order on the symbol and account, including orders you placed by hand.
Before you start:
- Sierra's Auto Trading Enabled must be on, or the footer shows
AT OFF. - Set the attached target and stop you want on the Trade Window. The study uses them on every entry.
- The footer should read
SIM ENTRY+BE CONTand thenARMED. - Keep the price column and COMBO on. With either one off, the study makes no entries and no exits.
- Do not switch off both the order flow panel and the bias meter. The study would then keep trading on a frozen reading.
While you hold a position:
- Do not change the auto trade choice, or reopen the chart or chartbook, while an
RB2 breakevenlimit is working. The study forgets that limit and can place a second one. Flatten or cancel it first. Chart >> Reload and Recalculate is safe. - If you exit by hand, check that no
RB2 breakevenorder and no attached target or stop is left working. - After going flat, wait for the cleanup before you place a new order. The trade log shows a
BE CLEANUProw when it has run. Otherwise the cleanup can cancel your new order.
Section 5, "Hazards with working orders", lists all 16 known cases.
What the evidence says
These are measurements, not advice (section 7):
- The entries alone show no edge that covers costs. Rebuilt from trades on 480 days of 2020-21 data, the exhaustion flash showed no direction against random times. The flash side did beat the opposite side by a small margin (a hit rate of x1.10, before costs), but that is about a tenth of the cost of a trade. The full-book version on 208 days lost 0.92 points a trade before costs at a 120-second exit.
- On 149 exhaustion entries you exited by hand, the result was +3.06 points a trade gross and +2.14 net, with 61% winners. The same fills with a 25-second exit made +1.30. With a 2.5 / 2.5 bracket they made +0.18.
- Every one of those dates had been replayed at least 6 times before, so skill and memory of the day cannot be told apart.
- The pre-registered blind exit test is meant to settle that. It uses 20 unseen dates, first pass only, and is running now.
Two real examples from your current setup
Both examples come from your 2026-10-09 replay with the setup above (RB2.b39, Full scale 5). They were picked by a rule fixed before looking at the outcome. The rule takes the first SELL and the first BUY, by the log's wall clock, that the study sent at box 8 on the Fixed scale. The entry bar had to be between 09:30 and 16:00 ET on a 2026-10-05 to 10-09 replay. The log row had to come after 14:43 ET on 2026-10-12, when this setup started. None of those dates is one of the blind-test dates. Readings come from the trade log at the moment of entry. The candles are 3-second bars built here from the NQZ26 tick file. Your chart's bars during these replays were 10-delta bars, so your chart looked different. Price moves after the entry are measured from that file, starting at the first trade at the entry price inside the entry bar.
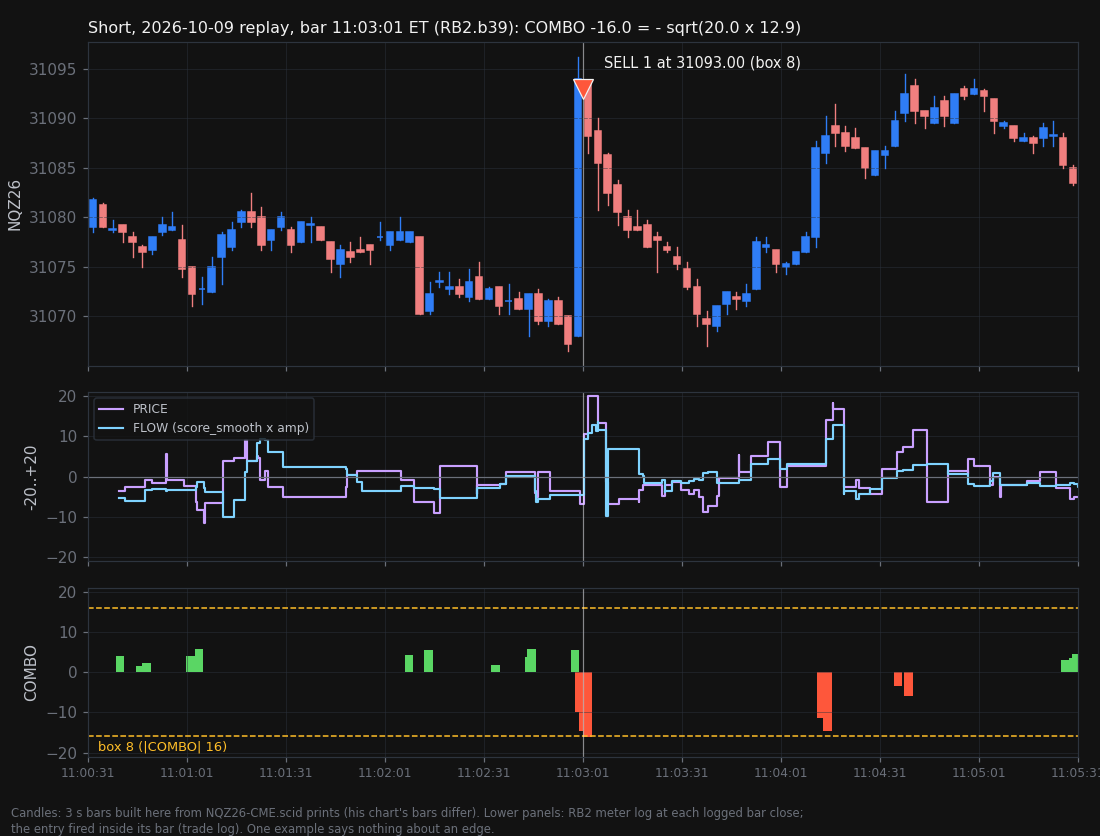
Short at 11:03:01 ET:
- Price spiked from 31066.50 to 31096.25, 29.75 points, in about 4 seconds, to a fresh 1-minute high.
- PRICE was +20.0 (capped) and FLOW was +12.9.
- COMBO = -sqrt(20.0 x 12.9) = -16.0, which is red box 8. The study sold 1 at 31093.00.
- Afterwards the short was ahead by up to 26.00 points within the first minute, and was +17.75 at 60 seconds. Price came back to the entry at about 97 seconds. The worst point in the first 2 minutes was -1.50.
- The breakeven exit arms only with price against you, so it could not have armed before about 97 seconds, when price came back to the entry. It could not have kept any of the early gain. Only a hand exit could.
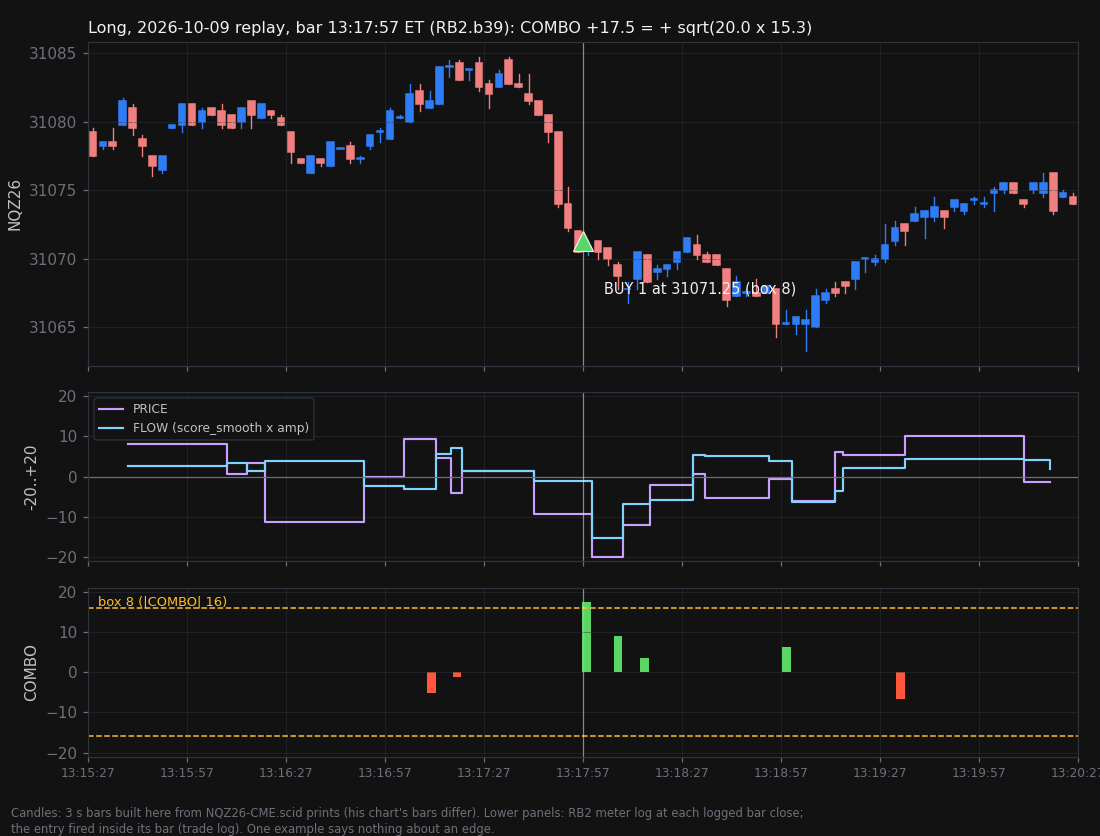
Long at 13:17:57 ET:
- Price fell 13.25 points in the 20 seconds before the entry, from 31083.50, to a fresh 1-minute low. PRICE was -20.0 (capped) and FLOW was -15.3.
- COMBO = +sqrt(20.0 x 15.3) = +17.5, which is green box 8. The study bought 1 at 31071.25.
- Afterwards the long was down by as much as 8.00 points in the first 2 minutes, and 6.00 down at 60 seconds. Price came back to the entry at about 89 seconds. The best point in the first 2 minutes was +3.25.
The trade log has no breakeven row after either entry, so neither position was closed by the study's breakeven exit. How many chart bars passed after each entry cannot be read from the replay logs, so these examples do not show when the breakeven exit would have armed. They show how an entry is made. They say nothing about whether the signal makes money.
About this reference
Written 2026-10-12 HST from engine/output/SIERRA_STUDIES_2026_10_07/source/RubberbandV2.cpp,
the source of build RB2.b39 (5559 lines, kBuild = "RB2.b39" at L648). V2 is frozen at b39
(tag rubberband-v2-b39). This file documents what that code does. It changes nothing.
How to read it:
L1234means line 1234 ofRubberbandV2.cppat b39. Other files are named in full.- Where the code and any older text disagree (the in-study descriptions, code comments, the
Rubberband and OFBL handoffs,
ofbl_guide.html,RB_IMPROVE_2026_10_12/signal_spec.md), the code wins. Each section ends with a list of the older text it corrects. - Independent reviewers read each section against the source, line by line, over three or four rounds, and each finding was checked against the code again before it was fixed. Where the behavior depends on Sierra rather than on this code (order cancels, exit quantities, partial fills, persistent study data), the text quotes Sierra's documentation with its URL and says what remains unknown.
- The input table (section 6) was generated by
tools/rb2_input_skeleton.pyfrom the source and from a read of1chart.Chtsaved 2026-10-12 09:59 (tools/chartbook_V2_inputs_1chart_2026-10-12_0959.json), then checked row by row.
Beej's chart as saved on 2026-10-12
The study Sierra runs is RB2.b39: C:\SierraChart\Data\RubberbandV2_64.dll carries the tag
"RB2.b39", and every meter log row since the evening of 2026-10-11 says RB2.b39. The chart is
NQZ26-CME. It ran 3-second time bars until about 01:57 ET on 2026-10-12 (signal_spec.md
section 9). Since then the logged bar starts fall on trade timestamps and the bars vary in
length: over the 1,771 gaps between bar starts in the live rows of 2026-10-12, the median is
3.1 s, and the 10th and 90th percentiles are 0.16 s and 13.3 s. Beej confirmed on 2026-10-12
that the chart now runs 10-delta bars. Every
setting counted in bars (the breakeven delay, the aggression lookback, the 300-bar rolling
window, wall persistence) is therefore not a fixed time on the current chart. Where this
reference converts bars to seconds, it means the old 3-second bars. Read from 1chart.Cht saved
2026-10-12 09:59, the Rubberband V2 inputs that decide entries and exits are:
| Input | Saved value |
|---|---|
| COMBO column | On, exhaustion (fade price + flow at a fresh 1-min high / low) |
| COMBO scale | Fixed, like PRICE and FLOW |
| Price window | 5 s |
| Typical move window | 30 min |
| Full scale | 5 typical moves (the default) |
| Auto trade COMBO | Entries, breakeven exit only, sim (choice 7) |
| Direction | Continuation (trade with COMBO) |
| First box count | 8 |
| Trade every Nth box | 1 |
| Enter on pullback | 1, which exhaustion mode forces to 0 (enter on touch) |
| Wait between entries | 10 s |
| Exhaustion entry filter | Off |
| Exit at boxes on the other side | 4, which choice 7 ignores |
| Breakeven exit after | 20 bars (60 s on the old 3-second bars; not a fixed time on the current chart) |
Only two of the 128 inputs differ from the b39 defaults: Auto trade COMBO and Breakeven exit
after. RB_IMPROVE_2026_10_12/his_settings.json was read at 2026-10-11 20:40 HST, before both
changes (it has choice 1, "Entries and exits, sim", and 10 bars). Full scale was 6 from about
03:15 to 14:43 ET on 2026-10-12 (inferred from the meter log) and is back at 5.
Read these first
These parts of the code can surprise a trader. Each is covered in full where the section numbers point.
- Several cases leave an order working that the study no longer tracks, or let two exits both fill. They include changing the auto trade choice, or reopening Sierra or the chartbook, while a breakeven limit is working. The full list, with what to do, is in section 5, "Hazards with working orders".
- Some study actions cancel the working orders on the symbol and account, including orders
placed by hand (for the exits, Sierra excepts market orders). They are the box exit and the
breakeven market backstop (both sent as Sierra exits with
CancelAllWorkingOrdersOnExit = 1,L5012), the breakeven cleanup after going flat (L5167), and the flatten fallback (L5119). Section 5 has the detail. - Some display switches change trading. With the price column off or COMBO Off, auto trade sends no entries and no exits, though the breakeven cleanup can still cancel orders after the position goes flat. With both the order flow panel and the bias meter off, auto trade keeps trading on a COMBO reading frozen at the moment they were switched off. The bias meter off on its own changes nothing but the drawing (section 4, "Display switches that change trading").
- The level switches "Show resting walls", "Show absorption" and "Show breakthroughs" change FLOW, and so change entries (section 2.0).
- The meter log's
score_smoothis FLOW before the speed amplifier. COMBO uses the amplified value (section 3.7 and section 1, meter log). - BROKE fires at the absorption price itself, not past the hold zone, because
L782overwritesL777. V1 has the same two lines. It affects the display and the meter log'sabs_statecolumn, not trading (sections 3.10 and 6).
Contents
- How to use (above)
- Identity, lifecycle and logs
- Levels on the chart (inherited from OFBL V1)
- Computations: PRICE, FLOW, COMBO, the exhaustion filter, ABSORB
- What the panel shows
- Auto trade, the entry filter and sounds
- Inputs (all 128)
- What has and has not been measured
1. Identity, lifecycle and logs
Source: engine/output/SIERRA_STUDIES_2026_10_07/source/RubberbandV2.cpp, build RB2.b39. A line
reference L1234 points into that file. The build script compiles
C:\SierraChart\ACS_Source\RubberbandV2.cpp, the copy the generator writes there, into
RubberbandV2_64.dll beside the script (build_rubberband_v2.bat). The repo DLL contains the
string "RB2.b39".
The DLL and its two studies
The DLL name is "Rubberband V2" (SCDLLName, L47). It holds two studies.
Rubberband V2 (scsf_RubberbandV2, L4656)
Settings made in SetDefaults (L4658-4704):
| Setting | Value | Line | Effect |
|---|---|---|---|
GraphName |
"Rubberband V2" | L4660 |
The name in Sierra's study list. The COMBO Line study finds its parent by this name. |
GraphRegion |
0 | L4662 |
Draws on the price region. |
AutoLoop |
0 | L4663 |
The study walks bars itself. |
MaintainVolumeAtPriceData |
1 | L4664 |
Needed for aggression per price. The study returns at once when VolumeAtPriceForBars is null (L4782). |
UsesMarketDepthData |
1 | L4665 |
Live depth for the book parts of FLOW. |
MaintainHistoricalMarketDepthData |
1 | L4668 |
Without it Sierra keeps no depth bars and the panel shows "Depth data 0" (comment L4666-4667). |
UpdateAlways |
1 | L4671 |
Sierra calls the study on every chart update timer tick, even with no new data, so the smoothing decays and STALE can show. The main function sets it again on every call (L4761) for instances added before it was a default. |
ValueFormat |
inherited | L4672 |
|
MaintainTradeStatisticsAndTradesData |
1 | L4673 |
Sierra requires it for the trading functions. The auto trade block sets it again (L5013). |
On every call (not only at defaults) the study also:
- registers the GDI callback
DrawFlowPanel(L4748), which draws the panel table and the meter. The callback does nothing when no state exists or the state's tag belongs to another build (L4303-4305); - turns Sierra's own stacked / pulled totals on when "Use computed stacked / pulled" is No,
and off when it is Yes (
L4753).
The study description, verbatim (L4661):
Order Flow Battle Levels V1 plus a price meter beside the bias meter (the move over the aggression bars against its typical size). Horizontal levels where market orders and limit orders met: absorption (passive side held), breakthrough (aggressor ate a wall), resting walls, and pulled walls. Uses Volume at Price and historical market depth bars. Visual context only.
What is stale in it:
- "the move over the aggression bars" describes PRICE before b16. PRICE now measures the move
over the last N seconds of trade time, sampled every 250 ms (comment
L2288-2293; input "00 Rubberband | Price window (seconds)"). - "Visual context only" is false. The study can send market and limit orders (auto trade,
L4961-5398) and plays entry sounds (L4988-5000). - It does not mention COMBO and its modes, the exhaustion entry filter, auto trade, the breakeven exit, the entry sounds, the COMBO subgraphs, the COMBO Line study or the log files.
The comment at the top of the source (L1-5) is also stale. It says the file is generated from
OFBL V1 "by make_rubberband.py" and that an "optional weight ... blends it into the meter".
The V2 generator is make_rubberband_v2.py, and the price weight is forced to 0 (L768).
Rubberband V2 COMBO Line (scsf_RubberbandV2ComboLine, L5480)
| Setting | Value | Line |
|---|---|---|
GraphName |
"Rubberband V2 COMBO Line" | L5488 |
GraphRegion |
1, a region of its own below the price graph | L5490 |
AutoLoop |
0 | L5491 |
UpdateAlways |
1 | L5492 |
CalculationPrecedence |
LOW_PREC_LEVEL, so it runs after Rubberband V2 |
L5493 |
| Scale | user defined, -10.5 to +10.5 | L5494-5496 |
The description, verbatim (L5489):
COMBO from the Rubberband V2 study on this chart, bar by bar, in boxes (-10..+10): a line of each bar's close, or candles of each bar's open / high / low / close. Only bars Rubberband saw live (live or replay) have values; it saves them per chart, so earlier sessions show too.
This description is right except for "it saves them per chart". The file is per chart number and symbol, with one file for flow against price, one for exhaustion, and one shared by off, agree and mean (see "COMBO history file").
Inputs (two):
| Index | Name | Default | What it does |
|---|---|---|---|
| 0 | "Rubberband V2 study (blank = the first on this chart)" | study ID 0 | Which Rubberband V2 instance to read (L5518-5519). At 0 the study takes the first study named "Rubberband V2" on this chart (L5525-5527). If none is found it returns without touching its subgraphs, so values from earlier calls stay on the chart (L5528-5529). |
| 1 | "Style" | 0, "Line (each bar's close)" | 1 = "Candles (open / high / low / close)" (L5520-5522). |
How it reads the parent. Each call copies the parent's four COMBO subgraphs (open, high, low,
close, in boxes, L5531-5534) and reads the parent's "first box" auto trade input
(IN_AT_START, L5536). A bar has a value only when the parent's COMBO close is not exactly 0
(L5547). The parent stores a real reading of 0 as 0.0001 (see the subgraph section), so 0
here means "no reading".
Subgraphs and drawing (L5497-5517, L5537-5558):
| Subgraph | Name | Drawn as |
|---|---|---|
| 0-2 | "COMBO open", "COMBO high", "COMBO low" | hidden in Line style; part of the candle in Candles style (L5539-5542) |
| 3 | "COMBO close" | a line, width 2, in both styles (L5543) |
| 4 | "Zero" | a gray line at 0, RGB(95,100,110), drawn even at 0 (L5508-5511, L5555) |
| 5 | "Entry box, green" | dashed line at +first box, RGB(60,140,80) (L5512-5516, L5556) |
| 6 | "Entry box, red" | dashed line at -first box, RGB(160,60,60) (L5557) |
In Line style the graph draw type is custom and only the close line shows. In Candles style the
draw type is candlestick (L5538). Colors per bar (L5553): green RGB(60,220,90) and red
RGB(240,60,60). In Line style a bar is green when its close is at or above 0 and red below.
In Candles style a bar is green when the close is at or above its open. The two dashed lines
show at the parent's first box count whether auto trade is on or not (L5556-5557).
Drawing slots
Every line, label and marker the study draws uses a Sierra drawing number (L1303-1306):
LineNumber = 96000000 + StudyGraphInstanceID * 6000 + category * 1300 + k
- The base 96000000 is Rubberband V2's own (
L361). For comparison, OFBL V1 uses 90000000, OFBL V2 92000000 and Rubberband V1 94000000, so all four can share a chart. - There are four categories (
L359): lines, text on bars, markers, and text in the fill space. Text in the fill space and text on bars use separate pools because Sierra keeps an old anchor when it adjusts a drawing (commentL356-358). - Each category has 1300 slots per instance (
L363). A drawing past slot 1300 in a category is not drawn (L1310-1311). - After a redraw, slots used last time but not this time are deleted (
Drawer::Finish,L1322-1330). When the study is removed, a finalFinishwith nothing drawn deletes them all (L4721-4722). DrawLevelsruns only when a bar was processed, a redraw is pending, the bar count changed, or the processed count changed (L4833-4844). The panel and meter rebuild on every call (BuildPanel,L4845).
State: allocation, tag and build
All per-instance memory lives in one State object held in persistent pointer 1
(L4706, L4745).
- It is allocated with
sc.AllocateMemory, Sierra's heap, not the DLL's own heap (L4739). After the DLL is rebuilt, the old block therefore stays valid and its tag can be read. - Its first member is
tag(L495). On creation the tag is set toStateTag()(L4743). StateTag()(L649-657) starts from 0x0FB4D000 +kStateVersion(22,L647), folds insizeofof ten types (State, Level, Pending, Wall, WallSpan, WallSignal, Cell, Table, RollingQuantile, MeterView) withh = h * 31 + size, and sets bit 0x40000000.kBuildis "RB2.b39" (L648). It is written into every row of the meter, trade and sound logs.
On each call, if the stored state's tag differs from this build's tag, the study drops the
pointer without freeing it and creates a new state (L4711-4715). Freeing it would run this
build's destructor on an object laid out by another build, which corrupts Sierra's heap (comment
L4708-4710). The old block is leaked once per such rebuild.
The tag changes only when kStateVersion or one of the ten sizes changes. A rebuild that keeps
all of them reuses the old state object as it is. Nothing in it resets then, beyond what a full
recalculation resets if Sierra does one after loading the new DLL (see below).
After a rebuild that changes the tag:
- The tag check (
L4711-4715) runs before the last-call block (L4717). If Sierra's last call arrives before any other call, it finds no state. It then skips the drawing cleanup and does not restore the fill space. - The new state starts with
prevUsed[c] = 1300for every category (L616-620). Its firstFinishtherefore deletes all 1300 slots per category, which clears the drawings the leaked state left. - If the fill-space reservation was on, the new state saves the chart's already-raised fill
space as the original (
L5407-5411). The trader's real fill space is then never restored.
On Sierra's last call to the function, the study deletes its drawings, restores the chart's
fill space if it changed it, destroys the state and frees the memory (L4717-4733). Sierra's
documentation says sc.LastCallToFunction "is set to 1 (TRUE) when an Advanced Custom Study
instance is in the process of being removed from the chart or the chart is being closed"
(ACSIL_Members_Variables_And_Arrays.html#scLastCallToFunction, read 2026-10-12).
What resets, and when
Sierra's documentation on persistent variables (read 2026-10-12, https://www.sierrachart.com/index.php?page=doc/ACSIL_Members_Functions.html#PersistentVariableFunctions):
When a study is added to a chart either through the Chart Studies window or through Study Collections, persistent variables are initially set to 0 for that study. When a chart that is saved as part of a chartbook is opened, all of the persistent variables for all of the studies on that chart, are set to 0.
The same page says a full recalculation does not reset persistent variables unless the study does it. The state pointer is a persistent variable, so:
- adding the study, opening the chart or its chartbook, and restarting Sierra (which opens the chartbook again) each give a new state;
- Chart >> Reload and Recalculate keeps the state. Sierra's docs do not name that menu item; this follows from the rule for a full recalculation.
Events
-
New state. The first call after one of these:
- the study is added to the chart;
- the chart or its chartbook is opened, including after a Sierra restart;
- a rebuild that changed the tag (
L4711-4715,L4735-4746).
Every member starts at its default. In particular:
- auto trade is not armed (
armed = false,L580); - every ring is empty;
- the Ranked seed has not been read;
- the COMBO history reloads from its file;
createdMsrestarts the 3-minute window for depth resets (L4744).
-
Reset (
resetAll,L4765-4777). It runs when Sierra does a full recalculation, or calls withUpdateStartIndex0, or with anUpdateStartIndexat or before the last processed bar (L4779-4780). It also runs on a historical-depth reset (event 3). -
Historical-depth reset (
L4787-4810). Historical depth often loads after the bars were first processed. The study checks processed bars, leaving out the newest 5, walking back from the newest with a step ofmax(1, (n - firstBar) / 96)in integer division (L4794-4800). That is about 96 bars on a long chart, and every bar when fewer than 192 are eligible (up to 191). If one of them was processed without depth and now has depth, it callsresetAll. This happens only within 3 minutes of the state's creation, and at most once a minute. Each one adds 1 todepthResets. -
Auto trade choice changed. When "99 Trading | Auto trade COMBO" changes, the whole auto trade state resets (
L4977-4981). The study must then re-arm before it enters, as described under "Arming after load": COMBO below the first box count when entering on touch, or at 0 with a pullback above 0 (L5036,L5051-5052). A change to any other input does not reset it. -
Replay jump back, or a long gap. No single reset. Each part checks its own clock (see the table).
-
Last call. The state is destroyed (above).
What resetAll clears and what it keeps
It clears (ResetCalc, L622-641, plus L4767-4776):
- all level and wall work: the rolling size percentiles, levels, pending levels, walls, wall history, wall signals, and the per-bar depth flags;
- the panel table;
lastLoggedBar(to -1), so the meter log can write again;- the cached slow typical move (
pxTypBar = -1), so it is recomputed; - both wall signal subgraphs, zeroed on every bar;
- the COMBO subgraphs, which it marks for rewriting from the history kept in memory.
It keeps:
- the whole
MeterView(commentL365-366): the PRICE rings, the fresh-extreme rings, the COMBO ring and its seed, the FLOW smoothing, the average-marker ring, and the position seen by the sound logic; - the speed-of-tape history and the stacked / pulled history;
- the panel flash timer;
- the ABSORB / HELD / BROKE state and its lines;
- the auto trade state: armed, boxes done, last entry time, and the breakeven state;
- the COMBO history in memory;
- the saved fill-space values.
The call that performs a reset is not "real time" (realtime = !didReset && !sc.IsFullRecalculation, L4821). On that call the study:
- sends no entry and no exit order (
L5028,L5134,L5177,L5304). One exception: the flat cleanup branch (L5160-5169) is not gated by real time. If the position is flat after a breakeven limit was placed, it can callsc.CancelAllOrders()and write aBE CLEANUProw on a recalculation call; - plays no sound (
L4992); - writes no COMBO history (
L4916); - writes no meter row (
L5432).
The next ordinary update is real time again. A replay counts as real time, because Sierra feeds it to the study as ordinary updates.
Clock checks inside the kept state
| Part | Starts over when | Line |
|---|---|---|
| PRICE and fresh-extreme rings (250 ms slots of trade time) | first sample, the slot goes back, or more than 480 slots (2 minutes) pass between updates | L2349-2357 |
| COMBO ring (250 ms slots of trade time) | first sample, the slot goes back, or the COMBO mode changes. A gap of up to 40 slots (10 s) repeats the last reading; a longer gap adds one copy. | L2787-2804 |
| FLOW 10 s trend history | market time goes back | L2593-2598 |
| Speed of tape | first update, the bar index goes back, a jump of more than 120 bars, or market time goes back | L1908-1911 |
| Stacked / pulled history | market time goes back (L1759-1760); also cleared, with init off, when either side of the book is empty, there is no bar, or the Volume at Price multiplier is above 1 |
L1787-1790 |
| COMBO history in memory | readings after the current bar's time are dropped, and the file's later lines win on the next load | L4925-4928 |
| Entry wait | a last entry "in the future" (replay restarted earlier) does not hold anything up | L5316-5320 |
"Bars to process"
After any reset, processing starts at lastClosed - N + 1, where N is "01 Thresholds | Bars to
process (0 = all)" (default 30000), or at bar 0 when N is 0 (L4815-4820). Bars before that
start are never processed. They get no levels, walls or wall signals. Only closed bars are
processed. lastClosed is the smaller of the second-to-last chart bar and the last bar with
Volume at Price (L4813-4814). The live bar never goes through ProcessBar.
Arming after load
A new state starts with auto trade not armed (L580). It arms on the first real-time update where
COMBO is lit fewer boxes than the start of the entry zone: the first box count when entering on
touch, or 1 with a pullback (L5036, L5051-5052). A full recalculation does not disarm it, because
the auto trade state is not part of ResetCalc. Changing the auto trade choice does (event 4).
A reset of the auto trade state while a position is open restarts every member of it (L580-603).
That reset comes from a new state while holding (the study added, the chart or chartbook opened
again, a Sierra restart, or a tag-changing rebuild) or from any change of the auto trade choice
(L4977-4981). Chart >> Reload and Recalculate does not cause it, because it keeps the state. In particular:
-
the breakeven clock counts from the first update after the reset (
L5188-5192); -
the boxes done per side restart at 0;
-
sawZerorestarts at false. In Continuation the box exit stays disarmed until COMBO returns to 0 (L5141); -
exitTried,lastEntryMs,lastEntryBarandwhyLoggedrestart (L589,L600-603). The entry wait therefore does not count an entry made before the reset; -
beOrderIdrestarts at 0 andbeCleanupat false (L597-599). A breakeven limit that was working is then no longer tracked. Two cases follow:- The old limit fills before the breakeven exit arms again. Arming needs the set seconds or
bars and price against the average (
L5195-5198). The position goes flat withbeCleanupfalse, so the flat cleanup (L5165-5169) does not run, and the attached stop and target stay working. - The breakeven exit arms again first. The study then sends a second full-size limit
(
L5230-5245), and placing it setsbeCleanupto true (L5243-5244). There are now two full-size closing limits at the same price. When one fills and the position goes flat, the flat cleanup runsCancelAllOrders(L5165-5168). Until that update, the second limit can fill too and open a new position in the other direction.
The auto trade section's hazards list covers these cases.
- The old limit fills before the breakeven exit arms again. Arming needs the set seconds or
bars and price against the average (
ABSORB lines
The ABSORB / HELD / BROKE lines (absLines, L576) survive resetAll, so they survive a full
recalculation, including Chart >> Reload and Recalculate. They are never written to a file, so
a new state starts with none: after the study is added, the chart or chartbook is opened, Sierra
restarts, or a tag-changing rebuild. The comment "never deleted" (L553) holds only for the
life of one state.
Subgraphs of Rubberband V2
Defined at L4675-4700. All six use DRAWSTYLE_IGNORE and DrawZeros = 0. They hold values
for other studies and do not draw or move the price scale.
| Index | Name | Holds | Written |
|---|---|---|---|
0, SG_BUY |
"Bid wall signal" | the wall's price (tick x tick size) on the bar where a bid wall signal fired, else 0 | MarkWallSignal L920, only when "wall signals" is on. The bar is the one after the confirming bar, or the wall's start bar, per "Draw from" (L913). Zeroed on every reset (L4774). |
1, SG_SELL |
"Ask wall signal" | the same for ask walls | the same (L920, L4775) |
2-5, SG_CO_OPEN.. SG_CO_CLOSE |
"COMBO open (boxes)", "COMBO high (boxes)", "COMBO low (boxes)", "COMBO close (boxes)" | COMBO's open, high, low and close on that bar, in boxes, -10 to +10 | see below |
The value stored for COMBO is coScore / 2 (L4920), not rounded. On the Fixed and Relative
scales coScore runs -20 to +20, so the value is the box reading with its fraction. On the
Ranked scale coScore = ±2 x bc (L2843), so the value is the fractional box count bc with
COMBO's sign. A reading of exactly 0 is stored as 0.0001 (L4921-4922), because with
DrawZeros off a 0 would read as "no value".
The live bar's four values update on every real-time update where COMBO is ready (L4916-4958).
The open is the first ready reading on that bar, high and low are the extremes, and close is the
latest. Bars the study did not see live, live or in replay, stay 0. After a reset every bar is
rewritten from the history in memory (L4909-4914).
Wall signal alerts never fire in V2. alertTier is forced to 0 (L745), and the alert at L933
needs it above 0.
COMBO history file
Path (L4853, L4861, RbLogPath L2066-2078):
<Data Files Folder>\OFBL_logs\<prefix><chart number>_<symbol>.csv
| COMBO mode in force | Prefix |
|---|---|
| 3, flow against price | RB2_combo_against_c |
| 4, exhaustion | RB2_combo_exhaust_c |
| 0 off, 1 agree, 2 mean | RB2_combo_c |
Example for exhaustion on chart 1: RB2_combo_exhaust_c1_NQZ26-CME.csv. In the symbol, the
characters / \ : * ? " < > | become _.
- The file is per chart number and symbol. Only flow against price and exhaustion have files of
their own. Off, agree (1) and mean (2) all use
RB2_combo_c(L4853), and a row has no mode column (L4941). SoRB2_combo_c*files can mix agree and mean readings, and a researcher cannot tell them apart from the file. The file is not per scale either, so readings from the Ranked, Fixed and Relative scales mix in one file. - The prefix follows the COMBO input (
s.coMode,L4853), not the COMBO actually computed (coOn,L2699). With the price column off, COMBO is off, but the study still loads the mode's file. It never writes to it then, because COMBO is never ready. It is not per chartbook either: a chart with the same number and symbol in another chartbook shares it. A contract roll changes the symbol and starts a new file. - Rows have no header. Each row is
bar_time,open,high,low,close.bar_timeis Sierra's date-time as a day count with 10 decimals. The four values are boxes with 4 decimals (L4941). - Loading (
L4865-4894). The file is read once per state and COMBO mode. A mode change clears the history in memory and reads that mode's file (L4854-4860). Between agree and mean that is the same file, so the history shown does not change, apart from the bar in progress, which is lost. Rows sort by time, and when a bar time appears twice (a stretch replayed twice) the later row wins (L4879-4889). Bars match by time within half a millisecond (L4862,L4895-4901). - Writing (
L4929-4949). Rows are written only on real-time updates with COMBO ready. When the first reading of a new bar arrives, every bar in memory newer than the last written one is appended, and the new bar starts in memory. So a bar reaches the file when the next bar starts. The bar in progress when the study is removed or Sierra closes is never written. Nothing writes it on the last call. A COMBO mode change also clears the history in memory without writing the bar in progress (L4854-4860). - After a replay jump back, the entries after the current bar are dropped, but the current
bar's own entry is kept. The new pass's readings then merge into its old open, high and low
(
L4925-4929,L4952-4955). The row written for that bar mixes two passes.
Fill-space reservation
Input "05 Panel | Reserve fill space for the meter", default No (L4546-4547). It acts only when
it is Yes, the meter is on, the meter position is "Right edge, centered", and the chart's bar
spacing is above 0 (L5402).
px   = max(meter width, 72) + 12 + 80 + max(meter offset, 0)
       + (price column on ? (80 + 6) * (COMBO mode != 0 ? 2 : 1) : 0)
need = Extend bars + 1 + ceil(px / ChartBarSpacing)
(L5404-5406.) The first time, the study saves the chart's fill-space bar count and its
"preserve fill space" flag (L5407-5412). It then sets preserve to 1 and raises the fill space to
need when it is smaller (L5413-5415). It never lowers it while the reservation is on. It restores both saved values when any of these is true: the reservation is turned off, the
meter is turned off, the meter position is not "Right edge, centered", or the bar spacing is 0
(the else branch, L5417-5423). It also restores them when the study is removed (L4723-4727).
Files in C:\SierraChart\Data\OFBL_logs
Every path is <Data Files Folder>\OFBL_logs\.... The study creates the folder when needed
(L2072, L5439, L5068, L2020). Symbol characters / \ : * ? " < > | become _. All CSV logs are
appended to and never trimmed. A header is written only when the file is empty. The meter, trade
and sound logs are per symbol, not per chart, so two charts of the same symbol append to the
same files.
| File | Written | Read |
|---|---|---|
RB2_meter_<symbol>.csv |
at most one row per update, for the newest closed bar, when "08 Meter | Log meter to CSV" is Yes (default Yes). Duplicates are possible after a reset (L5431-5434). |
for the Ranked seed |
RB2_trades_<symbol>.csv |
one row per order, skip or "no entry" change, whenever auto trade is not Off. The meter log input does not gate it. | no |
RB2_sound_<symbol>.csv |
one row per entry sound attempt | no |
RB2_combo_*_c<chart>_<symbol>.csv |
the COMBO history (above) | at load |
RB1_meter_<symbol>.csv |
not written by V2 (Rubberband V1's log) | for the Ranked seed |
RB2_bing.wav, RB2_bong.wav |
the entry sounds (see the sounds section) | by Sierra's sc.PlaySound |
Every sound attempt also goes to Sierra's message log (L2044-2046), and every trade log row has
a matching message log line (L5059-5063).
Meter log RB2_meter_<symbol>.csv
Header, verbatim (L5450):
bar_start,sample_time,build,replay,close,agg,book,stack,level,score_smooth,score_raw,tier,amp,tape_ratio,px_bars,px_move,px_typ,px_score,px_tier,w_price,abs_state,abs_price,co_val,co_avg,co_score,co_tier,co_mode
When a row is written (L5431-5434). All of these must hold:
- the input is Yes;
- the update is real time, which includes replay;
- the meter has run at least once;
- the newest processed bar is newer than the last one logged and is one of the newest closed
bars (
processed >= ArraySize - 3).
The row describes that bar, the one that just closed. It is written on the first update after the bar closed. Consequences:
- Replay bars are logged, with
replay= 1. - The call that does a recalculation logs nothing. A reset sets
lastLoggedBarto -1, so the next real-time update logs the newest closed bar again, even if it was logged before the reset. Duplicate rows are possible there. - Only the newest processed bar is logged per update. When several bars close between two updates, the earlier ones get no row.
Columns, in order (format at L5461, values at L5462-5469). Except for bar_start and close,
every value is the study's reading at sample_time, taken on the live bar, not at the bar's
close (comment L5451-5453).
| # | Column | Meaning | Units |
|---|---|---|---|
| 0 | bar_start |
start time of the bar that closed, chart time zone, with ms | date-time |
| 1 | sample_time |
this computer's clock in the Global Settings time zone, wall-clock time even in replay | date-time |
| 2 | build |
kBuild, "RB2.b39" |
text |
| 3 | replay |
1 when a replay is running | 0/1 |
| 4 | close |
last price of the bar that closed | price |
| 5-8 | agg, book, stack, level |
the four smoothed FLOW parts (comp[0..3]). book and stack are 0 with no depth. stack is logged even when its weight is 0. |
-5..+5 |
| 9 | score_smooth |
FLOW from the smoothed parts, before the speed amplifier (smoothBase) |
-20..+20 scale |
| 10 | score_raw |
the same from the unsmoothed parts, before the amplifier (rawBase) |
-20..+20 scale |
| 11 | tier |
the flow meter's displayed tier, signed, after the dead zone and hysteresis | integer |
| 12 | amp |
speed amplifier factor | 1..2 |
| 13 | tape_ratio |
tape pace over its baseline; 0 = baseline still filling | ratio |
| 14 | px_bars |
the PRICE window in seconds. The name is left over from when PRICE counted bars. | seconds |
| 15 | px_move |
PRICE move; 0 when PRICE is not ready | points |
| 16 | px_typ |
typical move, the larger of slow and fast; 0 = filling | points |
| 17 | px_score |
PRICE reading | -20..+20 |
| 18 | px_tier |
PRICE tier, signed | integer |
| 19 | w_price |
weight of price in FLOW. Always 0 in V2 (L768). |
number |
| 20 | abs_state |
0 idle, 1 ABSORB, 2 HELD, 3 BROKE | code |
| 21 | abs_price |
absorption price when abs_state is not 0, else 0 |
price |
| 22 | co_val |
COMBO before scaling: the mode's formula on PRICE and FLOW. COMBO uses FLOW after the amplifier (m.smooth, L2753), not score_smooth. To rebuild co_val from this row, use clamp(score_smooth x amp, -20, +20) as FLOW (L2662-2666). |
about -20..+20 |
| 23 | co_avg |
Ranked: the tail share (ge / total); Fixed: 0; Relative: average |COMBO| over the window, floored at 4 |
see text |
| 24 | co_score |
COMBO after scaling | -20..+20 |
| 25 | co_tier |
COMBO boxes lit, signed | -10..+10 |
| 26 | co_mode |
COMBO mode in force: 0 off, 1 agree, 2 mean, 3 flow against price, 4 exhaustion. 0 when the price column is off (L2699). |
code |
Columns 22-26 are all 0 while COMBO is not ready (L5469). Values print with 2 or 3 decimals.
Trade log RB2_trades_<symbol>.csv
Header, verbatim (L5079):
sample_time,bar_start,build,replay,to_service,side,qty,box,co_score,px_score,flow_score,last,pos_before,result,note
The record helper writes the rows (L5057-5092). It exists only inside the auto trade block, so
nothing is written while "Auto trade COMBO" is Off (L5002). Auto trade is on by default: the
default choice is 1, "Entries and exits, sim" (L4618). So the trade log is written on default
settings.
The filter part of the note says "filter pass" or "filter fail" whenever the filter input is not
Off (L5289). The filter acts only in exhaustion mode (L5286, L5327). In other COMBO modes a row
such as "sent; filter fail; ..." is therefore normal. Before the filter has readings, the note
reads "filter fail; no readings yet" whenever the filter input is not Off, in every mode
(L5292).
| # | Column | Meaning |
|---|---|---|
| 0 | sample_time |
this computer's clock, with ms |
| 1 | bar_start |
start time of the chart's last bar (the live bar) |
| 2 | build |
"RB2.b39" |
| 3 | replay |
1 when a replay is running |
| 4 | to_service |
sc.SendOrdersToTradeService for this update: 1 = orders go to the trade service (a real account), 0 = Sierra's simulation. It is 1 only for a "live" choice with Trade Simulation Mode off (L5015). |
| 5 | side |
what the row is about (list below) |
| 6 | qty |
contracts. 1 on every BUY / SELL row, including skipped entries where no order was sent (L5368). For EXIT and BREAKEVEN rows, the whole position with market orders in flight counted (L5101-5105). For BE LIMIT rows, fabs(PositionQuantity), without orders in flight (L5213, L5226, L5250). 0 for "no entry" and cleanup rows. |
| 7 | box |
for BUY / SELL, the box the order is for; for every other row, the boxes lit at that update (unsigned) |
| 8 | co_score |
COMBO after scaling, -20..+20. Printed without the coReady check the meter log uses (L5088 against L5469), so a row written while COMBO is not ready carries the last computed value. |
| 9 | px_score |
PRICE, -20..+20. Also printed without the pxReady check (L5088 against L5467), with the same stale-value caveat. |
| 10 | flow_score |
FLOW as COMBO uses it: m.smooth, after the speed amplifier and clamped to -20..+20 (L2666, L5088). This differs from the meter log's score_smooth, which is before the amplifier (L2662, L5466). |
| 11 | last |
last price of the live bar |
| 12 | pos_before |
the position Sierra reported at the start of this update's trading block. Orders sent earlier in the same update are not in it. |
| 13 | result |
Sierra's return value when an order call was made: above 0 = accepted, 0 or below = an error, and note holds Sierra's text for it. 0 when no order call was made: on "no entry" rows, and on skipped entries ("skipped: holding the other side", "skipped: at the most contracts for this side", L5340-5345). |
| 14 | note |
free text. Commas and line breaks become spaces (L5080-5083). |
side values and where each comes from:
side |
Written when | Line |
|---|---|---|
BUY, SELL |
an entry was sent or skipped. The note is "sent", "skipped: holding the other side", "skipped: at the most contracts for this side" or Sierra's error, followed by the exhaustion filter readings ("; filter off/pass/fail; effort .. delta .. absorb ../..t pace .." or "; filter ...; no readings yet") | L5368, L5288-5292 |
NO BUY, NO SELL |
entries are on, COMBO is ready and in the entry zone (pulled), nothing was sent this update, and the reason or the signed box count changed since the last such row (L5378, L5385). Waiting for a pullback shows on the footer only (L5376-5377). The "Exits only" choices never write these rows. Reasons: NOT LIVE, EXITING, WAIT, COOLDOWN, FILTER, BOX DONE. The note gives done / wanted boxes, the position, the position with market orders in flight, the real-time flag and the filter readings. |
L5376-5393 |
EXIT SHORT, EXIT LONG |
the box exit sent its market exit, or Sierra refused it. The row records the send, not the fill. | L5151, L5096-5128 |
BREAKEVEN SHORT, BREAKEVEN LONG |
the breakeven market backstop sent its exit, or Sierra refused it. The row records the send, not the fill. | L5274 |
BE LIMIT SELL, BE LIMIT BUY |
the breakeven limit order was placed or refused; the note gives the price | L5250 |
BE LIMIT SELL MOVE, BE LIMIT BUY MOVE |
the breakeven limit was moved or resized | L5226 |
BE CLEANUP |
flat after a breakeven limit had been placed; all working orders for the symbol cancelled | L5168 |
An exit that Sierra accepts writes one row. An exit that Sierra refuses writes two rows. The
first has Sierra's error. The second has the result of the Flatten and Cancel All Orders
fallback, or "no flatten: Sim only on a live account, so the study will not flatten it"
(L5110-5127). On that "no flatten" path the second row's result still holds the original
refusal code (L5124-5127).
A skipped or refused entry writes two rows on the same update. done is counted up before the
order call (L5333), so the box is used even though nothing was sent, and sentNow stays false.
The no-entry block then writes a NO BUY or NO SELL row with reason BOX DONE when the reason
or box count changed (L5378-5393). The box is not retried. It stays used until that side resets:
COMBO not lit on that side and no contracts held there (L5041-5044).
After a successful exit on the same update, q is 0 (L5109). A no-entry note written later in
that update then shows 0 for the position with orders in flight, while pos_before still shows
the old position.
Two kinds of row can appear on the call that does a recalculation, because neither needs a
real-time update. One is a "NOT LIVE" row (L5378-5382). The other is a BE CLEANUP row, with
its sc.CancelAllOrders() call, when the position is flat after a breakeven limit was placed
(L5160-5169).
Sound log RB2_sound_<symbol>.csv
Header, verbatim (L2056):
sample_time,bar_start,build,replay,sound,from_pos,to_pos,file_ok,play_result
One row per entry sound attempt (L2052-2061). Columns:
sample_timeis this computer's clock.bar_startis the live bar's start.soundisbingorbong.from_posandto_posare the position before and after.file_okis 1 when the WAV file was found or written.play_resultis the return value ofsc.PlaySound. Whenfile_okis 0 the study does not callsc.PlaySoundand writes a literal 0 (L2042).
This log does not depend on the meter log input. A row is written only when all of these hold:
- "Entry sounds" is Yes (
L4992); - this update and the previous one were both real time (
sndHave,L4992,L5000). A fill seen on the first real-time update after a recalculation gets no sound and no row; - the position became long or the long got larger, or it became short or the short got larger
(
qNow > sndPos + 0.5orqNow < sndPos - 0.5,L4994-4997). Reductions and exits write nothing.
The sound block runs outside the auto trade gate (L4985-5001), so rows are written with auto
trade Off too, for the trader's own fills.
Ranked seed from the meter logs
Only on the Ranked scale, and only once per state and COMBO mode, the study reads
RB1_meter_<symbol>.csv and then RB2_meter_<symbol>.csv (L2705-2748). It keeps a row when all
of these hold:
- it has at least 26 fields;
- its build starts with "RB1.b" in the RB1 file, or "RB2.b" in the RB2 file, with build number 3 or higher;
- its
co_modeequals the current mode. A row with noco_modecolumn counts as mode 1. co_valandco_avgare not both 0.
It takes |co_val| from each kept row and keeps the last 6000 values, RB1 rows first and RB2
rows after. So V2's own rows take over once it has 6000 of them. Replay rows count. Rows from
any chart of the symbol count. A contract roll changes the symbol, so the seed is empty on the
first day of a new contract.
The "not both 0" rule was written to drop rows logged while COMBO was filling (comment
L2735-2736). On the Fixed scale co_avg is always 0 (L2852). So every Fixed-scale row with a
COMBO of 0 is dropped as well, while Ranked-scale rows with a COMBO of 0 are kept (their
co_avg is the tail share, about 1). In exhaustion mode most readings are 0. Rows logged under
Fixed, which has been the default since b38, therefore give a seed with fewer zeros than the
live window has.
Settings that are not 1:1 with an input
ReadSettings (L671-842) and the main function change some inputs before use. The input table
covers the rest.
Unit conversions and lookups:
-
"Aggression percentile", "Wall percentile" and "Fallback percentile" are divided by 100 (
L675-676,L701). -
Label size and panel text size map dropdown index 0, 1 and 2 to 8, 10 and 12 points (
L184,L695,L704). -
"Draw from" index 0 means draw from the confirming bar (
L722). Signal shape index 1 means triangles (L730). -
"COMBO window" is minutes, clamped to 5..60, and stored as seconds (
L798). -
The COMBO column dropdown has 9 choices that map to a mode and a "COMBO big" flag (
L789-793):Index Choice Mode COMBO big 0 On, both must agree 1 agree yes 1 On, average of the two 2 mean yes 2 Off 0 no 3 On, both must agree, flow meter big 1 no 4 On, average of the two, flow meter big 2 no 5 On, flow against price 3 yes 6 On, flow against price, flow meter big 3 no 7 On, exhaustion (fade price + flow at a fresh 1-min high / low). The default ( L4615).4 yes 8 On, exhaustion, flow meter big 4 no -
COMBO scale: index 0 = Ranked, 1 = Fixed, 2 = Relative (
L795-796). -
The auto trade dropdown, clamped to 0..7, sets four flags (
L801-811):Index Choice Account Entries Exits Breakeven only 0 Off off 1 Entries and exits, sim sim yes yes 2 Entries only, sim sim yes 3 Exits only, sim sim yes 4 Entries and exits, live live allowed yes yes 5 Entries only, live live allowed yes 6 Exits only, live live allowed yes 7 Entries, breakeven exit only, sim sim yes yes yes -
Direction index 1 = Continuation, 0 = Reversion (
L810).
Clamps and floors:
- Extend bars at least 1 (
L693). - Price window 1..300 s (
L763). Typical move window 5..390 minutes (L764). - "Level holds within" 0..50 ticks (
L776). "ABSORB aggression" at least 0.5 (L778). "HELD at aggression" at least 0 (L781). - Box step 1..9 (
L800). First box 1..10 (L812). Exit box 0..10 (L813). Pullback 0..9 (L820). - Breakeven mode 0..2, its count at least 1 (
L816-817). Wait mode 0..2, its count at least 1 (L818-819). - Exhaustion filter 0..4, its setting at least 0 (
L823-824). A setting of 0 means the filter's default: effort 1.5, slowing delta 0.7, absorption 1.0, pace 0.7 (L2474-2475). - When auto trade is on, Sierra's
MaximumPositionAllowedis set to(10 - first box) / box step + 1in integer division (L5014). - Tick size from the chart, or 0.25 if the chart reports none (
L841).
Values that replace a 0 left by an instance added before the input existed:
- stacked / pulled window 3 s (
L752-753); - tape color from 1.1 (
L759-760); - full scale 5 (
L766-767); - tape window 10 s (
L827-828), and a tape baseline no longer than the window becomes max(300, 6 x window) (L829-830); - "signal after bars present" is raised to "wall persist" when below it (
L4759-4760).
Forced by another input:
- "Use computed stacked / pulled" = No sets the stacked / pulled weight to 0 (
L831-833). - Choice 7 sets the exit box to 0, so there is no box exit (
L814-815). - COMBO mode 4 (exhaustion) sets the pullback to 0, so entries are on touch (
L821-822). - COMBO is off whenever the price column is off:
coOn = pxOn ? coMode : 0(L2699).
Fixed values whose inputs were given to other jobs in earlier builds:
| Setting | Fixed at | Line | Its old input now drives |
|---|---|---|---|
| panel diagnostics | off | L733 |
the exhaustion entry filter (b33) |
| wall signal alert tier | 0, so no alerts | L745 |
the exhaustion filter setting (b33) |
| price weight in FLOW | 0 | L768 |
auto trade (b6) |
| price column width | 80 px | L769 |
the auto trade exit (b9) |
| ABSORB timer | on | L771 |
the breakeven exit (b11) |
| ABSORB sound flag | on, but alert numbers are 0, so silent | L774, L785-786 |
auto trade (b6); sounds (b35) |
| ABSORB lead | on | L775 |
"Level holds within" (b23) |
| ABSORB max range | 1.0 typical move | L779 |
trade direction (b26) |
| ABSORB bars | 2 | L780 |
entry pullback (b25) |
| HELD / BROKE shown for | 30 s | L783 |
breakeven exit (b11) |
| ABSORB gives up after | 120 s | L784 |
entry wait (b20) |
| COMBO full scale (Relative) | 3.0 averages | L799 |
box step (b11) |
The BROKE distance is 0. L777 sets brokeTicks = absHoldTicks + 1, then L782 sets it to 0
with the comment "set from absHoldTicks below (b23)", and nothing sets it again. BROKE tests
brokeTicks (L2974-2975). So BROKE fires on a trade at the absorption price itself, within a
quarter tick. The input "Level holds within (ticks)" says "BROKE needs a trade one tick beyond
it (3 ticks past at the default 2)". That is not what the code does. HELD still uses the
hold distance (L2990). Rubberband V1 has the same two lines since its b23 (commit 78cb615). This
affects the ABSORB / HELD / BROKE display and the meter log's abs_state and abs_price
columns. Nothing in auto trade reads absState.
When both "Panel" and "Meter" are off, BuildPanel returns at its start (L2085-2086). PRICE,
FLOW and COMBO are then not recomputed, and coReady, coTier and coScore keep the values
from the last update that computed them. Auto trade (L5024-5028) would act on those values.
meter.init also stays true, so the meter log keeps writing a row per bar with those stale
PRICE, FLOW and COMBO values (L5432).
Corrections to older docs
- The study description (
L4661) is stale: it describes PRICE as "the move over the aggression bars" and says "Visual context only", and it omits COMBO, auto trade, sounds and logs. The source header (L1-5) namesmake_rubberband.pyand a price weight that is forced to 0. - The meter log input text (
L4536) and the comment atL5425say "one line per closed bar". The code writes at most one row per update, for the newest closed bar only. Bars that close together between two updates get one row, and a reset can write the newest bar twice. - The "Level holds within (ticks)" input text (
L4577) says BROKE needs a trade one tick past the hold zone. The code sets the BROKE distance to 0 (L782), so BROKE fires at the absorption price. - The COMBO history comment (
L4847-4850) namesRB2_combo_c<chart>_<symbol>.csv. It leaves out the mode prefix (RB2_combo_against_c,RB2_combo_exhaust_c,L4852-4853). The "per chart" wording atL605and in the COMBO Line description (L5489) is incomplete. The file is per chart number and symbol. Flow against price and exhaustion each have their own file, while off, agree and mean shareRB2_combo_c, whose rows have no mode column. Readings from different scales also share one file. - The comment at
L5426-5428says "Log live bars only: no replay running ... replayed or recalculated history stays out of the log". The code logs replay bars (L5464), as the next comment line (L5429) says. - The Ranked seed is described as "the last 6000 bar closes in this COMBO mode" (input text
L4611, signal_spec.md section 7). Rows withco_valandco_avgboth 0 are dropped, and that drops every zero reading logged on the Fixed scale. The seed is therefore not a plain sample of the last 6000 closes. - The auto trade comment at
L4961-4964says "Green COMBO at the first box count sells 1". That holds for Reversion only. In Continuation, the default (L4621), green buys (L5338). - The handoff says the DLL holds the two studies and gives the state tag as "0x0FB4D000 +
kStateVersion 22". The tag also folds in the sizes of ten types (
L652-656). A rebuild keeps the old state when none of them changes.
2. Levels on the chart (inherited from OFBL V1)
Source: source/RubberbandV2.cpp, build RB2.b39. Lnnnn is a line in that file. Input names
are given as they appear in Sierra ("group | name"), with the b39 default in brackets.
Everything in this section is OFBL V1 code carried into V2 unchanged, except the drawing slot
base (L361), the wall-signal alert, which V2 switches off by forcing alertTier to 0 (L745;
V1 reads its input at RubberbandV1.cpp L720), and the Rubberband absorption lines at the
end (L1629-1671). The levels matter to
trading in one way only: live walls and live absorption and breakthrough levels feed the FLOW
part "nearest level" (L2199-2250). That section covers it. Pulled walls never feed FLOW.
2.0 Display switches
These "04 Display" switches decide which levels are drawn. Hidden levels are still computed.
| Switch [default] | What No hides | Also changes FLOW? |
|---|---|---|
"Show absorption" [Yes] (L4394) |
absorption lines, markers and labels (L1587-1588) |
Yes. Absorption levels leave the nearest-level part (L2248). |
"Show breakthroughs" [No] (L4395) |
breakthrough lines, markers and labels (L1598-1599) |
Yes. At Yes, breakthroughs enter the nearest-level part (L2246). |
"Show resting walls" [Yes] (L4396) |
live wall lines and labels (L1416) and departed wall lines (L1560) |
Yes. Walls leave the nearest-level part (L2223). Wall signal arrows and the subgraph values ignore this switch (L909, L1535). |
"Show pulled walls" [No] (L4397) |
pulled lines, markers and labels (L1406-1408, L1460, L1608-1609) |
No. Pulled levels never feed FLOW. |
"Keep departed walls as stopped lines" [Yes] (L4439-4440) |
departed wall lines. The study always stores them; it draws them only when this and "Show resting walls" are both Yes (L1560). |
No |
"Keep broken levels as stopped lines" [Yes] (L4380-4381) |
ended absorption, breakthrough and pulled lines, which No deletes (L1066-1072) |
No. Only active levels feed FLOW. |
"Wall signals" [Yes] (L4441-4442) |
arrows, their labels and the subgraph values (L909, L1535) |
No |
"Show labels" [Yes] (L4391) |
line labels; not signal labels (L1521, L1621, L1555) |
No |
"Mark event bars" [Yes] (L4432-4433) |
level markers (L1619) |
No |
"Label broken levels" [No] (L4430-4431) |
labels of ended levels (L1621) |
No |
"Aggression-only absorption without depth" [Yes] (L4398-4399) |
absorption on bars without depth, which No stops computing (L1079) |
Yes, through the absorption levels it adds. |
2.1 When bars are processed
- The study works on closed bars only. The live bar is the last index and is never processed.
The last closed bar is
min(ArraySize - 2, VAP bars - 1)(L4812-4814). - Each closed bar is processed once, in order, by
ProcessBar(L4823-4828,L977). - A full recalculation, an update from bar 0, or an update that starts at or before the last
processed bar clears all level state and both wall-signal subgraphs (
L4764-4780,ResetCalcL622-641). - After a reset, processing starts "01 Thresholds | Bars to process (0 = all)" [30000] bars
back from the last closed bar, or at bar 0 when the input is 0 (
L4815-4820). 30000 bars is about 25 hours of 3-second bars. - Lines, labels and markers are redrawn by
DrawLevelsonly when a bar closed, a redraw was requested, the bar count changed, or the processed count changed (L4833-4844). They are not redrawn on every tick. - Level state lives in memory only. The levels themselves are never saved. After any full
recalculation (including Chart >> Reload and Recalculate), and after the study is added or
its chart or chartbook is opened, every level is rebuilt from the bars in "Bars to process".
Their FLOW part is logged:
the meter log's
levelcolumn (headerL5450, rowL5461) is the nearest-level value.
2.2 Rolling thresholds
Two rolling distributions set every size threshold (L1015-1024).
| Distribution | What goes in, per bar | Code |
|---|---|---|
aggression (aggHist) |
For every price in the bar: its bid volume (market sells) and its ask volume (market buys), as two separate samples. | L1273-1277 |
resting size (restHist) |
For every price from bar low minus "Scan distance" to bar high plus "Scan distance": the last bid size and the last ask size at the bar's end, as two samples. Only bars with depth and a "sane" range. | L1278-1285 |
- Zero and negative values are never added (
L206-207). - The window is the "01 Thresholds | Rolling window (bars)" [300] bars before the current bar.
Before reading a threshold the study drops samples from bars at or before
i - window - 1(L1016-1017), and it adds the current bar's samples only after all checks on that bar (L1272). So the current bar is never part of its own threshold, and the window is barsi - 300toi - 1. - A threshold is the lower edge of a log bin: bins are 8 per doubling (about 9% wide), and the
q quantile returns
2^(b/8)for the binbthat holds theceil(q x total)-th sample (L187-239). A threshold is therefore rounded down by up to about 9%. - Nothing fires from a distribution until it holds "01 Thresholds | Minimum samples before
signals" [500] samples (
L1018-1019). - A bar whose high minus low is more than 400 ticks is treated as a bad print (
L1132). Only two steps skip it: the scan for new walls (L1240) and adding its resting sizes (L1278). Tracking of existing walls still runs on it, so walls can still be confirmed, eaten or pulled there, and absorption checks and aggression sampling run as usual.
Thresholds used:
thrAgg= the "01 Thresholds | Aggression percentile (absorption)" [99.5] quantile of aggression (L1020).thrFallback= the "04 Display | Aggression-only percentile" [99.8] quantile of aggression, used on bars without depth (L1021).thrWall= the "01 Thresholds | Wall size percentile" [99.95] quantile of resting size (L1022).
2.3 Absorption levels
Per closed bar, each side is checked once (L1075-1128). Bid absorption (market sells into the
bid) makes a support level; ask absorption (market buys into the ask) makes a resistance level.
A price in the bar is a candidate when all of these hold (L1084-1101):
- The volume traded into that side at that price (bid volume for bid absorption, ask volume
for ask absorption) is above 0 and at least the threshold. The threshold is
thrAggon a bar with depth andthrFallbackon a bar without (L1081,L1088). - The price is at most "02 Absorption | Max ticks from bar extreme" [0] ticks above the bar
low (bid) or below the bar high (ask) (
L1090). At the default 0 it must be the bar's low or high itself. - The bar's close is not through the price by more than "02 Absorption | Hold tolerance
(ticks)" [1]: for bid absorption, close >= price - 1 tick; for ask, close <= price + 1 tick
(
L1093). - On a bar with depth, the traded volume is at least "02 Absorption | Refill ratio (traded /
largest shown)" [4.0] times the largest bid (or ask) size the book showed at that price
during the bar, with that size floored at 1 (
L1096-1100). A ratio of 0 turns this check off. On a bar without depth this check is skipped.
Of the candidates, the price with the most traded volume wins (L1102-1107). Prices are visited
from low to high (an ordered map declared at L999, looped at L1084) and only a strictly larger volume replaces the best, so
on a tie the lowest price wins. The level price is that traded price. Absorption levels are
drawn and feed FLOW only while "04 Display | Show absorption" [Yes] is on (L1587, L2248); with
it off they are still computed. Nothing fires if the aggression distribution is not warmed up, or if the bar
has no depth and "04 Display | Aggression-only absorption without depth" [Yes] is off (L1079).
Confirmation (L1031-1037, L1118-1125):
- With "02 Absorption | Confirmation bars" [5] at 0, the level is added on the event bar.
- Otherwise it waits. On each later bar, starting with the next one, it fails if that bar
closes through the price by more than the hold tolerance (support: close < price - 1 tick;
resistance: close > price + 1 tick). If it has not failed by bar
event + 5, it is confirmed on that bar. The confirm bar is therefore the event bar plus 5. - A level is "depth mode" when its event bar had depth (
L1121). Depth mode is fixed for the level's life and sets its line style.
2.4 Resting walls
A wall is one price on one side of the book (L276-287, key L659).
Finding a wall (L1240-1269). On a bar with depth, once the resting-size distribution is warmed
up, every price from bar low minus "03 Walls | Scan distance beyond bar range (ticks)" [20] to
bar high plus 20 is checked on both sides. A price that is not already tracked becomes a wall
when its last size at the bar's end is above 0 and at least thrWall. The wall records:
- its start bar (this bar) and
barsPresent = 1; - its peak and current size (this size);
thr, the wall threshold at this moment, which stays fixed for the wall's life (L1262).
Tracking a wall (L1163-1181). On every later bar with depth, q is the last size at the wall's
price at that bar's end.
- If
q >= "03 Walls | Gone when size falls below (x peak)" [0.35] x peak, the wall stays:barsPresentgoes up by 1, the peak becomesmax(peak, q), and current becomesq. A wall that started above the threshold can therefore fall below the threshold and stay, as long as it keeps 35% of its peak. barsPresentcounts bars with depth on which the wall was present. It is not a clock.- A tracked wall is followed at any distance from price. Only the search for new walls is
limited to the scan range (
L1242againstL1163-1166). When price moves far enough that the recorded book no longer covers the wall's price,qreads 0 and the wall leaves (2.5).
Confirmation (L1172-1176). On the bar where barsPresent reaches "03 Walls | Bars present to
draw a resting wall" [3], the wall is confirmed. Its tier at that bar (tier0, from peak / thr)
fixes the line's color and width for its whole life. With the input at 1 the wall is confirmed
on its first bar (L1258).
Tiers (L943-951). ratio = size / thr. Tier 1 below 1.25, tier 2 from "07 Tiers | Tier 2
starts at (x threshold)" [1.25], tier 3 from [1.6], tier 4 from [2.4], tier 5 from [4.5].
Different things use a different size:
- line style: the peak at the confirm bar (
tier0); - the live edge label: the size resting now, shown as "T3>T4" when it differs from
tier0(L1529-1530); - a wall signal: the peak as of the bar whose close reached "Signal after bars present",
after that bar's peak update (
L1170,L925,L1548). At the default "Confirm bar" the marker is drawn one bar later (L913), so the stored peak is from the bar before the drawn signal bar; - the FLOW nearest-level value: the size resting now (
L2239).
2.5 When a wall leaves the book: eaten, pulled, or neither
A wall leaves when q falls below 0.35 x peak on a bar with depth (L1167, L1182). Then, with
traded = the volume that hit that side at that price during this bar (bid volume for a bid
wall, ask volume for an ask wall) (L1183):
- If the wall was present fewer than "03 Walls | Minimum wall age for breakthrough / pull
(bars)" [40] bars, it is neither eaten nor pulled (
L1185-1188). - Eaten:
traded >= "03 Walls | Eaten when traded reaches (x peak)" [0.8] x peak(L1189-1206). This makes a breakthrough candidate (2.6). - Pulled:
traded < "03 Walls | Pulled when traded below (x peak)" [0.3] x peak, and the distance from the bar's traded range is 0 to "03 Walls | Pull max distance from traded range (ticks)" [6] ticks. For a bid wall the distance is bar low minus wall price; for an ask wall, wall price minus bar high (L1184,L1207). At 0 the wall sits at the bar's low (bid) or high (ask), the edge of the traded range. A wall strictly inside the bar's range cannot count as pulled. A pulled level is added at once, on this bar (L1208-1220). Pulled levels are not drawn by default, because "04 Display | Show pulled walls" defaults to No (L4397,L1608). - A traded share between 0.3 and 0.8 of the peak, or a pull farther than 6 ticks out, ends the wall with no level.
In every case, if the wall had been confirmed, its line is kept as a departed wall (a
WallSpan) ending on this bar (L1222-1236), and the wall is dropped from tracking (L1237).
A wall that left because price moved away from it (its price fell outside the recorded book,
so q read 0) is usually more than 6 ticks from the bar's range, so it ends with no pulled
level (L1207).
A shrinking wall can be found again on the same bar. The wall ends when q < 0.35 x peak
(L1167) and is erased (L1237). The new-wall scan then runs on the same bar (L1240-1265) and
skips only prices still tracked (L1248), so the same price becomes a new wall if q >= thrWall
(L1251). The scan runs only when the resting-size distribution is warmed up and the bar range
is sane (L1240), and only over bar low minus 20 ticks to bar high plus 20 (L1242), so a
shrinking wall farther than "Scan distance" from the bar's range is not found again. It needs
the current wall threshold thrWall (not the old wall's stored thr) below 35% of the old
peak, so the peak must be above about 2.86 times today's threshold (1 / 0.35). In practice
these are tier 4 and 5 walls. The size must have shrunk to between thrWall and 35% of the
peak. Effects:
- the old line is cut and stored as a departed wall (
L1222-1236); - a new line appears only when
barsPresentreaches 3 again, starting on the bar after the new confirm bar, with a newtier0(L1174-1175,L1259); - for those bars the wall is out of FLOW's nearest-level part, which counts only confirmed
walls (
L2230); - if the old wall was 40 or more bars old, it can be classed eaten or pulled (
L1185-1220) while size above the threshold still rests at that price; - the new wall's signal is suppressed only if the old wall's arrow is within 100 bars of the
new signal bar (
L917-919). The old arrow sits at the old confirm bar + 1, so if the old wall lasted more than about 97 bars (about 5 minutes of 3-second bars), a second arrow is drawn and a second subgraph value is written at the same price.
Depth gaps (L1133-1159). On a bar without depth, tracked walls are frozen: nothing about them
changes. When 5 bars in a row have had no depth, every confirmed wall is ended as a departed
wall on that bar and all tracked walls are dropped. The counter resets on the next bar with
depth (L1162).
2.6 Breakthrough levels
From an eaten wall (L1189-1206). A broken bid wall becomes resistance (side -1). A broken ask
wall becomes support (side +1). Its event bar is the bar the wall left. At the default "Draw
lines, markers and signals from" = Confirm bar, its line starts on the bar after its confirm
bar. Only with "Event bar (back-drawn)" does it start at the wall's start bar (L1196, L1616).
- It is confirmed at once if this bar already closed at least "03 Walls | Breakthrough close
beyond (ticks)" [4] ticks through the wall: support needs close >= price + 4 ticks,
resistance close <= price - 4 ticks (
L1202-1203). - Otherwise, with "Confirmation bars" [5] above 0, it waits. It is confirmed on the first of
the next 5 bars that closes 4 ticks through, and it fails if none does by bar
event + 5(L1040-1046). With "Confirmation bars" at 0 it is dropped.
Breakthrough levels are hidden by default ("04 Display | Show breakthroughs" [No]). Hidden ones
are still computed and still end by the rules in 2.8, but they are not drawn and do not feed
FLOW (L1598, L2246).
2.7 Merging and storage limits
- A new level of the same type, side, price and depth mode as an active level merges into it:
traded volumes add, shown takes the larger value, and no new line appears (
L861-870). - "04 Display | Maximum stored levels per type" [400] caps three stores:
- Levels of each type (absorption, breakthrough, pulled). When the count of a type goes
over 400, its oldest ended levels are deleted. Active levels are never deleted, so a type
can hold more than 400 when most are active (
L884-898). - Departed walls, bid and ask together. The oldest is deleted (
L1155-1156,L1234-1235). - Wall signals, bid and ask together. The oldest is deleted (
L928-929).
- Levels of each type (absorption, breakthrough, pulled). When the count of a type goes
over 400, its oldest ended levels are deleted. Active levels are never deleted, so a type
can hold more than 400 when most are active (
- Drawing slots are a second, separate cap. See 2.11.
2.8 Level lifetime
On each bar after its confirm bar, an active level is checked (L1053-1073).
- Absorption and breakthrough support ends when a bar closes more than "04 Display | Level
broken when close beyond (ticks)" [2] ticks below it. Resistance ends when a bar closes more
than 2 ticks above it (
L1062-1065). Nothing else ends them. There is no time limit. - A pulled level ends when a bar trades at its price (bar high >= price and bar low <= price),
or "03 Walls | Pulled marker life (bars)" [30] bars after its confirm bar (
L1060-1061). - With "04 Display | Keep broken levels as stopped lines" [Yes], an ended level keeps its line,
cut off at the bar that ended it. With No, it is deleted at once (
L1066-1072). - A resting wall line lasts while the wall is tracked (2.4, 2.5). It is not ended by price.
2.9 Wall signals (arrows and the two hidden subgraphs)
MarkWallSignal (L907-940) runs when a wall's barsPresent reaches "03 Walls | Signal after
bars present" [3] (L1177-1178), or on the wall's first bar when that input is 1 (L1264-1265).
The input is raised to at least "Bars present to draw a resting wall" before use, so a signal
never comes before its wall line (L4759-4760).
- It does nothing when "04 Display | Wall signals" [Yes] is off (
L909). - The signal bar is the bar after the confirming bar with "04 Display | Draw lines, markers and
signals from" = Confirm bar [default], or the wall's start bar with Event bar (
L913). - The same side and price does not signal again if a signal there exists within the last 100
bars before the new signal bar (
L917-919). The check covers only those 100 bars. A wall that was dropped in a depth gap (L1137-1157), or that shrank and was found again on the same bar (2.5), signals twice at the same price when its first arrow is more than 100 bars back, which happens when the first wall lasted more than about 97 bars. - It writes the wall price into subgraph "Bid wall signal" (SG_BUY, index 0) for a bid wall or
"Ask wall signal" (SG_SELL, index 1) for an ask wall at the signal bar (
L920). Both subgraphs areDRAWSTYLE_IGNORE: they hold values for alerts or spreadsheets and draw nothing (L4675-4686). 0 means no signal. A reset clears both (L4772-4776). - The live alert code (
L931-939) never runs in V2.alertTieris forced to 0 because b33 gave its input slot to the exhaustion filter setting (L745).
The arrows are drawings, made in DrawLevels (L1535-1558); see 2.11.
2.10 Depth data
- The study asks Sierra to keep historical depth (
MaintainHistoricalMarketDepthData = 1,L4668) and depth data (L4665). A bar "has depth" when Sierra's depth bars exist for that index (L990). - Needs depth: resting walls, wall signals, breakthrough levels, pulled levels, the refill check, and depth-mode absorption.
- Without depth: absorption still fires from aggression alone at the stricter 99.8 percentile,
with no refill check, when "Aggression-only absorption without depth" is Yes. These levels
draw dash-dot and are labeled "(no depth)" (
L1078-1081,L1591-1594). Walls freeze, then end after 5 bars (2.5). - Late depth. Historical depth often loads after the bars were first processed. While the
study is less than 3 minutes old (since its state object was created), it samples processed
bars, leaving out the newest 5. It checks every
step-th bar from the newest down, withstep = max(1, floor(bars / 96)). Under 192 bars that is every bar; above, it isceil(bars / step), between 96 and 144 bars. If any sampled bar was processed without depth and now has it, the study resets and reprocesses everything. It does this at most once a minute (L4787-4810). After the first 3 minutes it never resets for depth, so history the trader has seen is not redrawn.
2.11 Drawing
Slots (L356-363, L1291-1330). Every drawing is a Sierra chart drawing with a fixed line number:
96000000 + StudyGraphInstanceID x 6000 + category x 1300 + k. The four categories are lines
(0), bar-anchored labels (1), markers (2), and edge labels in the fill space (3). Each category
has 1300 slots per study instance. Drawings past 1300 in a category are silently not drawn
(L1310-1311). Each redraw fills slots from 0 in the order below, then deletes any slot used on
the previous draw but not this one (Finish, L1322-1330). Removing the study deletes them all
(L4719-4722). The base 96000000 keeps V2 clear of V1 and OFBL, so they can share a chart (L361).
Draw order, which decides who loses when a category runs out of slots (L1512-1513):
- live walls, nearest first;
- wall signals, newest first;
- departed walls, newest first;
- levels, newest first;
- Rubberband absorption lines.
Where lines start. With "Draw lines, markers and signals from" = "Confirm bar (as seen live)"
[default], every wall, level and marker starts on the bar after the confirm bar, the first bar
a live chart could show it (L1519, L1566, L1616, L1620). With "Event bar (back-drawn)", walls
start on their first bar, absorption on its event bar, breakthrough and pulled levels on the
wall's start bar, and markers on the event bar. That option draws things earlier than they
were known live.
Where lines end. Active lines run to the last bar plus "04 Display | Right extension (bars)" [1]
(L1400). Ended lines stop at their end bar, and always span at least one bar (L1568, L1617).
| Item | Line | Color | Width | Marker | Label |
|---|---|---|---|---|---|
| live resting wall | solid | tier color of tier0 if "07 Tiers | Color wall lines by tier" [Yes], else "06 Colors | Resting bid wall" / "Resting ask wall" |
1 + round((W - 1)(tier - 1) / 4), W = "07 Tiers | Wall line width, tier 5" [5], so tiers 1-5 draw 1-5 px |
none | "T<tier0> <size now>", or "T<tier0>>T<now> <size now>" when the tier moved (L1530-1531) |
| departed wall (only with "Show resting walls" and "Keep departed walls" both Yes) | same as live, fixed at confirm | same | same | none | none (L1560-1572) |
| absorption, depth (only with "Show absorption" [Yes]) | solid | "06 Colors | Bid absorption (support)" / "Ask absorption (resistance)" | "04 Display | Absorption / breakthrough line width" [2] | triangle up (bid) / down (ask) | "Bid absorb <traded> vs <shown> shown" |
| absorption, no depth | dash-dot | same | same | same | "Bid absorb <traded> (no depth)" |
| breakthrough (only with "Show breakthroughs", default No) | dashed | "Bid wall hit (sellers won, resistance)" / "Ask wall lifted (buyers won, support)" | same | diamond | "Bid wall hit <traded> of <peak>" / "Ask wall lifted <traded> of <peak>" |
| pulled wall (only with "Show pulled walls", default No) | dotted | "06 Colors | Pulled wall" | 1 | X | "Pulled bid <peak>" / "Pulled ask <peak>" |
Code: walls L1514-1533, levels L1574-1627.
Labels.
- Labels need "04 Display | Show labels" [Yes] (
L1521,L1621), except signal labels (below). - Live labels sit one bar spacing right of the last bar, in the fill space (edge labels,
L1357-1361). Ended-level labels sit one bar after the line's end and get " (broken)" (L1625). Ended levels are labeled only with "04 Display | Label broken levels" [No] on. - Only the nearest "04 Display | Resting walls labeled" [8] walls get a label (
L1521). - A live label is hidden when its price is more than "04 Display | Hide levels farther than
(ticks)" [300] ticks from the last price. The line is still drawn (
L1403-1404,L1578). - Edge labels avoid each other (
L1430-1500). A label hangs just below its line. If another live line (with its width) or a placed label is in the way, it goes above the line; if both are taken it is skipped for this draw. Live absorption, breakthrough and pulled labels are placed before wall labels (L1502-1510), and a label keeps last draw's side while that side is free (L1484-1485). Pixel positions come from the last chart paint, so after a zoom labels re-sort on the next bar close. Before the first chart paint the price scale is unknown, so every edge label skips the check and hangs below its line (L1441,L1481-1482). - Text of tier 1 and 2 wall labels is blended toward light grey (45% and 25%) so it can be read
on the dark tier colors (
L1526-1528). - Font size is "04 Display | Label size" [Small] (Small 8 pt, Normal 10, Large 12;
L184,L695).
Wall signal markers (L1535-1558).
- Shape: arrow, or triangle with "07 Tiers | Signal shape" = Triangle. Up at bid walls, down
at ask walls. Placed at the signal bar and the wall price. With Triangle, signals use the
same triangle shapes as absorption event markers (
L1550,L1592); only color and size tell them apart. - Color: the tier color of the side, always, whatever "Color wall lines by tier" says.
- Size:
round(A1 x (A5 / A1)^((tier - 1) / 4))px, with A1 = "07 Tiers | Signal size, tier 1" [7] and A5 = "Signal size, tier 5" [36]. At the defaults tiers 1-5 are 7, 11, 16, 24 and 36 px. - Label "T<tier> <peak/thr>x" (for example "T5 6.2x") for tiers at or above "07 Tiers | Label
signals from tier" [4] (6 = none). It sits right of the marker by half the marker plus 3 px,
rounded up to whole bars and at least 1, and waits until that bar exists. This label ignores
"Show labels" and the hide distance (
L1554-1556).
Event markers on levels need "04 Display | Mark event bars" [Yes], size "04 Display | Marker
size" [8] px (L1619-1620).
2.12 Rubberband absorption lines (new in Rubberband, drawn here)
DrawLevels also draws the lines of the live ABSORB / HELD / BROKE state, which the panel section
describes (L1629-1671). They are drawn only when "99 Switches | Price meter column" [Yes] (L4559-4560), "99
Switches | ABSORB state (pressure without price)" [Yes] (L4622) and "99 Switches | Absorption price lines" [Yes] are all on.
- A dashed line, width 2, from the bar where ABSORB lit, running to the live edge until it is
cut off (
L1643-1644,L1660). - Amber RGB(255, 190, 40) while ABSORB is open.
- HELD sets only the line's result (
L3002-3003), so a HELD line keeps running to the live edge in the absorber's tier 4 color (ask tier 4 when buyers were absorbed, bid tier 4 when sellers were). If price then breaks through, it turns BROKE (L3025-3030). Otherwise it is cut off as HELD 30 seconds after it resolved (showSec,L783,L3034-3037). - BROKE takes the aggressor's tier 4 color and is cut off at once (
L2991-2995from ABSORB,L3029-3030from HELD). - An expired line turns grey RGB(120, 125, 135) and keeps the word "ABS" (
L1646,L1657-1658). A line expires when neither HELD nor BROKE came within 120 seconds (expireSec,L784,L3014-3017), or when the ABSORB condition lapses with "99 Switches | HELD / BROKE" off (L3009-3012). - Label "ABS", "HELD" or "BROKE", plus " x<ratio>" (traded over largest shown at the price) when depth gave a ratio, sitting above the line at its first bar, when "Show labels" is on.
- They are stored by bar time, so they find their bars again after a recalculation shifts
indexes (
L1637-1640). They are kept in memory only, in the State object (L576). They survive a full recalculation, including Chart >> Reload and Recalculate, because that keeps State (ResetCalcdoes not clear them,L622-641). They are lost when a new State is created (L4735-4746): when the study is added, when its chart or chartbook is opened (including a Sierra restart), or after a rebuilt DLL whose state tag differs (L4711-4715). At 400 lines the oldest 100 are dropped (L3090-3091).
2.13 What can change after it is drawn
Most drawings never move. Lines start on the first bar a live chart knew them, a wall's style is fixed at its confirm bar, and ended levels are cut off, not deleted. These are the exceptions:
- The live wall label (size and "T3>T4"), by design.
- An ended level is deleted when "Keep broken levels as stopped lines" is No.
- The oldest stored items go once a store passes 400 (2.7), and the oldest drawings in a category go once it passes 1300 slots (2.11).
- In the first 3 minutes after a new State is created (the study added, its chart or chartbook opened, or a tag-changing rebuild), late depth can reset and redraw history (2.10). Reload and Recalculate keeps State, so it does not restart this window.
- "Event bar (back-drawn)" moves starts earlier than they were known live.
- Edge labels can switch sides or be skipped when space runs out.
- Rubberband absorption lines are amber and extend while open, then turn to the HELD, BROKE
or grey color when they resolve (
L1643-1658). A HELD line can still change to BROKE, in color and label, for 30 seconds after it was drawn as HELD (L3025-3030). They are lost when a new State is created (2.12), not on a recalculation. - Any full recalculation (a changed input, or Chart >> Reload and Recalculate) rebuilds
every level from "Bars to process" bars back, with the thresholds warming up again
(
L4779-4780,L4815-4820). Levels near the new start can differ from what was shown live.
Corrections to older docs
- In-study text of "02 Absorption | Confirmation bars" (
L4346) says the line "starts on the confirm bar". It starts on the bar after (L1616). The same holds for "04 Display | Mark event bars" (L4433), whose marker sits on the bar after the confirm bar (L1620). - In-study text of "03 Walls | Signal after bars present" (
L4541) says the signal is an "arrow, alert". No alert fires in V2:alertTieris forced to 0 (L745).ofbl_guide.html(lines 257, 436, 475, 494) describes an "Alert on wall signals from tier" input; in V2 that input slot is "99 Trading | Exhaustion entry filter setting". The OFBL handoff line 276 ("alerts") is likewise V1 only. - In-study text of "01 Thresholds | Aggression percentile (absorption)" (
L4333) says "absorption is off by default on 3-second charts". "04 Display | Show absorption" defaults to Yes (L4394). - In-study text of "05 Panel | Show order flow panel" (
L4405) says "Level counts are in the diagnostic rows". V2 has no diagnostic rows:panelDiagis forced false (L733), because b33 gave its input slot to "99 Trading | Exhaustion entry filter".ofbl_guide.htmllines 321-322 and 526 describe "Show diagnostic rows" (V1 only). ofbl_guide.htmlline 273 says the chart keeps "the newest 400 stored items of each type". For levels the cap deletes only ended levels, so active levels can exceed 400 (L884-898). Departed walls and wall signals are capped at 400 for both sides together, not per side. The 1300-slot drawing cap per category (L363,L1310) is a second limit no doc mentions.- The tier help text (
L4453) says live lines use the size resting now and departed lines the largest size reached. In code both live and departed lines usetier0, fixed at the confirm bar (L1517,L1567). Only the live label uses the size now (L1529-1531). - The study description (
L4661) calls V2 "visual context only". The show switches for walls, absorption and breakthroughs change FLOW through the nearest-level part (L2223-2250), and FLOW drives COMBO and auto trade. - The source comment at
L916says "The same wall re-confirmed after a depth gap does not signal twice". The check looks back only 100 bars from the new signal bar (L917), so a wall that lasted more than about 97 bars and is found again after a depth gap or a shrink does signal twice at the same price (2.5, 2.9).
3. Computations: PRICE, FLOW, COMBO, the exhaustion filter, ABSORB
Source: source/RubberbandV2.cpp, build RB2.b39. Lnnnn is a line in that file. Input
names are given as Sierra shows them ("group | name"), with the default in brackets.
Where this section disagrees with engine/output/RB_IMPROVE_2026_10_12/signal_spec.md or the
handoff, the code wins, and the list at the end names each correction.
3.1 Where and when this runs
Everything in this section happens in BuildPanel (L2080-3307). The study calls it once per
study call, after the closed bars are processed and the levels are drawn (L4845). The study
runs on every chart update, with or without new data, because sc.UpdateAlways = 1 (L4671,
L4761). A full recalculation also calls BuildPanel once, at the last bar. It is never run
bar by bar over history. Every value below is a per-update reading, but several of them read
chart bars:
- aggression sums the last N chart bars (
L2115-2119); - the PRICE reference falls back to a chart bar until the rings reach back far enough
(
L2524-2528), and the slow typical move reads M minutes of bars (L2536-2559); - ABSORB reads the last N bars' high, low and volume at price (
L2907-2911,L3056-3061); - the level part reads the walls and levels that
ProcessBarbuilt from up to "01 Thresholds | Bars to process (0 = all)" [30000] historical bars (L2223-2250,L4818-4828).
The study returns before BuildPanel when sc.VolumeAtPriceForBars is null (L4782-4783) and
when the chart has no bars (L4830-4831).
If "05 Panel | Show order flow panel" [Yes] and "05 Panel | Show bias meter" [Yes] are both
No, BuildPanel returns at L2085 before computing anything. PRICE, FLOW and COMBO then stop
updating, and the auto trade and the meter log read the last values left in st.meter.
The computing state lives in st.meter (MeterView, L367-489) and in st.tape, st.sp,
st.abs and st.flash. State::ResetCalc (L622-641) does not clear any of them. A full
recalculation (Chart >> Reload and Recalculate included), a depth reset or an input change
therefore keeps the 250 ms rings, the tape history and the smoothing. The COMBO window is kept
too, except that a change of COMBO mode clears it (L2787-2792). Each block clears its own
history only on the rules given below. All of it starts empty only with a new State: when the
study is added, when the chart or chartbook is opened (a Sierra restart included), or after a
rebuild that changes the state tag (L4708-4733).
3.2 Clocks
Three clocks are used.
| Clock | Source | Used by |
|---|---|---|
tradeMs |
sc.LatestDateTimeForLastBar, the time of the chart's latest trade, in ms (L2307-2308, L2784-2785). Falls back to market time when 0. |
the PRICE rings, the fresh high and low, the exhaustion filter readings, the COMBO window |
MarketMs |
sc.GetCurrentDateTime() in ms: system time live, the replay clock in a replay (L1724-1728). Falls back to GetTickCount64 when 0. |
FLOW smoothing, the 10 s trend, the average marker, speed of tape, the study-computed stacked / pulled window, ABSORB timers |
| wall clock | GetTickCount64() (L2272, L3231) |
the STALE check signature and the 4-row agreement flash |
tradeMs does not move while a replay is paused. MarketMs returns the real clock while a
replay is paused (comment at L2781-2783), which is why the COMBO window uses tradeMs.
3.3 Trades since the last update (L2314-2348)
The study reads bars, not prints. m.exBar is the last bar seen, with its high, low, ask
volume and bid volume at that time. On each update, for bars from max(m.exBar, last - 50)
to last (L2319):
newHi   = max(close, highs that are new)       # the seen bar adds only a high above its old high
newLo   = min(close, lows that are new)        # likewise for lows; later bars add their whole range
newBuy  = ask-volume increments                # seen bar: max(0, ask - old ask); later bars: whole ask volume
newSell = bid-volume increments                # the same with bid volume
close   = sc.BaseDataIn[SC_LAST][last]
On the first update (no bar seen yet) the volumes stay 0, because the last bar's volume is
history, not new (L2336). The same holds when the bar index has gone back (m.exBar > last).
Then only the last bar is scanned, it adds its high and low, and it adds no volume
(L2317-2318, L2332-2336). At most 51 bars are scanned, so a jump of more than 50 bars loses
the older bars' range and volume.
3.4 The 250 ms rings (L2349-2385)
The rings exist only while "99 Switches | Price meter column" [Yes] is on and the chart has at
least 2 bars (L2302). A slot is 250 ms of tradeMs (kPxSlotMs, L416):
slot = floor(tradeMs / 250) (L2309). The rings hold kPxRing = 2400 slots, 10 minutes
(L417). ring(i) below means the stored slot i back from the newest (L2492).
if no slot yet, or slot < lastSlot, or slot - lastSlot > 480:      # replay jump back, or a gap over 2 min
    clear the rings; lastSlot = slot; lastPx = close
    cur.hi = newHi; cur.lo = newLo; cur.buy = cur.sell = 0          (L2349-2357)
for k in lastSlot .. slot-1:                                         # close every slot that ended (L2358-2368)
    own = (k == lastSlot)
    push px = lastPx
    push hi = cur.hi if own else lastPx;  lo = cur.lo if own else lastPx
    push buy = cur.buy if own else 0;     sell = cur.sell if own else 0
if slot != lastSlot: cur = (newHi, newLo, newBuy, newSell)          (L2369-2375)
else: cur.hi = max(cur.hi, newHi); cur.lo = min(cur.lo, newLo); cur.buy += newBuy; cur.sell += newSell
lastSlot = slot; lastPx = close
elapsedMs = tradeMs - slot * 250 + 1                                 (L2385)
All trades between two updates land in the slot of the later update, whatever their own
timestamps. px is the last price at the end of each slot. A slot with no update stores the
last price as its high and low, and zero volume.
3.5 The fresh 1-minute high and low (L2386-2403)
span = 240 slots (60 s)
if stored slots >= 240:
    freshHi = cur.hi >= max(ring(0..239).hi)
    freshLo = cur.lo <= min(ring(0..239).lo)
else: freshHi = freshLo = false
Ties count, so a double top at the same price is fresh. The current slot is compared with the 60 s of stored slots before it and is not part of the reference. No input changes the 60 s.
3.6 PRICE (L2294-2586)
Inputs:
- "00 Rubberband | Price window (seconds)" [5], clamped to 1..300 (
L763). Call itW.wSlots = W * 4, so 20 at the default (L2305). - "00 Rubberband | Typical move window (minutes)" [30], clamped to 5..390 (
L764). Call itM. - "00 Rubberband | Full scale (typical moves)" [5]; 0 or less reads as 5 (
L765-767). - "99 Switches | Price meter column" [Yes]. With it off, PRICE is not computed,
pxReadystays false, and COMBO is off (L2699).
# the move (L2513-2532)
if stored slots > wSlots: ref = ring(wSlots - 1).px           # the last price at the end of slot S - wSlots
else: ref = close of the last chart bar starting at or before tradeMs - W*1000   (barAt, L2496-2511)
move = close - ref                                            # points; spans (W - 0.25) s plus elapsedMs

# slow typical move, recomputed when a new bar starts, when W or M changes (L2536-2559),
# and after every full recalculation, because resetAll sets pxTypBar = -1 (L4770)
vals = []
for each closed bar k, newest first, while barStart(k) >= barStart(live) - M minutes:
    j = the last bar with barStart(j) <= barStart(k) - W*1000
    vals.append(|close(k) - close(j)|)                        # at most 20000 values
typSlow = vals[n/2] after nth_element (the upper median) if n >= 30 else 0

# fast typical move, every update (L2563-2574)
vals = [|ring(i).px - ring(i + wSlots).px| for i in 0..719 if i + wSlots < stored slots]   # last 3 minutes
typFast = upper median if n >= 120 (30 s of slots) else 0

typ = max(typSlow, typFast);  if typ > 0: typ = max(typ, tick)     (L2575-2577)
if ref exists and typ > 0:                                          (L2578-2585)
    z = move / typ
    p = clip(20 * z / fullScale, -20, +20)                          # at full scale 5: p = 4 z
    pxTier = sign(p) * min(5, floor(|p| / 4 + 1e-9))                # display, and ABSORB's "price against"
    pxReady = true
On 3-second bars with W = 5, j is bar k - 2, a 6 s gap, because the bar starting 5 s
earlier does not exist. PRICE is not smoothed.
PRICE as a fifth FLOW input does nothing in V2
L2646-2655 would add PRICE to FLOW with weight m.pxWeight. That weight is
s.pxOn ? s.wPrice : 0 (L2300), and s.wPrice is hard-set to 0 at L768 because its input
went to auto trade in b6. FLOW in V2 is therefore always the four-part meter.
3.7 FLOW (L2114-2287, L2588-2667)
Balance scales (L1679-1720)
The five "05 Panel | Balance for tier 1..5" inputs [0.05, 0.12, 0.20, 0.33, 0.50] are the
cuts c1..c5 (L731-732).
BalanceScore(x):  a = |x|; piecewise linear through (0,0) (c1,1) (c2,2) (c3,3) (c4,4) (c5,5); 5 at or above c5; sign of x   (L1695-1710)
BalanceTierX(x):  sign(x) * (the highest k with |x| >= c_k, 0 if none)                                                    (L1713-1720)
                  # equal to the number of cuts reached only while the cuts are in rising order, as the defaults are
BalanceTier(bull, bear) = BalanceTierX((bull - bear) / (|bull| + |bear|)), 0 when both are 0                               (L1679-1690)
BalanceScore feeds FLOW. The tier functions color the panel rows only.
The four parts
Each part gives a raw value from -5 to +5 per update (L2279-2286).
| # | Part | Raw value | Data |
|---|---|---|---|
| 0 | aggression | BalanceScore((B - S) / (B + S + 20)). B and S are the ask volume and bid volume summed over the last N bars, the live bar included, N = "05 Panel | Aggression lookback (bars)" [10] (L2114-2119, L2281). The 20-contract floor keeps a lone small print from scoring 5. |
trades |
| 1 | passive book | BalanceScore((bid - ask) / (bid + ask)). bid and ask are the resting sizes on every live depth level within R * tick + tick/2 of the close, R = "05 Panel | Book range (ticks)" [10] (L2160-2176, L2282). 0 when the chart has no depth levels. |
live depth |
| 2 | stacked / pulled | `BalanceScore((sb - sa) / ( | sb |
| 3 | nearest level | bull.value - bear.value (L2286), from the levels below. Not passed through BalanceScore. Range -5..+5. |
depth for walls; absorption levels need depth only for confirmation |
Stacked / pulled has two sources, chosen by "05 Panel | Use computed stacked / pulled" [No]
(L831):
- No: sb and sa are Sierra's own
GetBid/AskMarketDepthStackPullSumtotals since the feed connected (L2179-2180). With No, the stacked / pulled weight is forced to 0 (L832-833), so the part is shown on the panel but does not count. - Yes:
UpdateStackPull(L1749-1887) computes them. At each update it reads the whole live book and the volume at price of the bars since the last update. The bid range runs from the higher of the two samples' lowest bids (or close - R, if higher) to the higher of the two best bids (or close + R, if lower) (L1862-1863). For every price in that range that is not an ask level in either sample, it addsbid size now - bid size before + bid-side volume traded there since the last sample, where a missing level counts as size 0 (L1856-1867). So a bid present in only one sample counts in full: a bid pulled entirely adds-size, a new bid adds+size, and a filled one adds about 0. A refilled iceberg counts as stacking. The asks are the mirror, skipping any price that was a bid level in either sample (L1868-1875). An update adds an event to the window only when its bid or ask net is nonzero (L1876). Each update's net is stored with itsMarketMstime, and sb and sa are the sums over the last "05 Panel | Stacked / pulled window (seconds)" [3; 0 or less reads as 3,L751-753] of market time. The sums clear when the book or the volume at price is missing, when the chart's Volume At Price multiplier is above 1 (the panel then says "VAP mult 1"), when market time goes back, and when the bar index goes back or jumps more than 120 bars (L1759-1805).
The nearest level part (L2199-2250, L2286) takes candidate levels from three sources:
- Every resting wall with
barsPresent >="03 Walls | Bars present to draw a resting wall" [3]. These count only while "04 Display | Show resting walls" [Yes] is on (L2223-2241). Tier =WallTier(current size, the wall's threshold when it appeared). - Every live breakthrough level, only while "04 Display | Show breakthroughs" [No] is on.
Tier =
WallTier(shown, the current wall threshold)(L2246-2247). - Every live absorption level, only while "04 Display | Show absorption" [Yes] is on.
Tier =
WallTier(traded, the current market-order threshold)(L2248-2249).
WallTier(size, thr) is 1 plus the number of "07 Tiers | Tier 2..5 starts at (x threshold)"
cuts [1.25, 1.6, 2.4, 4.5] that size / thr reaches (L943-951). A bid wall or a level with
side +1 is support and counts only when it is at or below the close plus half a tick.
Resistance is the mirror (L2207-2208). Each level is worth
tier * max(0, 1 - distance_ticks / T), T = "08 Meter | Level taper (ticks)" [10]
(L2210). Each side keeps its highest value (higher by more than 1e-9). On a tie it switches
to another level only when that level is nearer by more than half a tick (L2211-2212).
When the threshold is 0 or less, WallTier uses a ratio of 1.0 (L945). That gives tier 1
while "Tier 2 starts at" is above 1.0, and tier 2 or more if a cut is set to its allowed
minimum of 1.0 (L947-949, L4458-4459). The current market-order and wall thresholds stay 0
until their rolling quantiles are ready (L1023-1024). Until then every breakthrough and
absorption level counts at that ratio-1.0 tier in the level part.
The walls and levels change only when a bar closes. ProcessBar sets a wall's current size
(L1171, L1261), and the two thresholds come from the last processed closed bar (L1023-1024).
Within a bar, only each level's distance to the live close moves the level part.
So the three "04 Display" switches change FLOW, and through FLOW they change COMBO and the entries.
Smoothing, weights and the score
Smoothing taus: "08 Meter | Smoothing, aggression (seconds)" [0], "Smoothing, passive book"
[8], "Smoothing, stacked / pulled" [4]. The level part has a fixed tau of 0 (L2588).
Weights: "08 Meter | Weight, aggression / passive book / stacked / pulled / nearest level"
[1 each], negative read as 0 (L2639).
dt = MarketMs now - MarketMs at the last update, seconds      # 0 on the first update (L2599)
for each part k:                                              (L2600-2607)
    compRaw[k] = raw[k]
    comp[k] = raw[k]                       if first update or tau[k] <= 0
    comp[k] += (1 - exp(-dt / tau[k])) * (raw[k] - comp[k])   otherwise
if no depth levels: comp[book] = comp[stack] = 0              (L2608-2609)
wSum = sum of all four weights            # the book and stack weights count even with no depth (L2636-2645)
smoothBase = 4 * sum(w[k] * comp[k]) / wSum       # -20..+20; 4 = 20 / 5 (L2656)
rawBase    = 4 * sum(w[k] * compRaw[k]) / wSum    # the unsmoothed "white bar" (L2657)
If market time goes back (a replay restarted), lastMs is set to now, so dt is 0 and the
smoothing holds (L2593-2598).
Speed of tape and the amplifier (L1892-1947, L2127-2146, L2658-2667)
UpdateTape stores, per update with new volume, the ask and bid volume added since the last
update (whole bars for bars started since then), stamped with MarketMs. It keeps events for
"05 Panel | Speed of tape baseline (seconds)" [300]. Its history restarts on the first update,
when the bar index goes back or jumps more than 120 bars, and when market time goes back
(L1908-1912). covered is the market time since that restart. "05 Panel | Speed of tape window
(seconds)" [10] is the window; 0 or less reads as 10, and a baseline not longer than the window
becomes max(300, 6 * window) (L827-830).
winVol    = ask + bid volume of the events within the last `window` s     (L2134-2138)
winSec    = max(1, min(window, covered))
baseSec   = min(baseline, covered)
needSec   = max(2 * window, min(baseline, 60))                            # 60 s at the defaults
basePace  = baseSum / baseSec  if baseSec >= needSec  else 0              # baseSum includes the window
ratio     = (winVol / winSec) / basePace  if basePace > 0  else 0         # 0 = "--", still filling
amp = min(2, 1 + max(0, strength) * (ratio - 1))  if "Speed of tape amplifies the meter" and ratio > 1  else 1
f   = smooth = clip(smoothBase * amp, -20, +20)                           (L2666)
raw = clip(rawBase * amp, -20, +20)                                       (L2667)
"08 Meter | Speed of tape amplifies the meter" [Yes], "08 Meter | Speed amplifier strength" [1.5]. At strength 1.5 the cap of 2 is reached at a ratio of 1.67.
m.smooth is FLOW. COMBO uses it (L2753). It picks the meter's shown tier (L3109), it is the
"+n / 20" text under the meter (L4219-4221), and it is the flow_score column of the trade
log (L5088). The meter log does not hold it. Its score_smooth and score_raw columns
are m.smoothBase and m.rawBase, taken before the speed amplifier (L5455-5457, L5466), and
amp is logged in its own column.
Warning for research. To rebuild COMBO from the meter log, use
f = clip(score_smooth * amp, -20, +20), not score_smooth. Using score_smooth directly
gives a FLOW that is too small whenever the tape runs faster than its baseline.
Display-only meter values
None of these feed COMBO or the entries.
- Reach (
L2875):min(20, 20 * reachable weight / wSum * amp), the largest |score| the inputs present can make. Without depth the book and stack weights are not reachable. - Shown tier with dead zone and hysteresis (
L3106-3134). "08 Meter | Dead zone (score)" [6]. The meter reads FLAT while|smoothBase|(unamplified) is below the dead zone. From FLAT it lightsceil(|smooth| / 4)blocks, 1 to 5. Once lit it moves up a block only 1 point past a boundary, down only 1 point below one, and goes FLAT when|smoothBase| < dead - 1. If the sign ofsmoothflips while lit, the shown tier resets to 0 and the from-FLAT rule applies on that same update (L3114-3115). - Average marker (
L2668-2693). "08 Meter | Average marker, seconds (0 = off)" [60]. The instant amplified scorem.rawis sampled once per 250 ms of market time (a slot with no update repeats the last value), in a ring of 2400 samples (600 s). Withwant = min(seconds * 4, 2400), the marker is the mean ofwantvalues in all: the current value plus the newestwant - 1samples (L2686-2691). - 10 s trend (
L3136-3153).smoothBaseis sampled every 0.5 s of market time into 64 slots. The trend issmoothBase nowminus the newest sample at least 10 s old. - Panel row tiers (
L2124,L2173,L2191,L3168-3182) and the speed of tape row coloring (L3184-3220), which uses "05 Panel | Speed of tape colors from (x normal)" [1.1] and the tier cuts. - The 4-row agreement flash (
L3222-3270). It lights when the aggression, book and stack row tiers share a sign and the level part is at least 1 that way. The condition must hold 2 s of wall clock to start, and the flash ends 2 s after it breaks. It blinks everymax(400, chart update interval)ms. - The STALE signature (
L2612-2635): the live bar's volume and the inside bid and ask price and size.lastDataMs(wall clock) moves when any of them changes.
3.8 COMBO (L2694-2874)
Modes
"99 Switches | COMBO column (price + flow)" has nine choices. L792-793 map them to a mode and
to which column is drawn big:
| Index | Choice | Mode | Big column |
|---|---|---|---|
| 0 | On, both must agree | 1 agree | COMBO |
| 1 | On, average of the two | 2 mean | COMBO |
| 2 | Off | 0 off | |
| 3 | On, both must agree, flow meter big | 1 agree | FLOW |
| 4 | On, average of the two, flow meter big | 2 mean | FLOW |
| 5 | On, flow against price | 3 against | COMBO |
| 6 | On, flow against price, flow meter big | 3 against | FLOW |
| 7 (default, b31) | On, exhaustion (fade price + flow at a fresh 1-min high / low) | 4 exhaustion | COMBO |
| 8 | On, exhaustion, flow meter big | 4 exhaustion | FLOW |
The mode is forced to 0 when the price column is off (L2699). COMBO is computed only when the
mode is not 0 and PRICE is ready (L2751). Otherwise coReady is false and the auto trade and
the logs treat COMBO as 0 (L5024, L5469).
With p = PRICE (m.pxScore) and f = FLOW (m.smooth), both -20..+20 (L2753):
mode 1, agree (L2755-2759):
    v = sign(p) * sqrt(|p| * |f|)    if p and f are both > 0 or both < 0;   else 0
mode 2, mean (L2778-2779):
    v = (p + f) / 2
mode 3, flow against price (L2770-2777):
    v = sign(f) * sqrt(|p| * |f|)    if p and f have opposite signs;        else 0
mode 4, exhaustion (L2760-2769):
    v = -sqrt(p * f)                 if p > 0 and f > 0 and freshHi        # red
    v = +sqrt(p * f)                 if p < 0 and f < 0 and freshLo        # green
    v = 0                            otherwise
A positive v lights green boxes and a negative v red ones. "99 Trading | Direction" decides
what a color trades: Continuation [default] buys green and sells red, Reversion does the
opposite. What that means per mode:
- Agree: green is price and flow both up. Continuation buys the push.
- Mean: the sign of the average. Continuation buys when the average leans up.
- Flow against price: the color follows FLOW. Price up into selling flow is red, so Continuation sells it (trades with the flow, against the price).
- Exhaustion: the color is the fade side. A push up into a fresh 1-minute high is red, so Continuation sells it.
Both inputs are on the same 20-point scale, so |v| <= 20 in every mode.
The meter log has no fresh-high or fresh-low column. In exhaustion mode v therefore cannot be
rebuilt from the logged PRICE and FLOW; only the logged co_val gives it.
The COMBO window ring (L2781-2811)
Every scale fills this ring, but only Ranked and Relative read it. A slot is 250 ms of
tradeMs (kCoSlotMs, L473). The ring holds kCoRing = 14400 slots, 60 minutes (L474).
if no slot yet, or slot < lastSlot, or the mode changed: clear the ring     (L2787-2792)
gap = slot - lastSlot
push `last |v|` gap times if gap <= 40 (10 s), else once                    (L2797-2804)
last |v| = |v| of this update                                               (L2806)
want = min(window * 4, 14400)                                               (L2807)
Each stored value is the |v| of the last update in its slot. The window is "00 Rubberband |
COMBO window (minutes)" [60], clamped to 5..60 and turned into seconds at L798. Changing the
scale does not clear the ring. Changing the mode does.
Scales
"00 Rubberband | COMBO scale" has three choices: "Ranked against its recent readings" (0),
"Fixed, like PRICE and FLOW" (1, the default since b38), "Relative to its own recent average"
(2) (L794-796, L4610-4612). Each scale sets coScore (-20..+20), coTier (signed lit boxes,
-10..+10) and coReady. The box count the auto trade uses is |coTier|.
Fixed (L2849-2858). Ready as soon as PRICE is ready.
coScore = clip(v, -20, +20)
lit     = min(10, floor(|coScore| / 2 + 1e-9))       # 2 points a box
coAvg = coZ = 0
| Box | Needs |v| | Needs |p * f| (agree, against, exhaustion) |
|---|---|---|
| 8 | 16 | 256 |
| 9 | 18 | 324 |
| 10 | 20 | 400, so both at 20 |
In the mean mode box 8 needs |p + f| >= 32.
Ranked (L2812-2848):
a = |v|
ge = 1 + count(stored values >= a - 1e-9)  # over the newest want-1 stored values (L2818-2824)
total = 1 + count(stored values)
if a seed exists and total < want:        # top up from the logs (L2825-2835)
    w = (want - total) / len(seed)
    ge += w * count(seed values >= a - 1e-6);  total += w * len(seed)
ready when total >= min(want, 240)        # 240 slots = 60 s (L2836)
tail = min(1, ge / total)
bc = 2 * (1 - tail)                              if tail >= 0.5
bc = 1 + 9 * ln(tail / 0.5) / ln(0.01)           otherwise;     bc = clip(bc, 0, 10)
coScore = sign(v) * 2 * bc;   lit = min(10, floor(bc));   coAvg = coZ = tail
Box k lights at tail <= 0.5 * 0.01^((k-1)/9): box 1 at the top 50%, box 5 at about the
top 6.5%, box 8 at the top 1.39%, box 10 at the top 0.5%.
The seed (L2703-2748) is read once per COMBO mode, and only while the scale is Ranked. It is
re-read when the mode changes. It reads OFBL_logs\RB1_meter_<symbol>.csv (Rubberband V1's
log) and then OFBL_logs\RB2_meter_<symbol>.csv (V2's own), through RbLogPath (L2066-2078).
A row counts when all of these hold:
- it has at least 26 fields;
- its build column starts with "RB1.b" (in the RB1 file) or "RB2.b" (in the RB2 file), with a build number of 3 or more;
- its
co_mode(column 26) equals the current mode, where rows without that column count as mode 1; co_valandco_avgare not both 0, because those rows were logged while COMBO was filling.
The seed is |co_val| (column 22) of the last 6000 such rows of the two files together, RB1
rows first. Once V2's log has 6000 rows in the mode, V1's rows drop out.
The seed and the live window sample at different rates. The meter log writes at most one
row per update, for the newest closed bar (the live-bar gate at L5431-5432), so about one row
per 3 s bar on Beej's chart, with duplicates possible after a reset. The live ring holds one
value per 250 ms slot. With a seed present, the top-up raises total to want, so Ranked is
ready on the first update after the seed is read (L2826-2836).
The seed is biased when the logs come from the Fixed scale. Fixed always sets coAvg = 0
(L2852), and the log writes co_avg whenever COMBO is ready (L5469). Every Fixed-scale row
with v = 0 therefore has co_val = 0 and co_avg = 0, and L2737 drops it as a "filling"
row. Ranked and Relative rows keep their zeros, because their co_avg is the tail share or an
average of at least 4. A seed built from Fixed-era rows holds only nonzero readings. That
raises the tail share of any |v|, so a Ranked chart topped up from such a seed lights fewer
boxes for the same reading until its own live window fills. Beej's chart has run Fixed since
about 20:16 ET on 2026-10-11, so his newest RB2 rows have this bias.
Relative (L2859-2872). Ready when the current value plus the stored values used reach
min(want, 240).
coAvg   = max(mean of |v| over the current value and the newest want-1 stored values, 4)
coZ     = v / coAvg
coScore = clip(20 * coZ / 3, -20, +20)        # 3 = coFull, hard-set at L799
lit     = min(10, floor(|coScore| / 2 + 1e-9))   # box 10 at |v| >= 3 x the average
The full-scale value of 3 averages is fixed. Its input went to the auto trade box step in
b11 (L799). The floor of 4 keeps a quiet stretch from lighting small readings.
3.9 The b33 exhaustion entry filter readings (L2404-2489)
The readings are computed on every update while the price column is on, in every COMBO mode.
The auto trade consults the result only when the mode is exhaustion (L5286). There it blocks
the next box while the filter fails, and the box is taken on a later update if the filter
passes while the box is still lit (L5325-5331).
Inputs: "99 Trading | Exhaustion entry filter" [Off], choices "Off; Effort against result;
Slowing delta; Absorption at the high; Pace turning down" (L4487-4489, clamped 0..4 at L823);
"99 Trading | Exhaustion entry filter setting" [0 = the filter's default] (L824, L4556).
Windows, in 250 ms slots (L2414-2418):
E      = max(4, wSlots - 4)                   # "earlier": 16 slots (4 s) at the 5 s price window
late   = the current slot so far + ring(0..2) # "the last second"
early  = ring(3 .. 3+E-1)
needs stored slots >= E + 4 (20 at the default) and a nonzero push
startPx = ring(3+E).px;   midPx = ring(3).px
d = sign(close - startPx)                      # push direction; no readings when 0
lateSec  = (750 + clamp(elapsedMs, 1, 250)) / 1000
earlySec = E * 0.25
push-side volume = ask volume (buying) for d = +1, bid volume (selling) for d = -1
peakDelta = max over every 4-slot window inside early of d * (buy - sell)     # contracts per second
peakVol   = max over the same windows of (buy + sell)
The four readings (L2452-2467):
effort  = (pushLate / max(1, d*(close - midPx)/tick)) / (pushEarly / max(1, d*(midPx - startPx)/tick))
          # 99 if the earlier effort is 0 and the late one is not; 0 if both are 0
delta   = (d * (lateBuy - lateSell) / lateSec) / peakDelta        # 99 if peakDelta <= 0
absVol  = (pushLate / lateSec) / (pushEarly / earlySec)           # 99 or 0 if the earlier rate is 0
absTicks = max(0, (lateHi - earlyHi) / tick) for d = +1;  max(0, (earlyLo - lateLo) / tick) for d = -1
pace    = ((lateBuy + lateSell) / lateSec) / peakVol              # 99 if peakVol is 0
Pass rules (L2474-2488). k is the setting, or the default when the setting is 0.
| Choice | Passes when | Default k |
|---|---|---|
| Off | always | |
| Effort against result | effort >= k | 1.5 |
| Slowing delta | delta <= k | 0.7 |
| Absorption at the high | absVol >= k and absTicks <= "00 Rubberband | Level holds within (ticks)" [2] | 1.0 |
| Pace turning down | pace <= k | 0.7 |
With the filter on and no readings yet (too few slots, or no push), the filter fails
(L2479-2480). The readings, pass or fail, go on every entry and FILTER line of the trade log
(L5288-5292).
3.10 ABSORB, HELD and BROKE (L2881-3104)
This is the state box under the PRICE column. It feeds no entry. It feeds the panel, the
absorption price lines and the abs_state and abs_price columns of the meter log (L5468).
Enabled when "99 Switches | Price meter column" [Yes] and "99 Switches | ABSORB state
(pressure without price)" [Yes] are both on (L2888). Several of its settings are hard-set,
because their inputs were reused by later builds (L770-786):
| Setting | Value | Source |
|---|---|---|
| ABSORB aggression tier | input "00 Rubberband | ABSORB aggression (tier)" [3], at least 0.5 | L778 |
| HELD tier | input "00 Rubberband | HELD when aggression falls to (tier)" [1] | L781 |
| hold ticks | input "00 Rubberband | Level holds within (ticks)" [2], 0..50 | L776 |
| resolve to HELD / BROKE | input "99 Switches | HELD / BROKE" [Yes] | L772 |
| range limit | 1.0 typical moves, fixed | L779 |
| bars in a row | 2, fixed | L780 |
| aggression must at least match the smoothed book part | yes, fixed | L775 |
| HELD / BROKE shown for | 30 s of market time, fixed | L783 |
| ABSORB gives up after | 120 s of market time, fixed | L784 |
| alert sounds | none (alert numbers 0) | L785-786 |
| BROKE distance | 0 ticks in effect (see below) | L777, L782 |
The condition, checked on every update (L2900-2916). agg is the raw aggression part, -5..+5,
unsmoothed and unamplified. The window is the last N bars, N = the aggression lookback [10].
cond is false unless ABSORB is enabled, PRICE is ready and the chart has at least N bars
(L2904).
cond = |agg| >= ABSORB tier
       and sign(pxTier) != sign(agg)           # PRICE flat (tier 0) or leaning against the aggressors
       and window high - low <= 1.0 * typ + tick/4
       and |agg| >= |comp[book]|
Switching ABSORB off (or the price column off) ends any open line and resets the state
(L2978-2983).
ABSORB lights when cond has held without a break from a candidate bar through the next bar,
so across 2 bars (L2917-2929). The candidate bar restarts at the current bar when the sign of
the aggression flips, even while cond holds (L2921-2925). After a HELD or BROKE, or a line ending, rearm blocks a new
light until cond goes false once (L2917-2918, L2941).
When it lights (L3042-3095):
- The side is the aggressors': buyers when
agg >= 0. - The absorption price is the price with the most aggressor volume over the window: ask
volume for buyers, bid volume for sellers, from volume at price. On a tie the price nearer
the close wins. With no aggressor volume in the window, the price is the close's tick
(
L3063), and the tie rule applies only once some volume has been found (L3066). - The ratio is that volume divided by the largest size the book showed on the passive side at that price in the window, from the depth bars. It is 0 without depth.
- A line record starts.
While ABSORB is lit (L2984-3019) the study tracks the high and low since the lit moment. On the
lit bar it counts only from the close at lighting; later bars count in full (L2956-2971).
Closed bars are read from lightBar + 1 on (L2958), so once the lit bar has closed, a high or
low it printed between two updates is never seen.
- BROKE is checked first. For buyers it fires at `high >= (absorption tick + brokeTicks) * tick
- tick/4`, and for sellers at the mirror.
- HELD fires when
|agg| <= HELD tierand the close is no more than the hold ticks past the absorption price (L2989-2990). - With "HELD / BROKE" off, ABSORB clears as soon as
condfails. - After 120 s with neither, it clears.
A HELD can still turn BROKE. HELD and BROKE show for 30 s and then clear (L3020-3040). Once
cond has lapsed and rearm is cleared, a new ABSORB can light while HELD or BROKE still
shows. It replaces that state and closes its line before the 30 s are up (L3042-3045). If
market time goes back or the bar index drops below the lit or candidate bar, the state resets
and open lines are closed as expired (L2889-2899).
BROKE fires at the absorption price itself. L777 sets brokeTicks = absHoldTicks + 1, but
L782 then sets it to 0, so the BROKE test is "a trade at or past the absorption price", less a
quarter-tick tolerance. A buyer absorption whose close at lighting is at or above the
absorption price turns BROKE on the next update. The input text for "Level holds within
(ticks)" ("BROKE needs a trade one tick beyond it (3 ticks past at the default 2)") does not
match the code. V1 has the same two lines (RubberbandV1.cpp L752 and L757). The defect
reaches the display and the meter log's abs_state column (L5468). It does not reach the
entries.
3.11 What leaves BuildPanel, and who reads it
Field (st.meter) |
Meaning | Read by |
|---|---|---|
coReady, coTier |
COMBO ready, and signed lit boxes | auto trade (L5024, L5028); meter log (L5469) |
coScore |
COMBO on -20..+20 | COMBO history subgraphs, as coScore / 2 boxes (L4920); trade log row (L5088); Sierra's message log line (L5060-5063); meter log |
coVal, coAvg, coOn |
raw v; tail (Ranked) or average (Relative) or 0 (Fixed); mode | meter log co_val, co_avg, co_mode (L5469). All three, with co_score and co_tier, are written as 0 whenever COMBO is not ready, so co_mode 0 means "not ready" as well as "off". |
exPass, exHave, exEffort, exDelta, exAbsVol, exAbsTicks, exPace |
filter result and readings | auto trade (L5286-5292, L5327) |
pxScore |
PRICE on -20..+20 | trade log (L5088); meter log px_score |
pxReady, pxMove, pxTyp, pxTier, pxSec, pxWeight |
PRICE ready, move, typical move, tier, window, weight | meter log only (L5467-5468). px_move, px_typ, px_score and px_tier are written as 0 when PRICE is not ready. px_bars holds pxSec, seconds, not bars. |
smooth |
FLOW, amplified and clipped, as COMBO uses it | trade log flow_score (L5088) only |
smoothBase, rawBase, amp, tapeRatio, comp[0..3] |
FLOW before the amplifier, the amplifier, the tape ratio, the four smoothed parts | meter log score_smooth, score_raw, amp, tape_ratio, agg..level (L5465-5466) |
absState, absPrice |
ABSORB state and price | meter log (L5468), with abs_price 0 when abs_state is 0; panel |
shownTier |
the meter's lit blocks: amplified, with the dead zone and hysteresis (L3106-3134) |
meter drawing; meter log tier column (header L5450, value L5466) |
everything else (reach, avg, trend, row tiers, flash, lastDataMs) |
display | the panel and meter drawing only |
Entries depend on coReady, coTier and, in exhaustion mode with the filter on, exPass.
Through them they depend on PRICE, the fresh high and low, FLOW and every input those read,
including the three "04 Display" switches through the level part.
Corrections to earlier docs
- signal_spec.md section 8 says absorption passes "only if the extreme gained 2 ticks or
fewer". The limit is the input "00 Rubberband | Level holds within (ticks)" (
L2486), which defaults to 2. - signal_spec.md section 6 lists the nearest-level sources as walls and absorption levels.
Breakthrough levels count too when "04 Display | Show breakthroughs" is on (
L2246-2247), and each source counts only while its "04 Display" switch is on (L2223,L2246,L2248). Those display switches therefore change FLOW and the entries. - signal_spec.md section 6 gives the tape window as
min(10, covered). The code usesmax(1, min(window, covered))(L2140), and the baseline needsmax(2 * window, min(baseline, 60))seconds of coverage (L2142), which is 60 s at the defaults. - signal_spec.md section 2 does not say that the first update adds no volume (
L2336) or that only the last 51 bars are scanned (L2319). - The input description of "00 Rubberband | Level holds within (ticks)" says BROKE needs a
trade past the hold zone. In the code BROKE fires at the absorption price itself, because
L782overwritesL777(section 3.10). V1 has the same bug. - The source comment at
L2646says PRICE counts as a fifth FLOW input when its weight is above 0. In V2 that weight is hard-set to 0 (L768), so it never does. (The input text of "99 Switches | Price meter column",L4560, says only that the column describes price, which is right.) - The source comment at
L1857says the bid range starts at "the deeper of the two lowest levels". The code takes the higher of the two lowest bids (std::max,L1862), so the range starts at the shallower one. - signal_spec.md section 6 checks
score_smooth = 4/3 (agg + book + level)and section 10 rebuilds f as4/3 x agg x amp, which is right. Anyone reading the meter log'sscore_smoothas the f that COMBO used is wrong by the factoramp, up to 2x (L5466againstL2666). - The meter log column
px_barsholdsm.pxSec, the price window in seconds, not bars (L5467). State::ResetCalcdoes not clear the PRICE rings, the COMBO window, the tape, the stacked / pulled window or the smoothing (L622-641). A recalculation keeps them. Earlier docs do not say this.
4. What the panel shows
Source: source/RubberbandV2.cpp, build RB2.b39.
Lnnnn is a line in that file. This section covers the display. The math behind PRICE, FLOW and
COMBO is in section 3.
How it is drawn
The study draws two things with Windows GDI: the order flow table and the meter group (flow
meter, PRICE column, COMBO column, position counter). The study function fills two structures on
every update, st.panel (a Table) and st.meter (a MeterView), in BuildPanel (L2080,
called at L4845). Sierra then calls DrawFlowPanel (registered at L4748), which draws the table
first and the meter second (L4301-4310). DrawFlowPanel draws nothing when the state object
belongs to another build (L4304).
Two inputs switch the two parts:
- "05 Panel | Show order flow panel" (default Yes,
L4404-4405) switches the table. - "05 Panel | Show bias meter" (default Yes,
L4490-4491) switches the whole meter group, not only the flow meter.m.visible = s.meterOn(L3155), andDrawMeterreturns at once when it is false (L3704). With it at No, the flow meter, PRICE, COMBO, the auto trade footer lines and the position counter all disappear.
Every "shown when" below for a part of the meter group assumes "Show bias meter" is Yes.
BuildPanel returns at once when both inputs are No (L2085). The study runs on every chart update
even without new data, because sc.UpdateAlways = 1 (L4671, L4761). That is what lets STALE
appear when the feed stops.
Display switches that change trading
The auto trade block (L4967-5397) runs on every update after BuildPanel and reads the COMBO
reading that BuildPanel left in st.meter (m.coReady, m.coTier, m.exPass; L5024-5028).
It never reads either display switch. The meter switch alone does not change trading (row 1).
Two settings do: the panel and meter both off (row 2), and the price column or COMBO off (row 3).
| Setting | Drawn | Auto trade |
|---|---|---|
| "Show bias meter" No, "Show order flow panel" Yes | no meter group | Trades as normal. BuildPanel still computes every reading (L2085 does not return), so entries, the box exit and the breakeven exit run with nothing on screen to show them. |
| "Show bias meter" No and "Show order flow panel" No | nothing | Keeps trading on a frozen reading. BuildPanel returns at L2085 before any reading is computed (L2279-3270), so coReady, coTier, exPass and pxReady keep the values from the last update before both were switched off. The trade block still runs on them (L5024, L5028): it can enter, exit and arm on that snapshot, and the per-side box counts and arming (L5037-5052) follow the old reading too. |
| "99 Switches | Price meter column" No, or "COMBO column" Off | no PRICE and no COMBO | No auto entries or exits at all, Exits only choices included. m.coOn is 0 (L2699), so coReady is set false on every update (L2750-2751), live is false (L5028), and the entries (L5304), the box exit (L5134) and the breakeven exit (L5177) all need live. The BE CLEANUP cancel still runs, because it is not gated by live: once the position is flat after a breakeven limit was placed earlier, the study cancels all the symbol's working orders and logs BE CLEANUP (L5160, L5165-5168). |
The entry sounds (L4988-5000) and the position read for the counter do not depend on any of these
switches.
The MeterView object is not reset by a recalculation (comment at L365-366), so the meter keeps
its last reading through a full recalculation. The table is reset: a recalculation from scratch
runs ResetCalc, which sets panel = Table() (L639, called from resetAll, L4765-4780), and
BuildPanel then fills it again.
When the chart has no Volume At Price data (sc.VolumeAtPriceForBars == nullptr), the study
returns before BuildPanel (L4782-4783). The meter keeps whatever it held last. The table keeps
its content only on an update that did not reset. A reset (L4779-4780) runs before that check, so
on a recalculation the table is emptied and then not rebuilt, and nothing is drawn for it
(RenderTable returns at L3332).
The order flow table
Layout
The table has 4 columns and 6 rows (L2093). It would have 9 rows with diagnostics on, but V2
forces s.panelDiag = false (L733), because b33 gave that input slot to the exhaustion entry
filter. The three diagnostic rows (L3272-3306: "Levels live / stored", "Depth data", "Size
thresholds now", and the draw time) therefore never show in V2.
The columns are logically label, BUY / BID, SELL / ASK, NET (L2096-2099). On screen they are
drawn in the order label, BUY / BID, NET, SELL / ASK, so the net sits between the two sides it
sums (L3387-3393). The three value columns share one width, the widest of the three (L3379-3383).
The label column is left aligned, value cells are centered (L3480).
The font is Arial at "05 Panel | Panel text size": Small 8, Normal 10, Large 12 points
(SizeToPts, L184; input L4408, default Small). Row height is the text height plus 2 pixels of
padding top and bottom, and cells have 5 pixels of side padding (L3342-3344). A cell can hold
several lines split on \n (L3312, L3359).
The table sits in the corner set by "05 Panel | Panel position" (Top Right, Bottom Right, Top
Left, Bottom Left; default Top Right, L4406-4407), 6 pixels from the chart region's edges, and
never over the price scale (L3408-3420). Its background is RGB(18, 23, 30), the header row is
RGB(34, 43, 56), and grid lines are RGB(45, 52, 62) (L3428-3439, L3488-3506).
Rows
| Row | Label (column 0) | BUY / BID | SELL / ASK | NET | Fill tier from |
|---|---|---|---|---|---|
| 0 | ORDER FLOW |
BUY / BID |
SELL / ASK |
NET |
none (header) |
| 1 | Aggressive, last N bars (N = "05 Panel | Aggression lookback (bars)", default 10) |
ask volume summed over the last N bars, live bar included | bid volume summed the same way | buy minus sell | BalanceTierX((buy - sell) / (buy + sell + 20)) (L2114-2125) |
| 2 | Passive book, N ticks (N = "05 Panel | Book range (ticks)", default 10) |
resting bid size within N ticks plus half a tick of the last price | resting ask size the same way | bid minus ask | BalanceTier(bid, ask) (L2152-2176) |
| 3 | Stacked + / pulled -, last N s when "Use computed stacked / pulled" is Yes, else Stacked + / pulled - (Sierra, since connect) |
bid stacking (+) or pulling (-) | ask stacking or pulling | bid minus ask | BalanceTierX((bidSP - askSP) / (abs(bidSP) + abs(askSP) + bid + ask + 1)) (L2153-2194) |
| 4 | Price vs strongest level, or Price vs level (DEPTH GAP) when the last processed bar had no depth |
support value below price, %.1f |
resistance value above price, %.1f |
support minus resistance, %+.1f, or 0.0 when under 0.05 |
max(1, min(5, floor(abs(net)))) when abs(net) >= 0.05 (L2256-2266, L3168-3182) |
| 5 | Speed of tape, N s (N = "05 Panel | Speed of tape window (seconds)", default 10) |
contracts per second bought at the ask, %.1f/s |
contracts per second sold at the bid, %.1f/s |
total pace against the baseline, %.1fx, or -- |
pace tiers, see below (L3184-3220) |
All numbers in rows 1-3 are whole contracts, printed %.0f (FmtQty, L661-666; used at
L2121-2123, L2170-2172, L2187-2189).
Row-specific text:
- Row 2 shows
no live bookin the BUY / BID cell when the chart has no depth levels at all (L2196-2197). Row 3 then stays empty apart from its label. - Row 3 shows
VAP mult 1in the BUY / BID cell when the computed stacked / pulled mode is on but the chart's Volume At Price multiplier is not 1 (L2181-2182). The row still gets its tier fill in that case, becausemark(3, stackTier)runs either way (L2191-2194). - Row 3 sets each number's text color by what it means for price. Bids stacking and asks pulling
are green; bids pulling and asks stacking are red; zero is white (
L2185-2189). The green and red are tier 3 of the bid and ask tier colors (L2095). Row 3 is also filled by its tier like rows 1 and 2 (mark(3, stackTier),L2194). On a filled cell the contrast rule replaces the text color (L3471-3472), so the meaning color shows only in the side cell that is not filled. - Row 4 shows the numbers only. A
describehelper that would name the level ("bid wall 21050.25 T3 (4t)") is built but never used (L2251-2259). The value cells are white when the side has a level with value above 0, else silver (L2264-2265). - Row 5 shows
--in NET when the tape ratio is 0 (L3195,L3218-3219). That happens while the baseline is still filling, and also when the baseline window holds no volume, because a base pace of 0 leaves the ratio at 0 (L2143-2145).
Fill colors
A row with a nonzero tier fills the winning side's cell and the NET cell with the tier color
(mark, L2103-2112). A positive tier fills BUY / BID with the bid tier color; a negative tier
fills SELL / ASK with the ask tier color. The colors are the ten "07 Tiers | Bid wall tier 1-5"
and "Ask wall tier 1-5" inputs (L4467-4476, TierColor L965-968). The same ten colors drive the
meter blocks.
The balance tiers for rows 1-3 come from the five "05 Panel | Balance for tier 1-5" cut-offs,
defaults 0.05, 0.12, 0.20, 0.33, 0.50 (L4480-4484). The tier is the highest cut-off that the
absolute balance reaches; below the first cut-off the row is not filled (BalanceTier L1679-1690,
BalanceTierX L1713-1720).
Row 5 uses its own scale (L3195-3217). Below "05 Panel | Speed of tape colors from (x normal)"
(default 1.1, L4527-4528) it has no fill. From that pace it is tier 1. Tier k + 1 (k = 1 to 4)
starts at the larger of "07 Tiers | Tier k+1 starts at" (defaults 1.25, 1.6, 2.4, 4.5) and the
colors-from pace (L3207). The faster side's cell and the NET cell fill green when more is bought
than sold, red when more is sold. Equal buying and selling leaves it unfilled.
Text on a filled cell is dark RGB(14, 18, 24) or white, whichever has the higher WCAG contrast
against the fill (InkFor and RelLum, L3603-3621, used at L3471-3472). Table::SetBg also picks
a text color by a simpler luminance rule (L351-352), but RenderTable overrides it for every filled
cell, so that rule has no visible effect.
The flash
When all four rows lean the same way, the filled cells blink (L3222-3270). The condition is:
- the aggression, passive book and stacked / pulled tiers (rows 1-3) are all above 0, and the level row's net is +1.0 or more; or
- all three are below 0 and the level net is -1.0 or less.
The condition must hold 2 seconds of wall-clock time before the blink starts, and the blink goes
on 2 seconds after the condition breaks. Each half of the blink lasts the larger of 400 ms and
the chart update interval (L3260). In the off half the fills disappear and filled-cell text turns
white (L3454, L3471-3472).
Rows 2 and 3 need depth, so a chart with no live book never flashes. Row 3's tier counts toward the flash even when the stacked / pulled weight is 0 in the meter.
The meter group
Everything in this part needs "05 Panel | Show bias meter" at Yes (L3155, L3704).
Layout and position
The group has up to four parts. From left to right in the default layout: COMBO, PRICE, FLOW.
The position counter sits under COMBO. Every size in the flow meter derives from its width
(MeterLayoutFor, L3632-3691).
Inputs that place and size it:
- "05 Panel | Meter position" (
L4537-4539). "Right edge, centered" (default) puts the slot's right edge "Meter distance from right edge (pixels)" (default 285,L4543-4544) plus 6 pixels left of the price scale, and centers the group vertically (L3773-3782). "Beside panel" puts the slot next to the table, on the side away from the corner, aligned with the table's top or bottom (L3783-3787). With "Beside panel" and the panel off, it goes 6 pixels inside the corner set by "Panel position" (L3788-3792). In the right corners that uses the region's right edge with no check for the price scale (L3790, unlikeL3776-3779), so it can sit over the scale. - "05 Panel | Meter width (pixels)", default 150, range 80-400 (
L4492-4494). This is the slot widthw. - "05 Panel | Meter height (pixels)", default 660, range 200-2000 (
L4495-4497). The meter never gets shorter than its content (L.need). It is capped at the region height less 12 pixels, unless the content alone is taller, in which case the content height wins:h = min(max(height, need), max(need, regionH - 12))(L3763-3765).
With the meter at the right edge and the table overlapping its columns (including the COMBO and
PRICE columns), the meter is limited vertically (L3719-3736). When the table's top is in the upper
half of the region, the meter uses the space below the table; otherwise it uses the space above
it. On a chart too short for the content, the width then shrinks (down to 80) in up to three
passes until the content fits (L3740-3747). The group is clamped inside the region, top first
(L3793).
"Panel text size" does not change the meter. m.fontPts is set (L3161) but DrawMeter never
reads it. All meter fonts are Arial, fitted by binary search so that the widest expected text fits
the column (FitFont, L3563-3594). The fits are cached per width and display scale (L3654-3673,
L3922-3944).
COMBO big or small comes from "99 Switches | COMBO column (price + flow)" (L4613-4615; mapping at
L789-793). Choices 0, 1, 5 and 7 ("On, both must agree", "On, average of the two", "On, flow
against price", "On, exhaustion ...", the last one the default) make COMBO big. Choices 3, 4, 6 and
8 ("... flow meter big") make it small. Choice 2 is Off.
- COMBO big, right edge or a right-corner table (
L3749-3754,L3797-3801,L3899-3904). The flow meter is drawn narrow,fw = max(80, round(80 x w / meterWidth))wide, at the right end of the slot (fx0 = x0 + w - fw,L3801). PRICE sits 6 pixels left of the flow meter (px0 = fx0 - 6 - pw), and COMBO,wwide, sits 6 pixels left of PRICE (coX = px0 - 6 - w,L3902-3903). COMBO is wholly left of the slot; it does not take the slot's place. - COMBO small (
L3905-3909). The flow meter fills the slot at full width; PRICE and COMBO sit left of it, each at the PRICE column width. - "Beside panel" with a left-corner table (
flowRight,L3795). The group starts at the slot's left edge and grows right. With COMBO big, COMBO fills the slot (coX = x0), then PRICE, then FLOW (L3801,L3902-3903). With COMBO small the order is FLOW, PRICE, COMBO, with room left for the average marker (L3907-3908).
The PRICE column width is max(40, round(80 x w / meterWidth)) (L3896). The 80 is fixed: V2 sets
s.pxWidth = 80 (L769) because b9 gave the old width input to the auto trade exit.
All columns share the flow meter's height and the vertical position of its blocks, so blocks and
zero lines line up across columns (L3886-3893, L3982-3989). Column background is RGB(18, 23, 30)
and each column has a 1-pixel RGB(45, 52, 62) outline (L3706, L3965, L4024).
Colors in the meter pass through dim(), which blends them 65% toward the background only while
STALE (L3710). Outside STALE, a color called "ask tier 4" below is the full "07 Tiers | Ask wall
tier 4" color (default RGB(254, 87, 59)).
The flow meter (FLOW)
Header (L3818-3841). The word is BULL, BEAR or FLAT, then the tier number 1-5, or - when
flat. BULL and BEAR and their number use the tier color; FLAT and - are silver
RGB(190, 194, 202), because the color stays silver at tier 0 (L3806-3812). Tier 1 and 2 colors are
lightened toward RGB(235, 235, 235) by 45% and 25% so the text stays readable (L3810-3811). A
triangle right of the number shows the 10-second trend when it is 1 point or more either way: apex
up for rising, down for falling, always silver (L3834-3840). The trend is the smoothed score before
the speed amplifier now minus its value at least 10 seconds ago, sampled every 0.5 s of market
time (L3136-3153).
Blocks (L3843-3869). Ten blocks: bull tiers 5 to 1 from the top, a gray zero line, then bear
tiers 1 to 5. A block is lit (filled in its tier color) when the displayed tier reaches it on that
side. Unlit blocks are outlines: 55% toward the block color when the meter can reach that block,
15% when it cannot (L3856-3860). A block of tier k is reachable when 4 x (k - 1) < reach, where
reach is 20 times the share of weight the available inputs carry, times the amplifier, capped at
20 (L2875). Without a live book, the book and stacked / pulled weights drop out of reach.
The displayed tier (L3106-3134) is the smoothed score with a dead zone and one point of
hysteresis:
- From flat, the meter lights only when the unamplified smoothed score reaches "08 Meter | Dead
zone (score)" (default 6,
L4498-4499). The tier is thenceil(|amplified| / 4), 1 to 5. - While lit, it moves up a tier only once the amplified score is 1 point past the boundary, and down a tier only once it is 1 point below it. It goes back to flat when the unamplified score falls below the dead zone minus 1.
- A change of sign resets the tier to 0, and the from-flat rule runs on the same update
(
L3114-3120). So when the unamplified score on the new side is already past the dead zone, the opposite side lights at once, with no FLAT frame between.
The amplifier can push the tier higher but never lights a flat meter, because the flat test uses
the unamplified score (L3110).
White bar (L3871-3884). A white bar with inward arrowheads marks the instant (unsmoothed,
amplified) score on the same -20..+20 scale, 4 points per block.
Average marker (L4190-4214). A triangle right of the flow meter points left at the average of the
white bar over the last "08 Meter | Average marker, seconds (0 = off)" (default 60, L4518-4519).
It averages one sample per 250 ms of market time (L2668-2693). It is green (bid tier 4) at +0.5 or
more, red (ask tier 4) at -0.5 or less, silver between. It is drawn twice, a background-colored
edge first, so it reads on any chart.
Score lines (L4216-4225). Under the blocks: +N / 20, the smoothed score after the speed
amplifier (m.smooth, L2666), rounded, with xA.A added when the amplifier is 1.05 or more (for
example +12 / 20 x1.6). The FLAT test uses the unamplified score, so a line such as
+8 / 20 x1.6 can sit under a FLAT header. Under that, in amber: NO BOOK when the chart has no
depth levels, else DEPTH GAP when the last processed bar had no depth, else nothing (L2876-2879;
the depth gap counter is at L1137 and L1162).
Chips (L4227-4283). Four chips, one per input: AGG, BOOK, S/P, LEVEL. A chip whose smoothed
component is 1 or more either way:
- fills bright green RGB(90, 214, 100) or red RGB(254, 87, 59) with a direction triangle, when its weight is above 0;
- is outlined in its direction color with the triangle, when its weight is 0. With "Use computed
stacked / pulled" at No (his setting),
S/Palways has weight 0 (L832-833).
A chip that does not lean is a gray outline with silver text (dimmer when weightless). BOOK and
S/P with no live book are near-invisible (L4239, L4278-4279).
STALE (L3707-3711, L3818-3827, L4285-4291). When neither the last bar's volume nor the inside bid
or ask price or size has changed for 5 seconds of wall-clock time (L2612-2635), the header shows
STALE in amber over --, the flow meter gets a 3-pixel amber border, and every flow meter color
is blended 65% toward the background. The STALE word and the border use full amber, not the
dimmed color (L3824, L4288-4290). STALE also shows when no data change has been recorded yet
(m.lastDataMs == 0, L3709): before the first BuildPanel, and on a chart without Volume At Price
data, where BuildPanel never runs (L4782-4783). The trend arrow is hidden. In a paused replay this shows after
5 seconds. Only the flow meter and the PRICE and COMBO columns use the dimming; the position
counter never dims (L4171-4172).
The PRICE column
Shown when "Show bias meter" and "99 Switches | Price meter column" are both Yes (both default;
L4559-4560; if (m.pxOn) at L3894).
Header and blocks (column, L3960-4026). The header is UP, DOWN or FLAT and the block
count, with - in place of the count at 0 blocks. While PRICE is not ready the word is -- in
gray and no count is drawn (L3978-3981). Five blocks a side, pixel-aligned with the flow meter's
blocks. Lit blocks: floor(|PRICE| / 4), capped at 5 (L2582-2583), so block 1 needs 4 points of
the -20..+20 reading and block 5 needs 20. With the default full scale of 5 typical moves, block k
lights at k typical moves. Unlit blocks are outlines at 55% (ready) or 15% (not ready) toward the
block color (L4004). A white bar with arrowheads marks the exact reading (L4009-4023). No white
bar is drawn while the column is not ready (L4009). The same holds for COMBO.
Footer, top to bottom (L4029-4087). Each text line is drawn only if it fits inside the column
(L4036-4038).
- The absorption box, when "99 Switches | ABSORB state" is Yes (default,
L4622-4623). See below. Unlike the text lines, the box has no fit check (L4044-4057), so on a short meter it can draw past the bottom of the column. - A line under the box: seconds since ABSORB lit (
12s, amber) during ABSORB; the absorption price in the chart's price format during HELD or BROKE; blank when idle (L4060-4068). The timer always shows, because V2 forcess.absTimer = true(L771). PRICE(silver).- The move in points,
%+.2f(for example+4.75), then its size in typical moves,x2.3 typ. While not ready:filling(gray) and a blank line (L4071-4082). - The window,
5 s("00 Rubberband | Price window (seconds)", default 5) (L4083-4084). IN METER(amber) when PRICE is blended into the flow meter. It never shows in V2, because V2 forces the price weight to 0 (s.wPrice = 0.0,L768; condition atL4085).
The ABSORB / HELD / BROKE box
The box sits under the PRICE blocks (L4040-4059). The logic that sets the state is at L2881-3104;
the display is:
| State | Box | Text | Line under the box |
|---|---|---|---|
| idle (0) | faint gray outline | none | blank |
| ABSORB (1) | filled amber RGB(255, 190, 40) | ABSORB |
seconds since it lit, amber |
| HELD (2) | filled with the absorber's color: ask tier 4 (red) when buyers were absorbed, bid tier 4 (green) when sellers were | HELD |
absorption price, silver |
| BROKE (3) | filled with the aggressor's color: bid tier 4 (green) when buyers broke through, ask tier 4 (red) when sellers did | BROKE |
absorption price, silver |
Text on the box is dark or light by contrast (L4057). HELD and BROKE stay up for 30 seconds of
market time after they resolve (s.showSec = 30, L783; L3034). A HELD box turns BROKE if price
breaks through during those 30 seconds, and the 30 seconds then start again (L3020-3033). A new
ABSORB replaces a HELD or BROKE box at once (L3042-3046). An ABSORB that neither holds nor breaks
within 120 seconds clears (s.expireSec = 120, L784; L3014). Both times are fixed in V2, because
their old inputs were given to the auto trade.
HELD and BROKE need "99 Switches | HELD / BROKE" at Yes (default; s.absResolve, L772,
L4624-4625). At No, the box never shows HELD or BROKE. ABSORB then clears when its condition fails
(L3009-3013) or at the 120-second expiry (L3014), whichever comes first.
V2 makes no sound for ABSORB, HELD or BROKE. The alert numbers are forced to 0 (L785-786), and
the alert function returns on 0 (L2947).
The COMBO column
Shown when "Show bias meter" is Yes, the price column is on, and "COMBO column" is not Off
(m.coOn = s.pxOn ? s.coMode : 0, L2699; drawn at L4092).
Header and blocks (L4094, column with nb = 10). The header is UP, DOWN or FLAT and the
box count 1-10, or - at 0 boxes. While COMBO is not ready the word is -- with no count
(L3978-3981). Ten boxes a side fit in the same height as the flow meter's five, so each box is
half as tall, with half the gap (L3987-3997). The five tier colors cover two boxes each: boxes 1-2
use tier 1, boxes 3-4 tier 2, up to boxes 9-10 in tier 5 (shade, L3969). Green (UP) is a positive
COMBO, red (DOWN) a negative one. In exhaustion mode green means "buy here" and red "sell here"
(L2762-2768). The white bar marks coScore on the -20..+20 scale (L4009-4023). On the Ranked scale
coScore is 2 x bc, so the bar sits at the fractional box count, not at the raw value (L2843).
Lit boxes per scale (from L2812-2872; section 3 has the formulas):
- Fixed:
floor(min(|v|, 20) / 2), so 2 points a box. - Relative:
floor(|20 x v / avg / 3| / 2), capped at 10. The 3 is fixed (s.coFull = 3.0,L799). - Ranked:
floor(bc)from the reading's rank in the window.
Footer, top to bottom (L4089-4169). Each line is drawn only if it fits inside the column height
(L4097-4099). The footer can have ten lines (L4101-4168): for example exhaustion mode with the
filter on, "Entries and exits, sim" with the exit at 4, and the breakeven exit armed. On a short
meter the last lines are cut off.
COMBO(silver).- The reading (silver), or
filling(gray) while COMBO is not ready:- Ranked:
top 3.2%(one decimal under 10%) ortop 45%(no decimal from 10%) (L4104-4109); - Relative:
x2.1 avg(L4110-4114); - Fixed:
+16 / 20, the raw COMBO value rounded (L4115-4119).
- Ranked:
- The mode (gray):
AGREE,MEAN,AGAINSTorEXHAUST(L4120). - The scale (gray):
RANK 60m,AVG 60m(the "COMBO window (minutes)" input) orFIXED(L4121-4127). - Exhaustion mode with the b33 filter on only: the filter reading, silver when it passes, ask
tier 4 red when it would block an entry (
L4128-4144). Forms:EFFORT 1.6x,DELTA 70%,ABSORB 1.2x 1T,PACE 55%, orEFFORT --(any of the four names) when there are no readings yet. With no readings the filter counts as failed (m.exPass = false,L2479-2480), so the--line is red and the filter blocks entries. - Auto trade lines, when "99 Trading | Auto trade COMBO" is not Off. See the next section.
When COMBO is not ready, the cause is one of these (L2751, L2836, L2849-2860):
- PRICE is not ready.
- Ranked: fewer than
min(window, 1 minute)of readings, counting the seed from the logs. - Relative: fewer than
min(window, 1 minute)of live 250 ms samples.
Fixed is ready as soon as PRICE is.
Auto trade lines in the COMBO footer
Built at L4145-4169 from values set at L4970-4987 and L5279-5383. They draw only with the COMBO
column showing. Auto trade can run without them when only the meter is off, but not when the price
column or COMBO is off (see "Display switches that change trading").
Line A, the mode (L4150-4152): SIM or LIVE, then what the study does, then CONT in
Continuation. SIM is amber; LIVE is ask tier 4 red.
| "Auto trade COMBO" choice (index) | Line A |
|---|---|
| Entries and exits, sim (1) | SIM BOTH |
| Entries only, sim (2) | SIM ENTRY |
| Exits only, sim (3) | SIM EXIT |
| Entries and exits, live (4) | LIVE BOTH |
| Entries only, live (5) | LIVE ENTRY |
| Exits only, live (6) | LIVE EXIT |
| Entries, breakeven exit only, sim (7) | SIM ENTRY+BE |
Add CONT when "99 Trading | Direction" is Continuation (his setting and the default), for
example SIM BOTH CONT. A live choice still shows LIVE when Sierra's Trade Simulation Mode is on,
although the orders then go to the simulator (L5015).
Line B, the status (L4153-4154). The first rule that applies wins:
AT OFF, ask tier 4 red: Sierra's Auto Trading Enabled is off (sc.IsAutoTradingEnabled,L4976).- A reason, when COMBO is at or past an entry box and no entry was sent on this update (
L5373-5383). ARMED, silver: since the study loaded or the choice changed, a live update with COMBO ready has seen COMBO below the arming line (L5028-5029,L5036,L5051-5052,L5371). The line is the first box count when "Enter on pullback" is 0, and 1 box when it is 1 or more (zoneLo = s.atPullback > 0 ? 1 : s.atStart). Exhaustion mode forces the pullback to 0 (L821-822), so there the line is the first box count. In the other modes at the default pullback of 1 (L4587), arming needs COMBO at 0 boxes.WAIT, silver: it has not, which includes every update before the first live update with COMBO ready.
The reasons in rule 2 apply only when the choice makes entries and COMBO is ready. PULLBACK comes
first; the others follow in this order:
| Text | Color | When |
|---|---|---|
PULLBACK |
silver | the study is armed, and COMBO reached a new peak at or past the next entry box and is waiting for the pullback (L5303, L5376-5377). Unarmed, the same state shows WAIT (rule 4). It cannot show in exhaustion mode, which forces the pullback to 0 (L821-822). |
NOT LIVE |
ask tier 4 red | the update is not a real-time one (a recalculation) (L5382) |
EXITING |
silver | the box exit or the breakeven exit tried its market close on this update, whether Sierra accepted it, refused it, or the Flatten fallback ran (closeAll, L5096; exitedNow set at L5152, L5275 regardless of the result) |
WAIT |
silver | the study is not armed yet |
COOLDOWN |
silver | "Wait between entries" has not run out since the last entry (L5318-5324) |
FILTER |
silver | the exhaustion entry filter failed (L5327-5331) |
BOX DONE |
silver | every box lit on this side was already used in this position, or the entry for it was skipped or rejected |
BOX DONE covers the skips. "skipped: holding the other side", "skipped: at the most contracts
for this side" and Sierra's rejection text go to the trade log and the message log only (L5342-5368),
never to the footer. For every reason except PULLBACK, a change of reason or lit box count also
writes a NO BUY or NO SELL line to the trade log (L5384-5393). PULLBACK shows on the footer
only and is never logged (L5376-5377).
Line C, the position (L4155-4161): LONG n, SHORT n or FLAT, silver, from Sierra's position
for the chart's symbol and account (L5022).
Line D, the exit box count (L4162-4166): EXIT n in gray when "Exit at boxes on the other side" is
above 0. Choice 7 forces it to 0 (L814-815), so the line is absent there. The "Entries only" choices
still show EXIT 4, although their box exit does not run (the exit needs s.atExits, L5134).
Line E, the breakeven exit (L4167-4168): BE ARMED (amber) once the breakeven exit has armed and
not yet fired; BE LIMIT once the study holds a breakeven limit order ID (limitsCover = T.beOrderId != 0, L5252-5253), whatever that limit's size, and only while BE ARMED shows
(L5279-5281).
The position counter
A box under the COMBO column, as wide as COMBO, with the absolute position as a big bold number
(L4171-4186). Long shows a green RGB(60, 220, 90) number and border, short a red RGB(240, 60, 60)
number and border. Flat shows 0 in gray RGB(95, 100, 110) inside the plain column border
RGB(45, 52, 62) (L4178-4180). It is never dimmed by STALE. It is drawn whenever the COMBO column is
showing, whether auto trade is on or not, because the position is read on every update
(L4982-4987). Its room is max(30, 0.7 x w) + 4 pixels (L3769). Its height is
min(room - 4, regionBottom - 6 - top), and it is skipped when that is under 20 pixels
(L4174-4176).
Fill space
"05 Panel | Reserve fill space for the meter" (default No, L4546-4547) applies only with the meter
on at the right edge and a chart bar spacing above 0 (L5402). It sets PreserveFillSpace and
widens the chart's fill space to at least extendBars + 1 + ceil(px / bar spacing) bars. Here
px = max(meter width, 72) + 12 + 80 + offset, plus (80 + 6) for PRICE and the same again for
COMBO (L5404-5406). Switching it off, or removing the study, restores the chart's own fill space
(L5417-5423, L4723-4727).
Display inputs and settings that do nothing in V2
| Input or setting | Why |
|---|---|
| The old "show diagnostic rows" slot | repurposed in b33 for "Exhaustion entry filter"; s.panelDiag = false (L733). The "Show order flow panel" description still says "Level counts are in the diagnostic rows" (L4405); no such rows show. |
| PRICE column width | fixed at 80 (L769); the input went to the auto trade exit in b9 |
| Price weight in the flow meter | fixed at 0 (L768); IN METER never shows |
| ABSORB timer switch | fixed on (L771); the input went to the breakeven exit in b11 |
| ABSORB / HELD / BROKE sounds | alert numbers fixed at 0 (L785-786) |
| COMBO full scale (Relative) | fixed at 3 (s.coFull = 3.0, L799); the input went to the auto trade box step in b11 |
| "Panel text size" for the meter | sets m.fontPts (L3161), which DrawMeter never reads |
| "99 Switches | (spare, does nothing)" | defined at L4581-4582 and read nowhere ("it was BROKE sound") |
Two display settings do the opposite and change trading: "Show order flow panel" and "Show bias meter" both at No (trading continues on a frozen reading), and the price column or COMBO switched off (no auto entries or exits). The meter switch alone does not change trading. See "Display switches that change trading".
Every string the panel and meter can show
"Meter on" below means "05 Panel | Show bias meter" is Yes. "Panel on" means "05 Panel | Show order flow panel" is Yes. The auto trade lines draw only with the COMBO column showing, but whether auto trade runs is a separate question (see "Display switches that change trading").
| String | Built at | Shown when |
|---|---|---|
ORDER FLOW, BUY / BID, SELL / ASK, NET |
L2096-2099 |
panel on, header row |
Aggressive, last N bars |
L2120 |
panel on |
whole-contract quantities, %.0f |
L2121-2123, L2170-2172, L2187-2189 |
panel on, rows 1-3 (rows 2-3 need depth) |
Passive book, N ticks |
L2152 |
panel on |
Stacked + / pulled -, last N s |
L2156 |
panel on, "Use computed stacked / pulled" Yes |
Stacked + / pulled - (Sierra, since connect) |
L2159 |
panel on, that input No |
VAP mult 1 |
L2182 |
panel on, computed stacked / pulled on, VAP multiplier not 1, depth present |
no live book |
L2197 |
panel on, no depth levels |
Price vs strongest level |
L2256 |
panel on, last processed bar had depth |
Price vs level (DEPTH GAP) |
L2256 |
panel on, last processed bar had no depth |
0.0, %+.1f, %.1f |
L2262-2265, L3172-3176 |
panel on, level row values |
Speed of tape, N s, %.1f/s, %.1fx |
L3190-3198 |
panel on |
-- (tape net cell) |
L3219 |
panel on, tape ratio 0 (baseline filling, or no volume in it) |
BULL, BEAR, FLAT, 1-5, - |
L3830-3832 |
meter on, feed live |
STALE, -- |
L3824-3826 |
meter on, no data change for 5 s of wall time |
+N / 20, +N / 20 xA.A |
L4218-4221 |
meter on; the factor from amp 1.05 |
NO BOOK |
L4224 |
meter on, no depth levels |
DEPTH GAP |
L4224 |
meter on, book present, last processed bar had no depth |
AGG, BOOK, S/P, LEVEL |
L4232 |
meter on, as chips |
UP, DOWN, FLAT, -- |
L3978 |
meter on, PRICE and COMBO headers; -- while not ready |
box count, or - at 0 |
L3980-3981 |
meter on, PRICE and COMBO headers, ready only |
ABSORB, HELD, BROKE |
L4045 |
meter on, price column on, ABSORB switch on, state 1-3 (HELD and BROKE also need the HELD / BROKE switch) |
Ns |
L4062 |
as above, ABSORB lit |
| absorption price | L4066 |
as above, HELD or BROKE |
PRICE |
L4070 |
meter on, price column on |
%+.2f, x%.1f typ |
L4073-4076 |
meter on, price column on, PRICE ready |
filling |
L4080, L4103 |
meter on; PRICE, or COMBO, not ready |
N s |
L4083 |
meter on, price column on |
IN METER |
L4086 |
never in V2 |
COMBO |
L4101 |
meter on, COMBO column on |
top x% |
L4107 |
meter on, COMBO on, Ranked scale, ready |
x%.1f avg |
L4112 |
meter on, COMBO on, Relative scale, ready |
+N / 20 (COMBO) |
L4117 |
meter on, COMBO on, Fixed scale, ready |
AGREE, MEAN, AGAINST, EXHAUST |
L4120 |
meter on, COMBO on |
RANK Nm, AVG Nm, FIXED |
L4121-4126 |
meter on, COMBO on |
EFFORT, DELTA, ABSORB, PACE readings or <name> -- |
L4132-4142 |
meter on, COMBO on, exhaustion mode, filter on |
SIM or LIVE + BOTH, ENTRY, EXIT or ENTRY+BE + optional CONT |
L4150-4151 |
meter on, COMBO on, auto trade not Off |
AT OFF |
L4153 |
as above, Sierra's Auto Trading Enabled off |
PULLBACK, NOT LIVE, EXITING, WAIT, COOLDOWN, FILTER, BOX DONE |
L5377, L5382 |
as above; see the status table |
ARMED, WAIT |
L4153 |
as above, no reason to show |
LONG n, SHORT n, FLAT |
L4155-4160 |
meter on, COMBO on, auto trade not Off |
EXIT n |
L4164 |
as above, exit box count above 0 |
BE ARMED, BE LIMIT |
L4168 |
as above, breakeven exit armed, or its limit working |
| position number | L4183 |
meter on, COMBO on, room for the counter |
The diagnostic strings at L3287-3306 (Levels live / stored, absorb a/b break c/d, walls n,
pulled a/b, Depth data, N of M bars, last bar: yes, last bar: none, full mode,
aggression only, walls off, depth resets n, Size thresholds now, market n, wall n,
draw x ms) exist in the code but cannot show in V2 (L733).
Corrections to older text
- The comment at
L4147says the footer reads "AUTO SIM / AUTO LIVE". The code printsSIMorLIVEwith noAUTO(L4151). - The handoff's list of footer strings to document includes "Depth data 0". That text belongs to
the diagnostic rows, which V2 never shows (
L733). The only place it appears is the comment atL4667. - The handoff names "the skip reasons" as footer strings. The skip reasons ("skipped: holding the
other side", "skipped: at the most contracts for this side", Sierra's rejection text) go to the
logs only. The footer shows
BOX DONEfor them. - The "Show order flow panel" description (
L4405) says "Level counts are in the diagnostic rows". V2 has no diagnostic rows. - The comment above the auto trade block (
L4961-4962) says green COMBO sells. That is Reversion only. The default Direction is Continuation, where green buys (L5338,L4619-4621). The "Auto trade COMBO" input description (L4617) and thedonecomment (L581) carry the same Reversion-only wording. - The
AutoTrade::armedcomment (L580) says "COMBO was seen below the first box count". With a pullback of 1 or more the arming line is 1 box, not the first box count (L5036,L5051-5052), and arming needs a live update with COMBO ready (L5028-5029). The "Auto trade COMBO" description (L4617) has the same error twice: it "waits until COMBO is below the first box count before its first trade", and a box can fire again once COMBO "has dropped below the first box count". With a pullback of 1 or more both lines are 1 box (L5036-5044,L5051). - The "Exhaustion entry filter" description (
L4488) and the comment atL4128-4129say the reading is "white when it passes". The code draws it silver RGB(190, 194, 202) (L4143,L3711). - The "COMBO column" description (
L4614) says COMBO is "the big column in the meter's place". At the default right-edge position COMBO is drawn wholly left of the meter slot, and the narrow flow meter keeps the slot's right end (L3801,L3902-3903). Only "Beside panel" with a left-corner table puts COMBO in the slot. - The comment at
L4190-4191names the input "Average marker, bars". The input is in seconds ("08 Meter | Average marker, seconds (0 = off)",L4518). - The comment at
L4029-4031says the PRICE footer shows "the bar count". It shows the window in seconds (L4083).
5. Auto trade, the entry filter and sounds
Source: source/RubberbandV2.cpp, build RB2.b39. Lnnnn is a line in that file. The auto
trade block is L4961-L5398. The settings it reads are parsed at L800-L824, with the entry sound at L787. The entry filter's
readings are computed at L2404-L2489. The sounds are L1953-L2063 and L4982-L5001.
Nothing in this section has been tested as a trading rule. The in-study descriptions say so
(L4617, L4488), and section 7 has the measurements.
The eight "Auto trade COMBO" choices
Input "99 Trading | Auto trade COMBO" (L4616-L4618) is a dropdown. Its default is index 1. The
choice is clamped to 0..7 and decoded at L804-L815 into four flags:
atMode: 0 off, 1 sim, 2 live.atEntries: the study sends entries.atExits: the study runs its exits (the box exit and the breakeven exit).atBeOnly: choice 7 only. It forces the box exit countatExitto 0 (L814-L815).
| Index | Name (verbatim) | atMode | Entries | Box exit | Breakeven exit | Footer |
|---|---|---|---|---|---|---|
| 0 | Off | 0 | no | no | no | none |
| 1 | Entries and exits, sim | sim | yes | yes, if "Exit at boxes" > 0 | yes, if "Breakeven exit after" is not Off | SIM BOTH |
| 2 | Entries only, sim | sim | yes | no | no | SIM ENTRY |
| 3 | Exits only, sim | sim | no | yes, if > 0 | yes, if not Off | SIM EXIT |
| 4 | Entries and exits, live | live | yes | yes, if > 0 | yes, if not Off | LIVE BOTH |
| 5 | Entries only, live | live | yes | no | no | LIVE ENTRY |
| 6 | Exits only, live | live | no | yes, if > 0 | yes, if not Off | LIVE EXIT |
| 7 | Entries, breakeven exit only, sim | sim | yes | no (atExit forced to 0) | yes, if not Off | SIM ENTRY+BE |
The footer text is built at L4150-L4151. In continuation it adds " CONT". The default choice
(1) with the default Direction reads "SIM BOTH CONT". His saved choice is 7, which reads
"SIM ENTRY+BE CONT". The footer label line is amber for sim and the ask side's tier 4 red
(m.ask[3]) for live (L4152). Every footer color passes through dim(), which blends it toward
the background only while the panel is STALE, that is no change in bar volume or inside book for
5 s (L3707-L3710).
Choice 7 with "Breakeven exit after" set to Off makes no exits at all. The breakeven branch is
skipped when atBeMode == 0 (L5160), and the box exit is skipped when atExit == 0 (L5134).
When the choice is 0 the whole trading block is skipped (L5002). The position counter and the
entry sounds still run, because they sit before that test (L4982-L5001).
Sim and live routing
The study sets sc.SendOrdersToTradeService = 1 only for a live choice (4, 5 or 6) and only
when Sierra's Trade Simulation Mode is off (L5015). In every other case it is 0, and Sierra
simulates the order.
- A sim choice (1, 2, 3, 7) always simulates, even on a chart connected to a real account with Trade Simulation Mode off.
- A live choice with Trade Simulation Mode on simulates. The message log then says "sim mode on"
instead of "live" (
L5061). - Replay always simulates. That is Sierra's rule, which the input description repeats (
L4617).
Auto Trading Enabled
The study reads sc.IsAutoTradingEnabled only to set the footer (L4976). When it is off, the
footer's state line reads "AT OFF" in the tier 4 red in place of ARMED, WAIT or a reason
(L4153-L4154). The study does not hold back its orders when it is off; it sends them. That
Sierra then refuses them is Sierra's behavior, as the input description states (L4617). The
code does not show it. Whatever Sierra returns, the study writes Sierra's error text for a
refused order to the trades log as the note on that row (L5366, L5112). The input description says Auto Trading Enabled must be on both globally and
on the chart (L4617).
Sierra trade settings the study forces
While the choice is not 0, every update sets these (L5004-L5014):
| Setting | Value | Effect |
|---|---|---|
AllowMultipleEntriesInSameDirection |
1 | adds on the same side are allowed |
SupportReversals |
0 | an entry never reverses a position |
AllowOppositeEntryWithOpposingPositionOrOrders |
1 | the breakeven limit is an opposite-side order |
AllowEntryWithWorkingOrders |
1 | his own working stop and target do not block an entry |
CancelAllOrdersOnEntriesAndReversals |
0 | an entry does not cancel his orders |
AllowOnlyOneTradePerBar |
0 | several entries per bar are allowed |
SupportAttachedOrdersForTrading |
0 | the study's own attached-order fields are not used |
UseGUIAttachedOrderSetting |
1 | entries take the Trade Window's attached orders |
CancelAllWorkingOrdersOnExit |
1 | an exit cancels the symbol's working orders |
MaintainTradeStatisticsAndTradesData |
1 | Sierra needs it for trading functions |
MaximumPositionAllowed |
(10 - first box) / step + 1 | 3 at the defaults |
Preconditions
The trading logic runs only when live is true (L5028):
m.coReady: COMBO has a reading. COMBO is not ready when the COMBO column is Off, when the price meter column is off (m.coOn = s.pxOn ? s.coMode : 0,L2699), or when PRICE is not ready (L2750-L2751). On the Ranked and Relative scales it also waits formin(window, 60000 / 250)samples, which is one minute, not the full window (RankedL2836, RelativeL2860). Ranked counts the log seed toward that total, so with a log it is ready at once (L2825-L2836).st->realtime: the update is not a full recalculation and did not reset the study's calculation (L4821). Replay updates count as real time. A recalculation, including Chart >> Reload and Recalculate and any input change, never trades.sc.ArraySize > 0.
This test gates the entries, the box exit and the breakeven exit. So with the COMBO column Off,
even an "Exits only" choice makes no exits. Only one branch runs without it. When the position
is flat, the breakeven cleanup can cancel the symbol's working orders on any update (L5160-L5169).
Earlier returns stop the auto trade block before it starts:
- The study function returns when Sierra cannot allocate the state block (
L4740-L4741), whensc.VolumeAtPriceForBarsis null (L4782-L4783), and whensc.ArraySize <= 0(L4830-L4831). Each skips the entry sounds and the whole auto trade block. BuildPanelreturns atL2085-L2086when "Show panel" and "Show bias meter" are both off. It returns before it computesm.coReady,m.coTier,m.coScoreandm.exPass, so these keep the values from the last update that computed them.live(L5028) can still be true, so the entries, the box exit, the breakeven exit and the filter then act on a stale COMBO reading. Keep the panel or the meter on while auto trade is on.
The study trades the chart's own symbol and trade account. It reads the position with
sc.GetTradePosition (L5018). That position includes contracts he entered by hand, so the
exits and the "holding the other side" skip act on his manual positions too.
The study keeps its trading state in State::AutoTrade (L577-L604). ResetCalc (L622-L641)
does not clear it, so a recalculation keeps the box counts, the wait clock and the breakeven
state. It starts fresh in two cases:
- a new state object (
L4711-L4745). The study keeps its state behind a persistent pointer. Sierra's docs (ACSIL_Members_Functions.html#PersistentVariableFunctions, read 2026-10-12) say persistent variables are set to 0 when a study is added and "When a chart that is saved as part of a chartbook is opened", and a recalculation does not reset them. So a new state comes from adding the study, opening the chart or its chartbook (a Sierra restart included), or a rebuilt DLL whose state tag differs (L4711-L4715). Chart >> Reload and Recalculate is a recalculation and keeps the state; - any change of the "Auto trade COMBO" choice, including one exits choice to another, such as
1 to 4 or 7 to 1 (
L4977-L4981).
A fresh state forgets the study's breakeven limit (beOrderId, beCleanup). See "Hazards with
working orders" below.
Direction
Input "99 Trading | Direction" (L4619-L4621) has two choices. The default is index 1,
Continuation. atCont is true for Continuation (L810).
| Direction | Green COMBO | Red COMBO |
|---|---|---|
| Reversion (index 0) | sells | buys |
| Continuation (index 1, default) | buys | sells |
The code is buyNow = atCont ? sign > 0 : sign < 0 (L5338). Green means coTier > 0.
In exhaustion mode, COMBO's color is already the side to trade: a push up into a fresh 1-minute high lights red and a push down into a fresh low lights green (see the COMBO section). So Continuation, his setting, fades the push.
Entries
Inputs
| Input | Default | Range | Setting |
|---|---|---|---|
| 99 Trading, First box count | 8 | 1..10 | atStart (L812) |
| 99 Trading, Trade every Nth box | 1 | 1..9 | atStep (L800) |
| 99 Trading, Enter on pullback (boxes) | 1 | 0..9 | atPullback (L820). Forced to 0 in exhaustion mode (L821-L822) |
| 99 Trading, Wait between entries | Seconds | Off, Seconds, Bars | atCdMode (L818) |
| 99 Trading, Wait between entries (seconds or bars) | 10 | 1..100000 | atCdN (L819) |
The boxes the study trades on one side are atStart, atStart + atStep, and so on up to 10.
The most it holds on one side is maxPos = (10 - atStart) / atStep + 1, in integer division
(L5308). At the defaults that is boxes 8, 9 and 10, three contracts.
Arming
T.armed starts false. It becomes true the first time a live update sees COMBO below the zone,
lit < zoneLo (L5051-L5052). zoneLo is the first box count on touch, and 1 with a pullback
(L5036). Nothing clears armed afterwards except a fresh AutoTrade state (see above). So
after a new state, or after the auto trade choice changes, COMBO must first be seen below the
first box count on touch, or below box 1 with a pullback above 0. Exhaustion mode forces the
pullback to 0, so in his mode the line is the first box count. Until then the footer reads WAIT and a lit box logs "no entry: WAIT".
The once-per-box rule
T.done[side] counts the boxes already used this swing. Index 0 is green COMBO and index 1 is
red (L5296). The comment on the struct (L581) says green "sells", which is true only in
Reversion. The code itself is direction-neutral.
Each live update first clears a side's count when both of these hold (L5040-L5044):
- COMBO is not lit on that color at or above
zoneLo; - the position that color trades is flat:
greenPos = atCont ? q : -qandredPos = -greenPos, and the side counts as flat when that value is below 0.5.
So while he still holds a long from a green flash (in Continuation), a new green flash does not restart at box 8. It only adds boxes past the ones already used.
Entering on touch
With the pullback at 0, which exhaustion mode forces, an entry is due when lit >= atStart
(L5301). The entry block runs when all of these hold (L5304):
live;- the choice includes entries;
- no exit was sent this update (
!exitedNow); T.armed;- the box condition above.
It then works through the boxes (L5307-L5369):
want = (lit - atStart) / atStep + 1          # trading boxes lit now, integer division
while done[side] < want:
    if wait is on and an entry was sent before:
        Seconds: if now >= lastEntryMs and now - lastEntryMs < N * 1000: stop (COOLDOWN)
        Bars:    if lastEntryBar <= lastBar and lastBar - lastEntryBar < N: stop (COOLDOWN)
    if filter is on (exhaustion mode only) and it does not pass: stop (FILTER)
    box = atStart + done[side] * atStep
    done[side] += 1                           # the box is used from here on
    buyNow   = atCont ? green : red
    heldSame = buyNow ? q : -q                # contracts on the side this would add to
    if heldSame < -0.5:          skip, "skipped: holding the other side"
    elif heldSame + 1 > maxPos + 0.5: skip, "skipped: at the most contracts for this side"
    else: send a market order for 1; on success q += +-1, sawZero = False,
          lastEntryMs = now, lastEntryBar = lastBar
    write a BUY or SELL row to the trades log
Details that follow from the code:
qisPositionQuantityWithMarketWorkingOrders(L5021). A market order that has not filled yet counts, so the next update does not send it again.- A box is used whether the order went out, was skipped, or was refused by Sierra. In all three
cases
donehas already gone up (L5333). - The wait clock is the latest trade's time,
sc.LatestDateTimeForLastBarin ms (L5310-L5311). It falls back to market time only when there is no trade time. In replay the clock follows the replay's trades and stops when the replay pauses. - Only a sent order starts the wait (
L5362-L5363). OnelastEntryMsserves both sides, so after a green entry a red flash within 10 s also waits. - With the wait on, the loop stops after one order: the next pass finds less than N seconds
since the order it just sent. A box that is still lit when the wait ends is taken then. A box
that went dark meanwhile is not, because
wantis recomputed fromliton each update. - A last entry that lies in the future does not block. That happens after a replay jumps back,
or after a rebuilt chart has fewer bars (
L5316-L5320). - It never reverses a position.
SupportReversalsis 0 (L5005), and an entry is skipped while he holds the other side. - The order is a market order for 1 contract, time in force DAY, with the text tag
RB2 COMBO box <box>(L5348-L5355). It goes throughsc.BuyEntryorsc.SellEntry.
Entering on pullback (not used in exhaustion mode)
In the other COMBO modes, a pullback greater than 0 changes the rule (L5293-L5303, L5334-L5335):
T.peak[side]tracks the highest box this swing (L5045-L5046).- An entry needs a new peak at or past the next trading box, above the peak the last pullback entry used. COMBO must then fall back by at least the pullback count while it stays at or above box 1.
- Each pullback is worth one contract (
want = done + 1). - The footer reads PULLBACK while the box has been reached and the pullback has not come yet
(
L5376-L5377).
His COMBO mode is exhaustion (index 7), so the pullback is forced to 0 at L821-L822. His saved
pullback value has no effect.
Why no entry
On a choice with entries (1, 2, 4, 5, 7), when COMBO is at or past the entry box, the reading
is ready and nothing was sent this update, the footer shows a reason (L5376-L5383). Choices
without entries never show a reason and never write these rows. This part sits outside the
live test, so it also runs on recalculation updates, where it can write NOT LIVE rows. The
first test that holds wins:
| Reason | Meaning |
|---|---|
| NOT LIVE | a recalculation, not a real-time update |
| EXITING | an exit was sent this update |
| WAIT | not armed since load or since the choice changed |
| COOLDOWN | the wait between entries is running |
| FILTER | the b33 exhaustion filter blocked the box |
| BOX DONE | every lit box on this side is already used. This also covers a box that was just skipped or refused this update |
NOT LIVE shows in the tier 4 red, and the other reasons in silver (L4154). Each time the reason or
the signed box count changes, the study writes one NO BUY or NO SELL row to the trades log with
quantity 0. Its note gives the reason, the boxes used of those wanted, the position, the
position with market orders in flight, the realtime flag and the filter readings
(L5384-L5393). Once COMBO drops below the zone, the same reason may be logged again on the next
flash (L5395-L5396).
The box exit
Input "99 Trading | Exit at boxes on the other side": default 4, range 0..10, 0 = no box exit
(L4598-L4600, L813). It runs when live, the choice includes exits, and the count is above 0
(L5134). Choice 7 forces the count to 0.
redExit   = COMBO red   and lit >= exit count
greenExit = COMBO green and lit >= exit count
exitArmed = Reversion, or (Continuation and COMBO has been at 0 since the last entry sent)
shortExit = redExit and exitArmed      -> closes a short (q < -0.5)
longExit  = greenExit and exitArmed    -> closes a long  (q > 0.5)
sawZero becomes true on any live update with lit == 0 (L5053-L5054). Only an entry the
study sends sets it back to false (L5361). A fresh trade state starts it at false. So "at 0
since the last entry" counts the study's own entries only. On an "Exits only" choice, or for a
trade he entered by hand, sawZero stays true once COMBO has read 0. In Continuation the box
exit then closes a long on the first green push at or past the exit count, and a short on the
first red one, with no new return to 0 needed.
| Direction | A long closes at | A short closes at |
|---|---|---|
| Reversion | green at the exit count (the opposite of its red entry) | red at the exit count |
| Continuation | green at the exit count, after COMBO has been at 0 since the last entry | red at the exit count, after the same |
In Continuation the trade entered on that same color. So the box exit can only close it on a later push of that color, after COMBO has gone back to 0. On the Fixed scale an exit count of 4 means |COMBO| >= 8.
The box exit tries once per visit to the exit boxes. T.exitTried resets when COMBO leaves
them (L5143-L5153). An exit sets exitedNow, so no entry and no breakeven step runs on that
update.
How the study closes a position
closeAll (L5094-L5128) is shared by the box exit and the breakeven backstop:
- It sends one market exit for
|q|contracts, DAY, text tagRB2 COMBO exit, throughsc.BuyExitfor a short orsc.SellExitfor a long (L5100-L5106).qisPositionQuantityWithMarketWorkingOrders(L5021), so it counts market orders in flight. Sierra's ACSIL trading doc (s_SCNewOrder OrderQuantity, https://www.sierrachart.com/index.php?page=doc/ACSILTrading.html#s_SCNewOrder_OrderQuantity, read 2026-10-12) says: "In the case of an sc.BuyExit or sc.SellExit, if this is set to 0, then the current Trade Position will be flattened. ... If it exceeds the quantity necessary to flatten the Trade Position, then the current Trade Position will be flattened and the extra quantity will be ignored." Two consequences follow:- With
qat 0 whilePositionQuantityis not, the exit goes out with quantity 0, and Sierra flattens the whole position. The box exit cannot do this, because it runs only whenqis nonzero (L5147). The breakeven backstop can, because it testsPositionQuantity(L5160,L5179). See hazard 13. - With an entry in flight,
|q|exceeds the position. Sierra flattens the position and ignores the excess, and the entry then fills and leaves a residual position. If the exit was the breakeven backstop,beTriedis already true, so the residual position gets no breakeven handling (L5205) until an update reads flat.
- With
CancelAllWorkingOrdersOnExit = 1(L5012) makes Sierra cancel the symbol's working orders when the exit is sent. Sierra's "Automated Trading Management" doc (https://www.sierrachart.com/index.php?page=doc/AutoTradeManagment.php#CancelAllWorkingOrdersOnExit, read 2026-10-12) says: "CancelAllWorkingOrdersOnExit cancels working orders except market orders at the time the BuyExit and SellExit Order Actions are triggered. This does not happen upon the order filling, but at the time the order is submitted." Under Buy Exit it adds: "If CancelAllWorkingOrdersOnExit is set to TRUE (Yes), then all working orders for the Symbol and Trade Account the automated trading system is for, will be canceled when a Buy Exit Order Action is performed." That includes the attached target and stop, the breakeven limit, and any working order he placed by hand on that symbol and account.- If Sierra refuses the exit, the study logs the refusal. It then falls back to
sc.FlattenAndCancelAllOrders(), Sierra's Flatten and Cancel All Orders command, but only in replay, with Trade Simulation Mode on, or on a live choice (L5117-L5123). On a sim choice running against a real account, it does not flatten. The note then reads "no flatten: Sim only on a live account, so the study will not flatten it" (L5125). This is the b10 fallback.
The breakeven exit
Inputs (L4601-L4606, L816-L817):
- "99 Trading | Breakeven exit after", with the choices Off, Seconds and Bars. The default is Bars (index 2).
- "99 Trading | Breakeven exit after (seconds or bars)": default 5, minimum 1.
When it resets
Each update first checks whether the position is flat, the mode is Off, or the choice has no
exits. If any of these holds, the whole breakeven state resets (L5160-L5176). If it is flat and
a breakeven limit was placed earlier (beCleanup), the study first calls sc.CancelAllOrders()
and logs a BE CLEANUP row. The reason is that a filled breakeven limit leaves the attached
stop and target behind, and a filled stop leaves the breakeven limit, which could open a new
position.
When the cleanup fires, exactly:
- It needs
beCleanup, which is set only when the study's own breakeven limit was accepted (L5241-L5245), and a flat position (L5165). It runs once, becauseL5175then clearsbeCleanup. - It is not gated by
liveorst->realtime. It runs on any call that reaches the auto trade block with a choice other than 0 (L5002), so a recalculation call can also run it and write the BE CLEANUP row. sc.CancelAllOrders()takes no order ID or tag (ACS_Source\sierrachart.hL2787). Sierra's ACSIL trading doc (https://www.sierrachart.com/index.php?page=doc/ACSILTrading.html#CancelAllOrders, read 2026-10-12) says: "The sc.CancelAllOrders() function cancels all working orders for the Symbol and Trade Account of the chart that the trading study is applied to. When Sierra Chart is in Trade Simulation Mode, only simulated orders are canceled. Otherwise, non-simulated orders are canceled. This function is affected by the sc.SendOrdersToTradeService variable." It is therefore not limited to the study's orders. The study setsSendOrdersToTradeServiceto 0 on every sim choice (L5015). On a sim choice the cancel therefore probably reaches only simulated orders, and leaves his real-account orders alone. That is an inference from the doc, not something the code shows. It also cancels any working order he placed by hand on that symbol and account, and any order from another study or another chart on the same symbol and account, if it is working when the cleanup fires.
The reset also clears beOrderId and beCleanup when "Breakeven exit after" is switched to Off
while a limit is working. That limit is then left working, and the study no longer tracks it.
Any change of the auto trade choice, and a new state object, also forget the limit (L4977-L4981,
L4711-L4745). "Hazards with working orders" below lists every such case.
The clock
The clock runs only on live updates with no exit sent that update (L5177). Its time is the
latest trade's time, with market time as the fallback (L5186-L5187). The clock starts at the
first such update where the position is not flat (L5188-L5192). That is when the position opens,
or the first live update after a load that finds a position open. Adds do not restart it.
The breakeven state resets only on an update that reads the position as flat (L5160). A position
that goes flat and reopens, or reverses, between two updates keeps the old clock and the old
arming (hazard 10).
Arming
Arming happens on one update, when both of these hold (L5193-L5204):
- The clock is due. In Seconds mode that means
now - start >= N * 1000ms. In Bars mode it means at least N new bars have started since the bar where the clock started. - Price is against the average: for a long,
last < avg - half a tick, and for a short,last > avg + half a tick(L5183-L5184).
It does not matter whether the trade was in profit earlier. Arming records the bar and that
bar's high and low at that moment. The footer then shows BE ARMED (L4167-L4168).
The limit order
Starting with the update after arming, and until a close attempt is made (L5205-L5251):
- The price is the average price rounded to a tick, with ties toward the market. A long uses
floor(avg / tick + 0.5), so 31518.875 becomes 31518.75. A short usesceil(avg / tick - 0.5)(L5212). - If no limit is working, the study places one: a limit order on the closing side for the whole
position, DAY, text tag
RB2 breakeven, sent withsc.SellOrderorsc.BuyOrder. It turnsUseGUIAttachedOrderSettingoff for this one order, so the limit carries no target or stop of its own (L5232-L5240). The log row is BE LIMIT SELL or BE LIMIT BUY. - If a limit is working and its price differs by more than a quarter tick, or its open quantity
(
OrderQuantity - FilledQuantity) differs from the position, the study moves or resizes it withsc.ModifyOrder. The log row is BE LIMIT SELL MOVE or BE LIMIT BUY MOVE (L5214-L5228). A refused modify sets no failure flag. The study tries again on every live update while the mismatch lasts, and writes a MOVE row each time. - A partial fill of the breakeven limit may make the study enlarge it. The study compares the
limit's open quantity,
OrderQuantity - FilledQuantity, with|PositionQuantity|, and on a difference of more than 0.5 sendsModifyOrderwithOrderQuantity = |posQ| + FilledQuantity(L5219-L5225). Sierra's ACSIL trading doc (https://www.sierrachart.com/index.php?page=doc/ACSILTrading.html, s_SCTradeOrder FilledQuantity, read 2026-10-12) says: "A working order that is only partially filled does not update the Internal Position data. It is only when an order completely fills that the Internal Position data is updated and will then reflect the position from the order." Take a 3-lot long whose sell limit fills 1. ThenFilledQuantityis 1 and the open quantity is 2, but the position still reads 3. The study sees 2 against 3 and modifies the order to 4 contracts, so 3 stay open. If those 3 fill too, 4 contracts sell against a 3-lot long, leaving a 1-lot short with no stop. Three things are uncertain:- whether the position that
sc.GetTradePositionreturns is the "Internal Position data" the doc means; - whether Sierra reports a partly filled order as working (
IsWorking()).scconstants.hL1328saysSCT_OSC_FILLEDcovers an order "completely filled or partially filled, and is no longer considered working", so a partial fill may instead end the order. In that case the study treats the limit as gone and places a new one for|PositionQuantity|(next bullet). If the position has not yet counted the partial fill, that also oversells by the filled amount; - whether a partial fill happens at all in Sierra's trade simulation. The risk is on live choices. After a partial breakeven fill, check the limit's size against the position.
- whether the position that
- The study replaces the limit when it stops working while a position is still open: it was
cancelled or rejected, or it filled in full while a larger position remained (an add between
two updates).
L5218clearsbeOrderId, andL5230places the new limit in the same pass, on the same update. So a breakeven limit he cancels by hand comes back at once. - If Sierra refuses the limit, the study does not try again (
beOrderFailed). The market backstop below takes over. - The footer shows BE LIMIT whenever the study holds a limit ID,
limitsCover = T.beOrderId != 0(L5252-L5253,L4168). It does not check the limit's size, so BE LIMIT also shows while a partial fill or a fill between updates has left the limit the wrong size (hazards 7 and 12).
The market backstop and the missed-touch fix (b17-b19)
The backstop is in L5255-L5276.
- With a working limit, it fires only if price trades 2 ticks past the limit price without a
fill: for a long, a high at or above
bePx + 2 ticks, and for a short, a low at or belowbePx - 2 ticks. - Without a limit, it fires on any touch of the average within half a tick. It also fires at once when the last price is no longer against the average.
- It scans the high (long) or low (short) of every bar from
max(beArmBar, beScanFrom)to the live bar (L5262).beScanFromis the previous update's live bar (L5270), so each update rescans the bar that was live last time and every bar after it. A wick that touched between two updates therefore counts. This is the b17 fix. - On the arming bar, only a new extreme past the high or low recorded at arming counts. So trades on that bar before the moment it armed are not counted.
- When it fires, it calls
closeAllwith the label BREAKEVEN SHORT or BREAKEVEN LONG and makes no further attempt until the position is flat (beTried). closeAllsizes the market exit fromq, which counts market orders in flight (L5021,L5101). The breakeven limit may still be working at that moment. If the limit fills in the same instant as the market exit, the two can together close more than the position.
Hazards with working orders
These are the cases where the study can leave an order working that it no longer tracks, send an order of the wrong size or at the wrong moment, or cancel or replace orders he placed. They fall into four groups, numbered 1 to 16 throughout. Each case gives its lines and what to do.
A. The study forgets its breakeven limit
In cases 1 to 4 the study loses beOrderId and beCleanup while its RB2 breakeven limit is
still working. Before the study places any new limit of its own, two things can go wrong:
- His stop fills first. The old limit is still working and can open a new position.
- The old limit fills first. The position goes flat, but BE CLEANUP needs
beCleanup(L5165), so it does not run. The attached target and stop are left working as orphans, which is the problemL5162-L5164describes. Either can then open a new position.
What to do in each case: check the DOM or the Orders window. Cancel any stray RB2 breakeven
order, and any target or stop that belongs to a position that is already closed.
-
A change of the "Auto trade COMBO" choice (
L4977-L4981). The whole trade state is replaced. That happens on every change, including one exits choice to another (1 to 4, 7 to 1). If the new choice has exits and a position is open, the breakeven clock restarts (L5188-L5192). What follows depends on timing:- If the old limit fills before breakeven arms again, the position goes flat with
beCleanupfalse. BE CLEANUP does not run, and the attached target and stop are orphans. Arming again needs the set bars or seconds to pass and price to be against the average (L5195-L5198). - Once breakeven arms again, the study places a second full-size
RB2 breakevenlimit at the same price (L5230-L5247) and setsbeCleanup(L5243-L5244). Two full-size closing limits are then working. When the first fills and an update reads flat, BE CLEANUP cancels the rest (L5165-L5168). If the second fills before any update reads flat, it opens a position on the other side.
Do not change the choice while a breakeven limit works.
- If the old limit fills before breakeven arms again, the position goes flat with
-
A new state object while he holds a position with a working
RB2 breakevenlimit. That happens when the study is added again, when the chart or its chartbook is opened (a Sierra restart included), or when a rebuilt DLL with a different state tag loads (L4711-L4745; see "Preconditions" for Sierra's doc). Chart >> Reload and Recalculate does not cause it. The newAutoTradestarts withbeOrderId0 andbeCleanupfalse (L597-L599). The outcomes are exactly those of case 1:- Before breakeven arms again, an old limit that fills leaves the attached target and stop as orphans, because no BE CLEANUP runs.
- After it arms again, two full-size limits work at the same price. The flat cleanup cancels the second only if an update reads flat before it fills. Otherwise it opens a new position.
Flatten, or cancel the
RB2 breakevenlimit by hand, before closing Sierra or the chartbook, re-adding the study, or loading a rebuilt DLL. After reopening with a position held, cancel anyRB2 breakevenorder left from the earlier session. -
"Breakeven exit after" set to Off (
L5160,L5174-L5175). No new limit is placed, so only the two outcomes above the list apply. -
The choice set to Off, index 0.
L5002then skips the whole block. As in case 3, only the two outcomes above the list apply.
B. Orders sized from stale or racing information
Cases 5 to 13 can leave an order of the wrong size working, a position on the other side, or an exit at the wrong moment. What still protects a resulting position depends on the case:
- Cases 5, 6, 11 and 13 send a study market exit that goes through. Sierra cancels the symbol's
working orders, except market orders, when that exit is submitted
(
CancelAllWorkingOrdersOnExit,L5012; quoted in "How the study closes a position"). The attached target and stop are then gone, so an opposite position left by the race has no stop. - Cases 7, 8, 9 and 12 send no study exit that goes through. In case 9 the exit was refused,
and whether a refused exit still triggers the cancel is unknown. An oversized limit can fill
alone. BE CLEANUP needs an update that reads flat (
L5165), and a fill that takes the position straight through zero never gives one. The old attached target and stop can then still be working, sized for the old position, and their fills add to the opposite position. - Case 10 starts from a box exit, a manual flatten or a reversal. Its own risk is an early backstop exit on the new position, or no breakeven handling for it.
-
The breakeven market backstop racing a working limit (
L5271-L5274). The exit is sized fromq(L5101). Sierra cancels the limit (a working order that is not a market order) when the exit is submitted, but on a live account the limit can fill while the exit or the cancel is in flight, and the two together can overshoot the position. Ifqis 0, the exit flattens whatever the position is (hazard 13). Ifqexceeds the position, Sierra ignores the excess (see "How the study closes a position"). -
The box exit racing a working breakeven limit (
L5134-L5153,L5101,L5012).closeAllsizes fromq. Sierra cancels the limit when the exit is sent, but on a live account the cancel takes time, and the limit can fill while the market exit or the cancel is in flight. Which way price is moving depends on the COMBO mode, because a long closes on green and a short on red (L5136-L5142):- In exhaustion (his mode), green is a push down into a fresh low (
L2760-L2768). A long's exit comes on a push down, away from its sell limit at the average price, so the race needs a quick turn back up while the exit is in flight. A short mirrors this. - In "both must agree", green is PRICE and FLOW both up (
L2755-L2758). A long's exit comes on a push up, toward the limit. - In "average of the two",
v = 0.5 (p + f)(L2779), so green means their mean is up, not both. A long's exit usually comes with price rising, toward the limit, but FLOW alone can light it. - In "flow against price", green is buying flow while price falls (
L2770-L2777). The push is away from the limit, as in exhaustion.
The race needs a live choice (4 or 6), because only then can the cancel and the fill take real time on an exchange. With those choices it is possible at the default box exit of 4 and the default breakeven exit after 5 bars. The default choice, 1, is sim. Whether Sierra's simulation can produce this race is unknown.
- In exhaustion (his mode), green is a push down into a fresh low (
-
A partial fill of the breakeven limit (
L5219-L5225). As described above, the study may resize the limit up to|position| + FilledQuantity, which oversells or overbuys by the filled amount if the rest fills. -
The study is not live while a breakeven limit works (
L5177). That happens when the COMBO or price column is off or PRICE is filling, becauseliveneedsm.coReady. The limit keeps its old price and size, and there is no backstop. The flat cleanup still runs (L5160-L5169). If an attached target fills, or he adds or reduces by hand, the limit is the wrong size and can overshoot. What to do: while the COMBO or price column is off or PRICE is filling, resize or cancel theRB2 breakevenlimit by hand after any fill, add or reduction. -
A refused backstop with no flatten (
L5273,L5117-L5125). This happens on a sim choice with Trade Simulation Mode off, outside replay.beTriedis already true, so from then on theelse if (!T.beTried)branch (L5205) skips the limit upkeep and the backstop while the position stays open. Entries can still change the position, becauseexitedNowblocks only that one update. The limit can therefore stay at a stale size. The same stuck state follows wherever the flatten fallback runs (replay, Trade Simulation Mode on, or a live choice,L5117) andsc.FlattenAndCancelAllOrders()itself fails (L5119-L5120, note "flatten and cancel all orders failed"), becausebeTriedstays true. The code does not show whether the flatten obeys Auto Trading Enabled. That is unknown. What to do: the study makes no further breakeven attempt until an update reads flat, so close the position by hand, then check that noRB2 breakevenorder or attached order is left working. -
A new position inherits the old breakeven state when no update reads flat in between (
L5160). That happens after a manual flatten and a fast re-entry, after a reversal, or when a box exit is followed on the next update by an entry before the exit fills.L5109zeroes only the localq. The next update's entry check readsqagain (L5339), andqcounts the exit in flight, so the side reads as flat there. This route exists in both directions:- Reversion: a short closed by the box exit on red, and red buys on the next update.
- Continuation: a long holds box 8 only (
done[0]is 1). The box exit closes it on a later green push at 4 or more, after COMBO has been at 0. On the next update green reaches box 9.wantis 2 andheldSame = q = 0while the exit is in flight, so a buy goes out (L5307,L5339).
Then:
- If the old state was armed and had not tried a close, a limit goes out at once at the new
average (
L5230). The backstop scans frommax(beArmBar, beScanFrom)to the live bar (L5262-L5269), and the live bar's high or low can come from before the position opened. So it can send a market exit on its first pass. - If the old state had already tried a close (
beTried), the new position gets no breakeven handling at all until an update reads flat.
-
A new full-size breakeven limit while the study's own box exit is in flight. The box exit does not set
beTried. On the next updatePositionQuantitystill shows the position (L5179,L5213), whileqalready counts the exit and reads 0. Once Sierra's cancel of the old limit is done,IsWorking()is false (L5217-L5218), andL5230places a fresh limit for the full position. If the market exit fills and then this limit fills, the result is an opposite position. On the same update the backstop can also fire with quantity 0 (hazard 13). -
Any fill that reduces the position between two live updates, such as one attached stop or target, leaves the breakeven limit oversized until the next update resizes it (
L5219). A fill of the limit in that gap oversells or overbuys. Case 8 is the same problem over a longer gap. What to do: after one of his attached orders fills, check that the breakeven limit's size matches the position. The gap is one update, so this matters most at a slow replay speed or chart update interval. -
A breakeven backstop exit with quantity 0 (
L5101,L5160,L5179,L5259). The backstop testsPositionQuantity, butcloseAllsizes fromq. On the update after a box exit, or while his own market exit or a Flatten is in flight,PositionQuantityis not 0 andqis 0. If the backstop fires then, it sendssc.SellExitorsc.BuyExitwith quantity 0, which Sierra's doc (quoted in "How the study closes a position") says flattens the current position. In case 11 the fresh full-size limit is placed on exactly that update, solimitsCoveris true, and the backstop needs only a trade 2 ticks past the limit (L5259). The trades log row then reads "BREAKEVEN LONG" or "BREAKEVEN SHORT" with quantity 0 and the note "sent". Whether Sierra's flatten nets out the exit already in flight, or sends a second exit for the full position, is unknown.
What to do after any EXIT, BREAKEVEN or BE LIMIT ... MOVE row, a partial fill, a reversal, or a fast re-entry: compare the position with the working orders. Cancel any order sized for the old position, and put a stop on any position left without one. A BREAKEVEN row with quantity 0 needs the same check.
C. A stale COMBO reading drives the exits
- "Show panel" and "Show bias meter" both off (
L2085-L2086). COMBO keeps its last reading, and the entries, exits and filter act on it. Keep one of the two on.
D. The study cancels or replaces orders he placed
-
The study's exits cancel his own orders on the symbol. All three cancel paths act on the chart's symbol and account, not only on the study's orders:
sc.CancelAllOrders()in BE CLEANUP (L5165-L5169). It runs on the first call that reads the position flat after the study placed a breakeven limit, whether that call is a live update or a recalculation. The position can go flat by the breakeven limit, by his own stop or target, or by a manual exit; no study exit is needed (L5162-L5168). Sierra's doc, quoted in the breakeven section, says it "cancels all working orders for the Symbol and Trade Account of the chart". On a sim choice it probably reaches only simulated orders (see the breakeven section).CancelAllWorkingOrdersOnExit = 1(L5012), on every box exit and backstop exit sent withsc.BuyExitorsc.SellExit. Sierra's "Automated Trading Management" doc (https://www.sierrachart.com/index.php?page=doc/AutoTradeManagment.php#CancelAllWorkingOrdersOnExit, read 2026-10-12), quoted in "How the study closes a position", says that "all working orders for the Symbol and Trade Account the automated trading system is for, will be canceled". It happens when the exit is submitted, not when it fills, and market orders are excepted.sc.FlattenAndCancelAllOrders(), the fallback when an exit is refused (L5119). Its scope here comes from Sierra's name for the command and from the study's comment that it is "the same command as the Trade Window's button" (L5114-L5115). No Sierra doc text for it is quoted in this reference.
A manual entry order, or a stop or target from another source, that is working at that moment is cancelled. Do not place new orders on that symbol right after a study exit, or right after any flat that follows a breakeven limit, including his own stop or target filling. Wait until the EXIT, BREAKEVEN or BE CLEANUP line has appeared in the message log, then re-check working orders.
-
A breakeven limit cancelled by hand while the position is open (
L5217-L5218,L5230). The study replaces it on the same update. To be rid of it, set "Breakeven exit after" to Off first (then see case 3), or close the position.
Attached orders from the Trade Window
Entries go out with UseGUIAttachedOrderSetting = 1 (L5011). Each entry then gets the attached
target and stop set in the chart's Trade Window when Use Attached Orders is on there, the same
as a manual entry from that window. The study sets no target or stop itself. The breakeven
limit is the one order sent without them (L5238-L5240).
What the trades log records
Every order, skip and refusal writes one line to the Sierra message log and one row to
OFBL_logs\RB2_trades_<symbol>.csv (L5056-L5092). The log section of this reference lists the
columns. The side column holds one of these event names:
| side | When |
|---|---|
| BUY, SELL | each box the entry loop uses: sent, skipped or refused. The note is "sent", a skip reason, or Sierra's error text, followed by the filter readings |
| NO BUY, NO SELL | a lit box with no entry, when the reason or box count changes (quantity 0) |
| EXIT SHORT, EXIT LONG | a box exit: one row on success, two on failure (the refusal, then the flatten result or "no flatten") |
| BREAKEVEN SHORT, BREAKEVEN LONG | a breakeven market backstop, rows as for EXIT |
| BE LIMIT SELL, BE LIMIT BUY | the breakeven limit placed, or refused, with its price |
| BE LIMIT SELL MOVE, BE LIMIT BUY MOVE | the breakeven limit moved or resized |
| BE CLEANUP | flat after a breakeven limit: working orders cancelled |
NO BUY and NO SELL name the side the entry would have taken, so in Continuation a green flash
logs NO BUY (L5392). The message log line reads Rubberband auto trade (<live | sim mode on | sim>): <side> <qty> at COMBO box <box> (<COMBO score>): <note> (L5060-L5062).
The b33 exhaustion entry filter
Inputs:
- "99 Trading | Exhaustion entry filter" (
L4487-L4489). The choices are Off, Effort against result, Slowing delta, Absorption at the high and Pace turning down. The default is Off. - "99 Trading | Exhaustion entry filter setting" (
L4556-L4558): default 0, range 0..100. A value of 0 means the chosen filter's own default.
It applies only in exhaustion COMBO mode: exOn = exMode != 0 && coOn == 4 (L5286). In any other
COMBO mode it never blocks, even when it is set.
The readings (L2404-L2470)
Each update computes them over the price window. With the 5 s default, the window is 20 slots of 250 ms.
- "Late" is the current slot so far plus the 3 stored slots before it. Its length in seconds is
(3 x 250 + clamp(elapsed ms in the current slot, 1, 250)) / 1000. - "Earlier" is the
E = max(4, slots - 4)stored slots before that, 16 at 5 s. Its length isE x 0.25s. - The push direction
dis the sign of the close minus the price at the end of stored slot3 + Eback. If the two prices are equal, there is no reading. - The readings need at least
E + 4stored slots. - Volume means aggressive volume: ask-side volume is buying and bid-side volume is selling. Push-side volume is buying for a push up and selling for a push down.
- The peaks are the largest 1-second windows of 4 consecutive slots that lie fully inside "earlier".
| Filter | Reading | Passes when | Default threshold |
|---|---|---|---|
| 1 Effort against result | (late push volume / late progress in ticks) / (earlier push volume / earlier progress in ticks), each progress at least 1 tick. Late progress is close minus the mid price at slot 3 back, and earlier progress is that mid price minus the start price, both in the push direction | reading >= threshold | 1.5 |
| 2 Slowing delta | (push-side delta per second, late) / (largest earlier 1 s push-side delta) | reading <= threshold | 0.7 |
| 3 Absorption at the high | (late push volume per second) / (earlier push volume per second), and the extreme's gain in ticks, late high over earlier high (or earlier low over late low) | reading >= threshold, and gain <= "00 Rubberband, Level holds within (ticks)" (default 2) | 1.0 |
| 4 Pace turning down | (all volume per second, late) / (largest earlier 1 s all volume) | reading <= threshold | 0.7 |
When a denominator is 0, the readings follow these rules:
- Effort (
L2457) and absorption (L2464) read 99 when the numerator is above 0, and 0 when it is also 0. - Slowing delta (
L2460) and pace (L2467) read 99 whenever the earlier peak is 0. peakDeltastarts at 0 and only takes larger values (L2439,L2448). So if no earlier 1 s window had a positive push-side delta, Slowing delta reads 99 and blocks every entry, unless the setting is 99 or more (the range is 0..100,L4558; the test isexDelta <= k,L2484). Pace behaves the same way when the earlier peak volume is 0.
With no reading yet, a filter that is on fails (L2479-L2480). The defaults are the array
kExDefault at L2474.
How a blocked box waits
The filter check comes after the wait check and before the box is used (L5325-L5331). A failed
check stops the loop without using the box. The footer shows FILTER, and a NO BUY or NO SELL
row is logged. On a later update, while the box is still lit, the check runs again, and the box
is taken if it passes. A box that goes dark first is never taken.
The COMBO footer shows the live reading in exhaustion mode when a filter is chosen: EFFORT 1.6x,
DELTA 55%, ABSORB 1.2x 1T or PACE 40%, or "--" with no reading. It is silver when it passes and
the tier 4 red when it would block (L4128-L4143). Every BUY, SELL, NO BUY and NO SELL row carries all
four readings in its note: ; filter <off|pass|fail>; effort .. delta .. absorb ../..t pace ..,
or ; filter <off|fail>; no readings yet (L5287-L5292). The word after "filter" follows the
filter input alone (s.exMode), not exOn. In a COMBO mode other than exhaustion, a box the
study sent can therefore be logged "filter fail" even though the filter did not block it.
Sounds (b35-b37)
When a sound plays
Input "99 Trading | Entry sounds (bing long, bong short)": Yes/No, default Yes (L4579, L787).
No turns the sounds off. No other input affects them, and the auto trade choice does not
matter. The check runs before the auto trade block, on every update (L4982-L5001):
qNow = sc.GetTradePosition().PositionQuantity          # this chart's symbol and account
if sndHave and this update is real time and the input is Yes:
    if qNow > 0.5 and qNow > sndPos + 0.5:  bing   (became long, or a long grew)
    elif qNow < -0.5 and qNow < sndPos - 0.5: bong (became short, or a short grew)
sndPos = qNow; sndHave = (this update is real time)
fromQ and toQ in RbPlayEntrySound are the position before and after (sndPos, qNow).
Some consequences of this code:
- It sounds on any fill that opens or adds, whether the study's or his own.
- A reduction or an exit is silent.
- A reversal from long to short in one step bongs.
- The first real-time update after a recalculation or a new state only records the position, so a position that already exists then makes no sound.
- Several fills that arrive between two updates make one sound.
The sound itself (RbChime, L1957-L2004)
The study builds each sound in memory once per DLL load. Each one is a 22,050 Hz, 16-bit mono PCM WAV of 0.9 s. The sample formula is:
x(t) = sin(2 pi f0 t) exp(-t / 0.28) + 0.35 sin(2 pi 2.76 f0 t) exp(-t / 0.112)
sample = round(0.55 x 32767 x min(1, t / 0.004) x x(t) / 1.35)
The bing uses f0 = 659.3 Hz (E5), and the bong uses f0 = 329.6 Hz (E4). The 4 ms ramp at the start avoids a click. Each file is 44 header bytes plus 19,845 samples x 2 bytes = 39,734 bytes.
Files and playback (RbPlayEntrySound, L2006-L2063)
- Folder:
<Data Files Folder>\OFBL_logs\, created if missing. That isC:\SierraChart\Data\OFBL_logson his machine. - Files:
RB2_bing.wavandRB2_bong.wav. - When the files are written: at each play, the study opens the file and compares its size with
the WAV in memory. It rewrites the file only when the file is missing or a different size
(
L2023-L2041). Both sounds are 39,734 bytes. A later build that changes the pitch but keeps the 0.9 s length would therefore not replace files an older build wrote. - Playback is
sc.PlaySound(path, 1)(L2042). That puts the file on Sierra's own alert sound queue. b35 and b36 called the WindowsPlaySoundAdirectly. The source comment (L2006-L2011) records that the b36 entries made no sound on 2026-10-11. It gives as the reason that Windows plays one such sound per process at a time, so Sierra's own sound handling "can cut it off". That cause was not confirmed. b37 moved playback to Sierra's queue. - Every attempt writes a message log line,
Rubberband V2 entry sound: <bing|bong> (position A to B), <path or "could not write the sound file">, sc.PlaySound returned <n>(L2043-L2046). It also appends a row to a third log,OFBL_logs\RB2_sound_<symbol>.csv, with the columnssample_time,bar_start,build,replay,sound,from_pos,to_pos,file_ok,play_result(L2047-L2062).
V2 has no other sounds. The HELD and BROKE alerts are forced to 0 (L785-L786), the wall-signal alerts are off (L745),
and
the old BROKE sound input is now the spare input "99 Switches | (spare, does nothing)" (L4581).
Footer lines for auto trade
These lines are listed here for completeness. The panel section describes the rest of the
footer (L4145-L4169). When the choice is not 0, the footer shows, in order:
- The mode: SIM or LIVE, then BOTH, ENTRY, EXIT or ENTRY+BE, with " CONT" in Continuation.
- The state: AT OFF, a reason from the table above, ARMED or WAIT.
- The position: LONG n, SHORT n or FLAT.
- EXIT n, whenever the exit count is above 0. This line also shows on the "Entries only" choices, where the box exit does not run, because the line checks only the count.
- BE ARMED or BE LIMIT, while the breakeven exit is armed and has not tried a close yet.
Corrections to older docs
- The "Auto trade COMBO" input description (
L4617) opens with "Market orders that fade COMBO ... in green it sells", and the block comment (L4961-L4966) says "Green COMBO at the first box count sells 1". Both describe Reversion. The default Direction since then is Continuation, where green buys (L4621,L5338). The struct comment atL581has the same Reversion wording. - The "Breakeven exit after" description (
L4602) says Seconds counts market time (replay time in replay). The code counts the latest trade's time (L5186-L5187). It falls back to market time only when there is no trade time, so a paused replay stops the clock. The entry wait description (L4593) says "trade time", which matches the code. signal_spec.mdsection 8 says "the box is used even when the order is skipped". The box is also used when Sierra refuses the order (L5333comes before the send).signal_spec.mdsection 8 and the handoff's b19 notes describe the breakeven limit as placed when the exit arms. It is placed on the update after arming (L5193arms, and theelse ifatL5205places it).- The handoff (item 6 of the reference plan) lists an "Auto Trading Enabled requirement". The
study does not check it before sending. It only shows AT OFF on the footer (
L4976,L4153). That Sierra then refuses the orders is Sierra's behavior, stated in the input description (L4617), not something the code shows. - The handoff says arming happens "after a load or a mode switch". The trade state resets when
the Auto trade COMBO choice changes, or when the state object is new (
L4977-L4981). A change of COMBO mode, Direction or scale does not reset it. - The handoff's log list (item 8) names two logs. The study also writes
RB2_sound_<symbol>.csv(L2052) and the two WAV files. - All exits need a COMBO reading (
liveincludesm.coReady,L5028). The "Exits only" description (L4617) implies the exits manage hand-entered positions on their own. They do nothing while the COMBO column or the price column is off, or while PRICE is still filling.
6. Inputs (all 128)
Read from source/RubberbandV2.cpp at RB2.b39. Lnnnn is a
line in that file. The skeleton with every use line is RB2_INPUTS_SKELETON.md, made by
tools/rb2_input_skeleton.py.
Most inputs are read once per update in ReadSettings (L671-842) into a field s.<name>, and the
code then uses the field. The line cites below are the uses of that field.
The class column says what an input can change:
- entries: when or whether auto trade sends an entry order. This includes anything that moves FLOW, PRICE or COMBO, the fresh high / low test, the exhaustion filter or the trade block.
- exits: when or whether the study closes a position.
- entries and exits: both. The box exit and the breakeven exit run only while COMBO is ready
(
live,L5028; box exitL5134, breakevenL5177), so an input that can stop COMBO also stops them.
An "entries" input that moves COMBO also moves the box exit's timing on the Auto trade choices that
have a box exit, because the box exit fires on the boxes COMBO lights (L5136). Those rows are not
reclassed.
- display only: drawings, panel, meter, colors, subgraph values, or a sound. Nothing in the trade block reads it.
- logs only: changes only what goes into the log files.
- nothing: read, or not read at all, with no effect in V2.
A class can carry a qualifier in brackets, such as "entries (inert at his settings)". That means the input can change entries, but at Beej's saved values it does not.
The level inputs count as entries even though OFBL filed many under "Display". Walls, absorption and
breakthrough levels feed FLOW through its nearest-level part (L2199-2249, weighted by input 87), and
COMBO reads FLOW (L2753). An entries input can be inert at Beej's current settings; the row says so
where that applies (for example Show breakthroughs is No on his chart, and Use computed stacked /
pulled is No).
"Saved" is Beej's value in C:\SierraChart\Data\1chart.Cht as read on 2026-10-12 (file time 09:59),
kept in tools/chartbook_V2_inputs_1chart_2026-10-12_0959.json. Two values moved since
RB_IMPROVE_2026_10_12/his_settings.json was written from the 2026-10-11 20:40 read: inputs 118
and 127, marked "moved". Input 106 (Full scale) was 6 in the 08:29 read and is back at 5. Colors are
shown as RGB(red,green,blue).
| # | Group | Name | Default | What it changes | Class | Saved |
|---|---|---|---|---|---|---|
| 0 | 01 Thresholds | Rolling window (bars) | 300 | Bars of history behind the per-price percentile thresholds; older samples expire at L1016-1017. The thresholds decide which walls and absorptions exist, and those feed FLOW's nearest-level part (L2223-2249). |
entries | 300 |
| 1 | 01 Thresholds | Minimum samples before signals | 500 | No absorption or wall fires until the aggression and resting-size histories hold this many samples (L1018-1019). |
entries | 500 |
| 2 | 01 Thresholds | Aggression percentile (absorption) | 99.5 | Aggression threshold for absorption: the percentile of per-price traded volume (L1020). Absorption levels feed FLOW when Show absorption is on (L2248). |
entries | 99.5 |
| 3 | 01 Thresholds | Wall size percentile | 99.95 | Resting-size threshold that makes a price a wall (L1022). Walls feed FLOW when Show resting walls is on (L2223). |
entries | 99.95 |
| 4 | 02 Absorption | Max ticks from bar extreme | 0 | Absorption must sit within this many ticks of the bar low (bid) or high (ask) (L1090). |
entries | 0 |
| 5 | 02 Absorption | Refill ratio (traded / largest shown) | 4.0 | Absorption needs traded volume of at least this multiple of the largest size shown at the price; 0 skips the check (L1099). |
entries | 4.0 |
| 6 | 02 Absorption | Confirmation bars | 5 | Bars an absorption or breakthrough has to confirm (L1118, L1198). At 0 an absorption confirms on its event bar (L1122-1123), but a breakthrough is kept only if the event bar already closes through it; otherwise it is dropped, never pended (L1202-1205). |
entries | 5 |
| 7 | 02 Absorption | Hold tolerance (ticks) | 1 | A pending absorption fails if a bar closes more than this many ticks through it (L1034, L1093). |
entries | 1 |
| 8 | 03 Walls | Bars present to draw a resting wall | 3 | Bars a wall must stay in the book before it is confirmed and drawn (L1142, L1172). FLOW counts only confirmed walls (L2230). Also raises Signal after bars present to at least this value (L4759-4760). |
entries | 3 |
| 9 | 03 Walls | Gone when size falls below (x peak) | 0.35 | A wall is gone once its size drops below this fraction of its peak (L1167); a gone wall leaves FLOW's wall list (L1237). |
entries | 0.35 |
| 10 | 03 Walls | Eaten when traded reaches (x peak) | 0.8 | A departed wall counts as eaten, and becomes a pending breakthrough, when traded volume at its price reaches this fraction of its peak (L1189). Breakthroughs reach FLOW only with Show breakthroughs on (L2246); his is off. |
entries (inert at his settings) | 0.8 |
| 11 | 03 Walls | Breakthrough close beyond (ticks) | 4 | Ticks a bar must close through an eaten wall for the breakthrough level (L1042, L1202). Reaches FLOW only with Show breakthroughs on (L2246); his is off. |
entries (inert at his settings) | 4 |
| 12 | 03 Walls | Pulled when traded below (x peak) | 0.3 | A departed wall counts as pulled when less than this fraction of its peak traded there (L1207). Pulled levels are drawn only; FLOW ignores them (L2244-2249). |
display only | 0.3 |
| 13 | 03 Walls | Pull max distance from traded range (ticks) | 6 | Pulled walls must be within this many ticks of the bar's traded range (L1207). Drawing only, as for Pulled when traded below. |
display only | 6 |
| 14 | 03 Walls | Scan distance beyond bar range (ticks) | 20 | Ticks beyond the bar range scanned for new walls (L1242, L1280), so it decides which walls exist for FLOW. |
entries | 20 |
| 15 | 03 Walls | Pulled marker life (bars) | 30 | A pulled level ends after this many bars or when price trades at it (L1061). Pulled levels are drawing only. |
display only | 30 |
| 16 | 04 Display | Level broken when close beyond (ticks) | 2 | Absorption and breakthrough levels end when a bar closes this many ticks through them (L1063-1065). FLOW skips ended levels (L2244). Filed under 04 Display but it changes FLOW. |
entries | 2 |
| 17 | 04 Display | Keep broken levels as stopped lines | Yes | Yes keeps ended levels as stopped lines; No erases them (L1068-1071). FLOW skips ended levels either way (L2244). |
display only | Yes |
| 18 | 04 Display | Maximum stored levels per type | 400 | Cap on stored ended levels, wall signals and departed-wall lines (L889-891, L928, L1155, L1234). The trim at L891 removes only ended levels, so live levels in FLOW are never trimmed. |
display only | 400 |
| 19 | 04 Display | Hide levels farther than (ticks) | 300 | Hides labels of levels and walls farther than this from the last price (L1404). |
display only | 300 |
| 20 | 04 Display | Right extension (bars) | 1 | Bars that live lines extend past the last bar (L1400); also widens the reserved fill space (L5406). |
display only | 1 |
| 21 | 04 Display | Show labels | Yes | Turns the line labels on or off (L1508, L1521, L1621, L1661). |
display only | Yes |
| 22 | 04 Display | Label size | 0 = Small (choices: 0 Small; 1 Normal; 2 Large) | Font size of the line labels (L1453, L1531, L1556, L1625, L1668). |
display only | 0 = Small |
| 23 | 04 Display | Show absorption | Yes | Draws absorption levels (L1408, L1587) and lets them into FLOW's nearest-level part (L2248). |
entries | Yes |
| 24 | 04 Display | Show breakthroughs | No | Draws breakthrough levels (L1408, L1598) and lets them into FLOW's nearest-level part (L2246). |
entries | No |
| 25 | 04 Display | Show resting walls | Yes | Draws resting walls (L1416, L1560) and lets confirmed walls into FLOW's nearest-level part (L2223-2236). |
entries | Yes |
| 26 | 04 Display | Show pulled walls | No | Draws pulled walls (L1408, L1608). Pulled levels never enter FLOW (L2244-2249). |
display only | No |
| 27 | 04 Display | Aggression-only absorption without depth | Yes | On bars with no depth, still detects absorption from aggression alone; No skips detection on those bars (L1079). Such levels are labeled "(no depth)" (L1594). |
entries | Yes |
| 28 | 04 Display | Aggression-only percentile | 99.8 | Aggression percentile used for absorption on bars without depth (L1021). |
entries | 99.8 |
| 29 | 05 Panel | Show order flow panel | Yes | Shows the order flow panel table (L2090). With this and Show bias meter both No, BuildPanel returns at L2085-2086, before FLOW, PRICE and COMBO are computed (L2281-2871) and before m.coReady is reset (L2750). The trade block then reads a frozen COMBO (L5024-5028), for entries (L5304) and for the box and breakeven exits (L5134, L5177); after a load with both No, coReady never becomes true, so auto trade never enters or exits. |
entries and exits (inert at his settings) | Yes |
| 30 | 05 Panel | Panel position | 0 = Top Right (choices: 0 Top Right; 1 Bottom Right; 2 Top Left; 3 Bottom Left) | Chart corner of the panel and of the meter when it sits beside the panel (L2091, L3158). |
display only | 0 = Top Right |
| 31 | 05 Panel | Panel text size | 0 = Small (choices: 0 Small; 1 Normal; 2 Large) | Text size of the panel table (L2092, L3337). L3161 copies it into the meter, but DrawMeter never reads it. |
display only | 0 = Small |
| 32 | 05 Panel | Aggression lookback (bars) | 10 | Bars summed for FLOW's aggression part, raw[0] (L2115-2119, L2281-2285), and the panel row (L2120). Also ABSORB's window (L2295). |
entries | 10 |
| 33 | 05 Panel | Book range (ticks) | 10 | Ticks around the last price summed for FLOW's passive book part (L2165, L2168) and for the computed stacked / pulled (L1853). |
entries | 10 |
| 34 | 06 Colors | Bid absorption (support) | RGB(0,200,120) | Color of bid absorption lines (L1589). |
display only | RGB(0,200,120) |
| 35 | 06 Colors | Ask absorption (resistance) | RGB(235,70,90) | Color of ask absorption lines (L1589). |
display only | RGB(235,70,90) |
| 36 | 06 Colors | Ask wall lifted (buyers won, support) | RGB(0,150,255) | Color of breakthrough lines from a lifted ask wall (L1600). |
display only | RGB(0,150,255) |
| 37 | 06 Colors | Bid wall hit (sellers won, resistance) | RGB(255,140,0) | Color of breakthrough lines from a hit bid wall (L1600). |
display only | RGB(255,140,0) |
| 38 | 06 Colors | Resting bid wall | RGB(0,140,110) | Color of resting bid walls when Color wall lines by tier is No (L1518, L1569). |
display only | RGB(0,140,110) |
| 39 | 06 Colors | Resting ask wall | RGB(160,50,70) | Color of resting ask walls when Color wall lines by tier is No (L1518, L1569). |
display only | RGB(160,50,70) |
| 40 | 06 Colors | Pulled wall | RGB(170,170,170) | Color of pulled-wall lines (L1610). |
display only | RGB(170,170,170) |
| 41 | 04 Display | Absorption / breakthrough line width | 2 | Line width of absorption and breakthrough lines (L1463, L1590, L1601). |
display only | 2 |
| 42 | 04 Display | Resting walls labeled | 8 | Number of nearest live walls that get a label (L1521). |
display only | 8 |
| 43 | 04 Display | Label broken levels | No | Labels broken levels as well as live ones (L1621). |
display only | No |
| 44 | 04 Display | Mark event bars | Yes | Draws a marker on each level's confirm or event bar (L1619). |
display only | Yes |
| 45 | 04 Display | Marker size | 8 | Marker size in pixels (L1620). |
display only | 8 |
| 46 | 03 Walls | Minimum wall age for breakthrough / pull (bars) | 40 | A departed wall younger than this many bars counts as neither eaten nor pulled (L1185). It reaches FLOW only through breakthroughs, so only with Show breakthroughs on. |
entries (inert at his settings) | 40 |
| 47 | 04 Display | Keep departed walls as stopped lines | Yes | Keeps departed walls drawn as stopped lines (L1560). |
display only | Yes |
| 48 | 04 Display | Wall signals (up arrow at bid walls, down arrow at ask walls) | Yes | Wall signal arrows (L909, L1535-1545) and the Bid / Ask wall signal subgraph values (L920). Their alert input is gone (L745), so no alerts. |
display only | Yes |
| 49 | 04 Display | Draw lines, markers and signals from | 0 = Confirm bar (as seen live) (choices: 0 Confirm bar (as seen live); 1 Event bar (back-drawn)) | Confirm bar draws from where the study first knew a level; Event bar back-draws to where it began (L913, L1519, L1566, L1616, L1620). Affects only where lines, markers and signal subgraph values start. |
display only | 0 = Confirm bar (as seen live) |
| 50 | 07 Tiers | Wall line width, tier 5 | 5 | Width of tier 5 wall lines; tiers 1-4 step up to it (L955, used by DrawLevels). |
display only | 5 |
| 51 | 07 Tiers | Signal size, tier 1 | 7 | Signal arrow size at tier 1 (L961). |
display only | 7 |
| 52 | 07 Tiers | Signal size, tier 5 | 36 | Signal arrow size at tier 5 (L961). |
display only | 36 |
| 53 | 07 Tiers | Tier 2 starts at (x threshold) | 1.25 | Size ratio where wall tier 2 starts (L948). The tier sets each level's weight in FLOW's nearest-level part (L2210, L2239, L2247, L2249), the panel colors and the tape row colors (L3207). |
entries | 1.25 |
| 54 | 07 Tiers | Tier 3 starts at (x threshold) | 1.6 | Size ratio where wall tier 3 starts (L948); same uses as tier 2. |
entries | 1.6 |
| 55 | 07 Tiers | Tier 4 starts at (x threshold) | 2.4 | Size ratio where wall tier 4 starts (L948); same uses as tier 2. |
entries | 2.4 |
| 56 | 07 Tiers | Tier 5 starts at (x threshold) | 4.5 | Size ratio where wall tier 5 starts (L948); same uses as tier 2. |
entries | 4.5 |
| 57 | 07 Tiers | Label signals from tier | 4 | Signals at this tier and above get a text label (L1555). |
display only | 4 |
| 58 | 07 Tiers | Color wall lines by tier | Yes | Yes colors wall lines by tier; No uses the resting wall colors (L1518, L1569). |
display only | Yes |
| 59 | 07 Tiers | Bid wall tier 1 | RGB(57,85,63) | Tier 1 bid color for wall lines (L967); with tiers 2-5 it also colors the meter blocks (L3164). |
display only | RGB(57,85,63) |
| 60 | 07 Tiers | Bid wall tier 2 | RGB(69,125,82) | Tier 2 bid color (L967, L3164). |
display only | RGB(69,125,82) |
| 61 | 07 Tiers | Bid wall tier 3 | RGB(76,169,95) | Tier 3 bid color (L967, L3164); also the panel's green (L2095). |
display only | RGB(76,169,95) |
| 62 | 07 Tiers | Bid wall tier 4 | RGB(90,214,100) | Tier 4 bid color (L967, L3164); also HELD / BROKE line colors (L1649, L1654). |
display only | RGB(90,214,100) |
| 63 | 07 Tiers | Bid wall tier 5 | RGB(137,255,111) | Tier 5 bid color (L967, L3164). |
display only | RGB(137,255,111) |
| 64 | 07 Tiers | Ask wall tier 1 | RGB(100,58,55) | Tier 1 ask color (L967, L3165). |
display only | RGB(100,58,55) |
| 65 | 07 Tiers | Ask wall tier 2 | RGB(152,71,66) | Tier 2 ask color (L967, L3165). |
display only | RGB(152,71,66) |
| 66 | 07 Tiers | Ask wall tier 3 | RGB(210,77,69) | Tier 3 ask color (L967, L3165); also the panel's red (L2095). |
display only | RGB(210,77,69) |
| 67 | 07 Tiers | Ask wall tier 4 | RGB(254,87,59) | Tier 4 ask color (L967, L3165); also HELD / BROKE line colors (L1649, L1654) and the red of the LIVE footer and of a failing filter reading (L4143, L4152; dimmed only while the meter is stale, L3710). |
display only | RGB(254,87,59) |
| 68 | 07 Tiers | Ask wall tier 5 | RGB(255,135,20) | Tier 5 ask color (L967, L3165). |
display only | RGB(255,135,20) |
| 69 | 07 Tiers | Signal shape | 0 = Arrow (choices: 0 Arrow; 1 Triangle) | Arrow or triangle for wall signals (L1550). |
display only | 0 = Arrow |
| 70 | 05 Panel | Balance for tier 1 | 0.05 | Balance cut-off for tier 1 (L1687, L1717). BalanceScore (L1701) turns each FLOW part into a -5..+5 score from these cut-offs (L2281-2285), so they set FLOW, not only the panel colors. |
entries | 0.05 |
| 71 | 05 Panel | Balance for tier 2 | 0.12 | Balance cut-off for tier 2; same uses as tier 1. | entries | 0.12 |
| 72 | 05 Panel | Balance for tier 3 | 0.20 | Balance cut-off for tier 3; same uses as tier 1. | entries | 0.2 |
| 73 | 05 Panel | Balance for tier 4 | 0.33 | Balance cut-off for tier 4; same uses as tier 1. | entries | 0.33 |
| 74 | 05 Panel | Balance for tier 5 | 0.50 | Balance cut-off for tier 5; same uses as tier 1. | entries | 0.5 |
| 75 | 99 Trading | Exhaustion entry filter | 0 = Off (choices: 0 Off; 1 Effort against result; 2 Slowing delta; 3 Absorption at the high; 4 Pace turning down) | Picks the exhaustion entry filter (L2477-2488). In exhaustion COMBO mode a failing filter holds the entry until it passes while the box is lit (L5286, L5327). The footer and trade log show the readings (L4130-4141, L5290). |
entries | 0 = Off |
| 76 | 05 Panel | Show bias meter | Yes | Shows the meter (L3155) and gates the reserved fill space (L5402). With this and Show order flow panel both No, BuildPanel returns at L2085-2086 and COMBO freezes or, after a load, never becomes ready, so auto trade stops entering and exiting (see input 29). |
entries and exits (inert at his settings) | Yes |
| 77 | 05 Panel | Meter width (pixels) | 150 | Meter width in pixels; all meter text scales from it (L3156); also the fill space (L5404). |
display only | 150 |
| 78 | 05 Panel | Meter height (pixels) | 660 | Meter height in pixels (L3157). |
display only | 660 |
| 79 | 08 Meter | Dead zone (score) | 6.0 | Dead zone for the displayed meter tier (L3112-3133). The tier is shown (L3803) and logged (L5466); COMBO reads the score, not the tier (L2753). |
display only | 6.0 |
| 80 | 08 Meter | Smoothing, aggression (seconds) | 0.0 | Smoothing time of FLOW's aggression part (L2588). COMBO uses the smoothed FLOW (L2753). |
entries | 0.0 |
| 81 | 08 Meter | Smoothing, passive book (seconds) | 8.0 | Smoothing time of FLOW's passive book part (L2588). |
entries | 8.0 |
| 82 | 08 Meter | Smoothing, stacked / pulled (seconds) | 4.0 | Smoothing time of FLOW's stacked / pulled part (L2588). Its weight is forced to 0 while Use computed stacked / pulled is No (L832-833), his setting. |
entries (inert at his settings) | 4.0 |
| 83 | 08 Meter | Level taper (ticks) | 10.0 | Distance at which a level's weight in FLOW fades to 0 (L2210); 0 zeroes the level part. |
entries | 10.0 |
| 84 | 08 Meter | Weight, aggression | 1.0 | Weight of the aggression part in FLOW (L2589). |
entries | 1.0 |
| 85 | 08 Meter | Weight, passive book | 1.0 | Weight of the passive book part in FLOW (L2589). |
entries | 1.0 |
| 86 | 08 Meter | Weight, stacked / pulled | 1.0 | Weight of the stacked / pulled part in FLOW (L2589); forced to 0 while Use computed stacked / pulled is No (L832-833), his setting. |
entries (inert at his settings) | 1.0 |
| 87 | 08 Meter | Weight, nearest level | 1.0 | Weight of the nearest-level part in FLOW (L2589). |
entries | 1.0 |
| 88 | 01 Thresholds | Bars to process (0 = all) | 30000 | Bars processed after a full recalculation (L4818), so it sets how much history builds the thresholds and levels. |
entries | 30000 |
| 89 | 99 Trading | Exhaustion entry filter setting | 0.0 | Threshold for the chosen exhaustion filter; 0 uses the filter's default 1.5 / 0.7 / 1.0 / 0.7 (L2474-2475). |
entries (inert at his settings) | 0.0 |
| 90 | 08 Meter | Log meter to CSV | Yes | Writes RB2_meter_<symbol>.csv, at most one row per update, for the newest closed bar only (gate L5431-5432), live or replay; a full recalculation resets the last-logged bar (L4769), so a bar can be written twice. So it is also a logs input. The Ranked scale seeds from that file (after V1's RB1 log) on later loads (L2705-2742) and ranks against the seed until live readings fill the window (L2826-2846). |
entries (Ranked scale only; inert at his Fixed) | Yes |
| 91 | 05 Panel | Meter position | 0 = Right edge, centered (choices: 0 Right edge, centered; 1 Beside panel) | Meter at the right edge or beside the panel (L3159); right edge also allows the reserved fill space (L5402). |
display only | 0 = Right edge, centered |
| 92 | 03 Walls | Signal after bars present | 3 | Bars a wall must stay before its signal arrow and subgraph value (L1177, L1264); raised to at least Bars present to draw a resting wall (L4759-4760). |
display only | 3 |
| 93 | 05 Panel | Meter distance from right edge (pixels) | 285 | Pixels between the meter and the price scale (L3160); also the fill space (L5404). |
display only | 285 |
| 94 | 05 Panel | Reserve fill space for the meter | No | Yes locks and widens the chart fill space for the meter (L5402-5406). |
display only | No |
| 95 | 05 Panel | Stacked / pulled window (seconds) | 3.0 | Window of the study's own stacked / pulled computation (L1753); the panel row label (L2156). Read 0 becomes 3 (L752-753). It reaches FLOW only when Use computed stacked / pulled is Yes; his is No. |
entries (inert at his settings) | 3.0 |
| 96 | 05 Panel | Use computed stacked / pulled | No | No: the panel shows Sierra's own stack / pull sums (L2179-2180) and FLOW's stacked / pulled weight is forced to 0 (L832-833). Yes: the study computes them and FLOW scores them. Also sets Sierra's pulling / stacking data use (L4753). |
entries | No |
| 97 | 08 Meter | Average marker, seconds (0 = off) | 60 | Seconds averaged for the meter's average marker (L2686-2692); 0 hides it (L4192). |
display only | 60 |
| 98 | 05 Panel | Speed of tape window (seconds) | 10 | Window of the speed of tape row (L2133-2142). The pace ratio feeds the speed amplifier, which scales FLOW (L2664-2667). Read 0 becomes 10 (L827-828). |
entries | 10 |
| 99 | 05 Panel | Speed of tape baseline (seconds) | 300 | Baseline of the speed of tape pace (L1939, L2141-2142). Forced to max(300, 6 x window) when not longer than the window (L829-830). |
entries | 300 |
| 100 | 08 Meter | Speed of tape amplifies the meter | Yes | Yes multiplies FLOW by the speed amplifier when the tape runs faster than its baseline (L2664-2667). |
entries | Yes |
| 101 | 08 Meter | Speed amplifier strength | 1.5 | Amplifier strength: 1 + strength x (pace - 1), capped at 2 (L2665). |
entries | 1.5 |
| 102 | 05 Panel | Speed of tape colors from (x normal) | 1.1 | Pace at which the speed of tape row gets colored (L3203, L3207). Read 0 becomes 1.1 (L759-760). |
display only | 1.1 |
| 103 | 99 Switches | Price meter column | Yes | Turns PRICE on. COMBO is off without it (L2699), so coReady stays false and no auto entry, box exit or breakeven exit runs (L5028, L5134, L5177); only the BE CLEANUP cancel can (L5165-5168). Also the ABSORB box and absorption lines (L1632, L2888). |
entries and exits | Yes |
| 104 | 00 Rubberband | Price window (seconds) | 5 | Seconds of the PRICE window, clamped 1-300 (L763, L2304). PRICE feeds COMBO. |
entries | 5 |
| 105 | 00 Rubberband | Typical move window (minutes) | 30 | Minutes behind PRICE's slow typical move, clamped 5-390 (L764, L2536-2542). |
entries | 30 |
| 106 | 00 Rubberband | Full scale (typical moves) | 5.0 | PRICE score = 20 x moves / this, clamped to +-20 (L2581); a read 0 or less becomes 5 (L766-767). Sets how fast PRICE reaches its cap inside COMBO. |
entries | 5.0 (it was 6.0 from about 03:15 to 14:43 ET on 2026-10-12) |
| 107 | 99 Switches | ABSORB state (pressure without price) | Yes | Turns on the ABSORB state box (L2888, L3097, L4040) and, with the lines switch, the absorption price lines (L1632). The state is drawn and logged (L5468); nothing in the trade block reads it. |
display only | Yes |
| 108 | 99 Switches | HELD / BROKE | Yes | Yes resolves ABSORB to HELD or BROKE (L2991, L2998); No clears it when the condition ends (L3009). Display and meter log only. |
display only | Yes |
| 109 | 99 Switches | Absorption price lines | Yes | Dashed lines at absorption prices (L1632). |
display only | Yes |
| 110 | 00 Rubberband | ABSORB aggression (tier) | 3.0 | Aggression tier ABSORB needs, at least 0.5 (L778, L2913). |
display only | 3.0 |
| 111 | 00 Rubberband | HELD when aggression falls to (tier) | 1.0 | ABSORB turns HELD once aggression is at or below this tier (L781, L2989). |
display only | 1.0 |
| 112 | 00 Rubberband | Level holds within (ticks) | 2 | Ticks past the absorption price that still count as HELD (L2990). Also the most ticks the high may gain in the last second for the filter's absorption option to pass (L2486), so it affects entries when that filter is chosen. |
entries (inert at his settings) | 2 |
| 113 | 99 Trading | Entry sounds (bing long, bong short) | Yes | Plays bing on a long fill and bong on a short fill, on real-time updates, live or replay, never during a full recalculation (L4992). A sound, so filed here as display. |
display only | Yes |
| 114 | 99 Switches | (spare, does nothing) | 0 | Not read anywhere. It was BROKE sound before b35. | nothing | 0 |
| 115 | 99 Switches | COMBO column (price + flow) | 7 = On, exhaustion (fade price + flow at a fresh 1-min high / low) (choices: 0 On, both must agree; 1 On, average of the two; 2 Off; 3 On, both must agree, flow meter big; 4 On, average of the two, flow meter big; 5 On, flow against price; 6 On, flow against price, flow meter big; 7 On, exhaustion (fade price + flow at a fresh 1-min high / low); 8 On, exhaustion, flow meter big) | COMBO mode (L792): agree, average, flow against price, exhaustion, or off; the 'flow meter big' choices only swap column sizes (L793, L3752). Choice 2, Off, sets the internal mode to 0, which leaves COMBO unready, so auto trade never enters and the box and breakeven exits never run (L792, L2751, L5028). Picks the COMBO history file (L4853). Exhaustion forces Enter on pullback to 0 (L821-822). |
entries and exits | 7 = On, exhaustion (fade price + flow at a fresh 1-min high / low) |
| 116 | 00 Rubberband | COMBO window (minutes) | 60 | Minutes of COMBO history for the Ranked and Relative scales, clamped 5-60 (L798, L2807). No effect on the Fixed scale, his setting. It never delays readiness, because its 5-minute minimum is longer than the 1-minute ready threshold (L2836, L2860). |
entries (inert at his settings) | 60 |
| 117 | 00 Rubberband | COMBO scale | 1 = Fixed, like PRICE and FLOW (choices: 0 Ranked against its recent readings; 1 Fixed, like PRICE and FLOW; 2 Relative to its own recent average) | Ranked, Fixed or Relative COMBO scale (L795-796, L2705, L2812, L2849). Sets how many boxes a reading lights. Ranked and Relative keep COMBO unready, so no auto entry or exit, until a minute of samples (or the Ranked seed) is in (L2836, L2860). |
entries and exits | 1 = Fixed, like PRICE and FLOW |
| 118 | 99 Trading | Auto trade COMBO | 1 = Entries and exits, sim (choices: 0 Off; 1 Entries and exits, sim; 2 Entries only, sim; 3 Exits only, sim; 4 Entries and exits, live; 5 Entries only, live; 6 Exits only, live; 7 Entries, breakeven exit only, sim) | Off, sim or live, entries, exits or both, or b39's sim entries with the breakeven exit only (L803-809). Routes orders (L5015) and gates entries (L5304, L5376-5378) and exits (L5134, L5160). Choice 7 sets the box exit to 0 (L814-815). |
entries and exits | 7 = Entries, breakeven exit only, sim (moved; his_settings.json has 1 = Entries and exits, sim) |
| 119 | 99 Trading | Direction | 1 = Continuation (trade with COMBO) (choices: 0 Reversion (fade COMBO); 1 Continuation (trade with COMBO)) | Continuation trades with COMBO's color, Reversion against it (L5040, L5338). In Continuation the box exit arms only after COMBO has been back to 0 (L5141). |
entries and exits | 1 = Continuation (trade with COMBO) |
| 120 | 99 Trading | First box count | 8 | Box where entries start, clamped 1-10 (L812, L5299-5308, L5332). Sets Sierra's maximum position (L5014). The COMBO Line study reads it to draw the entry line (L5536). |
entries | 8 |
| 121 | 99 Trading | Enter on pullback (boxes) | 1 | Boxes COMBO must pull back before each entry; 0 enters on touch (L5301-5303, L5334). Forced to 0 in exhaustion mode (L821-822), so it does nothing on his chart. |
entries (inert at his settings) | 1 |
| 122 | 99 Trading | Trade every Nth box | 1 | Boxes between entries, clamped 1-9 (L800, L5299, L5307-5308, L5332); also the maximum position (L5014). |
entries | 1 |
| 123 | 99 Trading | Wait between entries | 1 = Seconds (choices: 0 Off; 1 Seconds; 2 Bars) | Off, Seconds or Bars wait after each entry before the next (L5318-5320). |
entries | 1 = Seconds |
| 124 | 99 Trading | Wait between entries (seconds or bars) | 10 | Length of that wait in seconds or bars, at least 1 (L819, L5319-5320). |
entries | 10 |
| 125 | 99 Trading | Exit at boxes on the other side | 4 | Closes the whole position when COMBO lights this many boxes on the other side (L5134-5136); 0 = no box exit. Forced to 0 under choice 7 of Auto trade COMBO (L814-815), his setting now. |
exits (inert at his settings) | 4 |
| 126 | 99 Trading | Breakeven exit after | 2 = Bars (choices: 0 Off; 1 Seconds; 2 Bars) | Off, Seconds or Bars for the breakeven exit clock (L5160, L5195). |
exits | 2 = Bars |
| 127 | 99 Trading | Breakeven exit after (seconds or bars) | 5 | Seconds or bars before the breakeven exit can arm, at least 1 (L817, L5195-5196). |
exits | 20 (moved; his_settings.json has 10) |
Reused input slots
Sierra keys saved inputs by index, and a study has at most 128. When Rubberband needed a new input,
an old one was dropped. The dropped input's field is now a constant in ReadSettings. The history
below comes from diffing the input enum across every committed RubberbandV1.cpp and
RubberbandV2.cpp. The first committed source is V1 b5 (4813db4), so changes in b1 to b4 are not
traced.
Two kinds of reuse happened.
Same index, new meaning. A saved value carries over into the new input:
| Index now | Build | Old input | New input | Old field now |
|---|---|---|---|---|
| 75 | b33 | 05 Panel | Show diagnostic rows | 99 Trading | Exhaustion entry filter | s.panelDiag = false (L733): the panel's diagnostic rows never show (L2093, L3272) |
| 89 | b33 | 04 Display | Alert on wall signals from tier (0 = off) | 99 Trading | Exhaustion entry filter setting | s.alertTier = 0 (L745): no wall signal alerts (L933) |
| 113 | b35 | 00 Rubberband | HELD sound (alert number) | 99 Trading | Entry sounds | s.heldAlert = 0 (L785): HELD makes no sound |
| 114 | b35 | 00 Rubberband | BROKE sound (alert number) | 99 Switches | (spare, does nothing) | s.brokeAlert = 0 (L786): BROKE makes no sound |
| 104 | b16 | 00 Rubberband | Price meter bars (0 = aggression lookback) | 00 Rubberband | Price window (seconds) | same input, unit changed from bars to seconds |
| 105 | b16 | 00 Rubberband | Typical move window (bars) | 00 Rubberband | Typical move window (minutes) | same input, unit changed from bars to minutes |
The b33 change to slots 75 and 89 first landed in RubberbandV1.cpp (9dfb59f, V1 build 33). It was
reverted there in b79f427, when the filter moved to its own study and V1 was frozen at b32. So V1 at
b32 still has Show diagnostic rows and the wall signal alert tier in those slots, and V2 has the
filter.
Removed from the middle of the list. In V1 the enum was compacted, so every later input moved down one index and saved values shifted to the wrong inputs in that build. V2 copied V1 b32's order, so this affects only V1 history:
| Build | Removed input | Replaced by (per the L768-799 comments) |
Field now |
|---|---|---|---|
| b6 | 00 Rubberband | Weight of price in the bias meter | auto trade | s.wPrice = 0.0 (L768): PRICE never enters FLOW |
| b6 | 99 Switches | HELD / BROKE sounds | auto trade | s.absSound = true (L774), but both alert numbers are 0, so no sound |
| b9 | 00 Rubberband | Price meter width (pixels) | auto trade exit | s.pxWidth = 80 (L769) |
| b11 | 99 Switches | ABSORB timer | breakeven exit | s.absTimer = true (L771): the timer always shows |
| b11 | 00 Rubberband | Show HELD / BROKE for (seconds) | breakeven exit | s.showSec = 30 (L783) |
| b11 | 00 Rubberband | COMBO full scale (x its average) | trade every Nth box | s.coFull = 3.0 (L799) |
| b20 | 00 Rubberband | BROKE ticks past the price | wait between entries | s.brokeTicks: L777 sets absHoldTicks + 1, then L782 sets 0 (see the defect below) |
| b20 | 00 Rubberband | ABSORB gives up after (seconds) | wait between entries | s.expireSec = 120 (L784) |
| b23 | 99 Switches | ABSORB only when aggression leads the book | Level holds within (ticks) | s.absLead = true (L775) |
| b25 | 00 Rubberband | ABSORB bars in a row | Enter on pullback | s.absBars = 2 (L780) |
| b26 | 00 Rubberband | ABSORB max range (typical moves) | Direction | s.absRange = 1.0 (L779) |
In b11 "COMBO average window (seconds)" also became "COMBO window (minutes)".
Defect found: BROKE fires at the absorption price, not past the hold zone
L777 sets s.brokeTicks = s.absHoldTicks + 1. Five lines later L782 sets s.brokeTicks = 0, with the
comment "set from absHoldTicks below (b23)", and nothing sets it again. So brokeThrough()
(L2972-2976) turns ABSORB into BROKE once the high (low) reaches the absorption price itself, not 3
ticks past it as inputs 108 and 112 say. V1 has the same two lines (RubberbandV1.cpp L752, L757) since
V1 b23 (78cb615). ABSORB, HELD and BROKE are display and meter-log only, so no entry or exit changes.
A fix belongs in V3.
In-study text that is stale against the code
- Main
sc.StudyDescription(L4661): still the OFBL V1 text, with nothing on COMBO, auto trade, sounds or the filter (already noted in the handoff). - 2 Aggression percentile: says "absorption is off by default on 3-second charts". Show absorption (23) defaults to Yes, and its own text says so.
- 29 Show order flow panel: "Level counts are in the diagnostic rows". The diagnostic rows input
became the exhaustion filter in b33, and the rows never show (
L733,L3272). - 92 Signal after bars present: "A wall signal (arrow, alert) fires". The alert input became the
filter setting in b33 (
L745,L933), so there is no alert. The subgraph value is still written (L920). - 108 HELD / BROKE and 112 Level holds within: BROKE "needs a trade one tick beyond it (3 ticks past at the default 2)". The code breaks at 0 ticks (defect above).
- 118 Auto trade COMBO: opens with "Market orders that fade COMBO ... in green it sells ... in red it
buys". That is Reversion. The default Direction is Continuation, which buys green (
L5338). It also says the study closes a position "only by its exit rule (Exit at boxes on the other side)", while the breakeven exit (126, 127) closes positions too, as the same text says further on. - 121 Enter on pullback: says 1 (the default) makes each entry wait for a pullback. In exhaustion
mode, the default COMBO mode, the code forces it to 0 (
L821-822). Only input 115's text says so. - 125 Exit at boxes on the other side: uses Reversion framing ("a short from green COMBO closes at 4
red boxes"). Under Continuation, the default, a short is entered on red (
L5338). It also leaves out that in Continuation the box exit arms only after COMBO has been back to 0 since the last entry (L5141), and that choice 7 of Auto trade COMBO forces it to 0 (L814-815). Inputs 118 and 119 say those two things. - 126 and 127 Breakeven exit after: 127 says "how many seconds, or bars, the position must be against
you". The clock starts when the position opens, not when it goes against you (
L5189-5192). Once the time has passed, the exit arms at the first moment price is against the position (L5195-5198). 126 describes this correctly; 127 does not.
Incomplete rather than wrong. These texts describe only the panel or the drawing, but the input also moves FLOW and so COMBO and entries:
- 16 Level broken when close beyond, filed under "04 Display".
- 23, 24 and 25, the show switches for absorption, breakthroughs and resting walls.
- 32 Aggression lookback.
- 33 Book range.
- 53 to 56, the tier cut-offs.
- 70 to 74, Balance for tier 1 to 5.
- 29 Show order flow panel and 76 Show bias meter: neither says that turning both off freezes COMBO,
or after a load keeps it unready, so auto trade stops entering (
L2085-2086).
7. What has and has not been measured
This section describes the research record. It makes no new measurement. Every result below
comes from engine/output/RB_IMPROVE_2026_10_12/ and the "Research team results (2026-10-12
HST)" section of engine/output/HANDOFF_2026_10_09_RUBBERBAND.md, after two independent audits.
Untested rules
Every auto trade rule in section 5 is untested as a trading rule. That covers the first box
count, the box step, the wait between entries, the box exit, the breakeven exit and its
backstop, the exhaustion entry filter and both Directions. Three in-study descriptions say so
(the exhaustion entry filter at L4488, the COMBO column at L4614 and Auto trade COMBO at
L4617). The descriptions of the other trading inputs do not repeat it, but it applies to them
too. Beej asked for these as switches to try by hand, not as tested rules.
What the entries alone have shown
- On 2020-21
.sciddata (480 days, rebuilt twice by independent code from trades only), the exhaustion flash shows no direction against uniform random times. A small edge of the flash side over the opposite side at live update speed (R8 x1.10, day t +8) is COST-ABSENT and about a tenth of the cost. - A full-book Fixed relative of the rule (an approximation built with the rebuilt order book, not his exact chart) lost 0.92 pt gross per trade at a 120 s exit on 208 depth days, and 1.78 pt net.
- The rb_wicks hit-rate lift of x1.1 is real as a hit rate. With taker fills it shrinks to x1.08 (t +2.9), which is about 2 to 4 extra hits per 100 entries, far below the 0.92 pt cost.
- His Fixed-scale chart cannot be rebuilt exactly from recorded data. The order book part of FLOW decides which flashes reach box 8 (only 15 of 109 of his Fixed entries reach it without the book), and the best parity reached with the rebuilt book is 0.37 / 0.41.
What his own trades show
- On 149 exhaustion entries that he exited by hand, he made +3.06 pt gross and +2.14 pt net per trade, with 61% winners. A 25 s exit on the same fills made +1.30 pt, and a 2.5 / 2.5 bracket made +0.18 pt.
- His 400 bracket trades (+2.5 / -2.5) lost 0.46 pt gross each.
- All 559 exhaustion entries under any mechanical exit made between -0.36 and +0.14 pt gross.
- None of the 149 was a first look. Each date had at least 6 earlier replay passes and each entry moment at least 2. Skill and memory of the day cannot be told apart in these trades.
The open test
The pre-registered blind exit test (RB_IMPROVE_2026_10_12/prereg/PREREG_BLIND_EXIT_TEST.md,
commit a4311d6, with Addendum 1) separates exit skill from knowing the days. It uses 20 random
unseen 2026 dates, first pass only. H1 is net P&L above 0, and H2 is his exit minus a 25 s
exit above 0, at about 150 trades. The scorer is
engine/analysis/rb_improve/blind_exit_test.py. Those 20 dates must never be used for
research.
What this reference does not settle
- The chart update interval when trading live is a Sierra global setting that is not in the chartbook. It sets how trades group into 250 ms slots and when an entry fires.
- Whether Sierra's reported position changes during a partial fill decides whether the breakeven limit can be resized past the position (section 5).
- Whether
sc.FlattenAndCancelAllOrders()obeys Auto Trading Enabled is not shown by the code or by the documentation read here (section 5).